Basement Finishing Checklist That Actually Works
A complete basement finishing checklist covering permits, moisture, framing, insulation, egress and inspections. Built for NYC homeowners and beyond.
By Excellent Home Improvement & Remodeling
You've cleared the old paneling, exposed the concrete, and started sketching rooms on the floor. Then someone asks whether the new bedroom has legal egress, whether the basement needs a permit, and what happens to the damp wall behind the planned drywall. That's the point where a simple renovation can become a stalled job.
A reliable basement finishing checklist isn't a shopping list for flooring, paint, and trim. It's a sequence of decisions that protects life safety, controls moisture, coordinates trades, and gets the work approved before anything is concealed. In New York City, that also means accounting for Department of Buildings requirements, building or co-op approvals, older foundations, and the conditions around neighboring properties.
Table of Contents
- Why Most Basement Projects Stall Before Drywall
- The Project Sequence That Gates Every Step
- Permits and Approvals You Cannot Skip
- Moisture, Mold and Radon Before a Single Stud
- Choosing the Right Moisture Remedy
- Framing Insulation and Air Sealing as One System
- Egress Windows Wells and Sleeping Rooms
- Electrical Plumbing and HVAC Rough-Ins
- Inspections That Protect the Project
- Finishing Touches That Hold Up Below Grade
- Quick Reference Checklist You Can Print
Why Most Basement Projects Stall Before Drywall
A Bronx homeowner once removed the old paneling during the first weekend of work, ordered drywall on Monday, and began planning the finish schedule. Only afterward did the questions surface: Did the proposed sleeping room have a compliant escape opening? Did the window well drain? Was a permit required for the new framing and electrical work? What was causing the staining at the foundation wall?
Those questions weren't cosmetic. Each one could stop drywall installation.
Moisture concealed behind insulation can damage finishes and create conditions for mold. A missing or undersized emergency escape opening can force a layout change, window replacement, or excavation after framing is already complete. Unapproved work can also create trouble during inspections, insurance reviews, resale, or future alterations.
Practical rule: A basement task belongs on the checklist only when it has a clear phase, responsible person, and verification point.
A useful checklist separates gates from selections:
- Life-safety gates: Confirm emergency escape and rescue openings, stair access, alarms, and unobstructed routes before room labels are finalized.
- Health gates: Test for radon, document moisture, investigate contaminants, and correct water sources before enclosure.
- Regulatory gates: Confirm filings, approvals, and inspection requirements before demolition or construction.
- Construction gates: Pass rough inspections before walls and ceilings are covered.
- Finish selections: Choose flooring, paint, trim, lighting, and storage only after the enclosure and systems are sound.
A New York City basement may also sit inside a co-op, condominium, landmarked property, or older masonry building. Those conditions can add approvals and access restrictions that a generic checklist misses. The sequence below is designed to keep those issues visible while there's still time to act.
The Project Sequence That Gates Every Step
Treat the job as a chain, not a pile of tasks. A selection such as paint can happen while permits are being reviewed, but framing cannot proceed until the layout, moisture strategy, and applicable approvals are settled.
A workable sequence looks like this:
- Pre-design: Define the intended use, inspect the structure, document moisture, test radon, identify contaminants, and locate utilities.
- Design and engineering: Draw the layout around egress, columns, beams, ceiling height, plumbing routes, mechanical equipment, and access panels.
- Permit and building approval: Confirm filings with the applicable authority, then obtain co-op, condominium, landmark, or adjacent-property approvals where required.
- Protection and demolition: Empty the space, protect the route through the home, isolate dust, and remove materials safely.
- Remediation: Correct drainage, leaks, condensation, foundation defects, contaminants, or radon conditions.
- Framing and rough mechanicals: Frame partitions, coordinate electrical, plumbing, HVAC, ventilation, fire blocking, and service access.
- Air sealing and insulation: Seal penetrations and rim joists, then install the approved insulation assembly.
- Inspections: Complete framing, rough-trade, fire-blocking, and insulation inspections before cover.
- Drywall and finishes: Close approved assemblies, install flooring and trim, paint, set fixtures, and complete final testing.
- Final approvals: Collect inspection records, close punch-list items, and retain warranty and maintenance information.
The dependency is simple. You can compare flooring while a filing is under review, but you can't close a wall before the applicable rough inspections pass. If a drain, duct, or electrical box moves after drywall, the crew may have to open finished work and repeat part of the inspection process.
Permits and Approvals You Cannot Skip
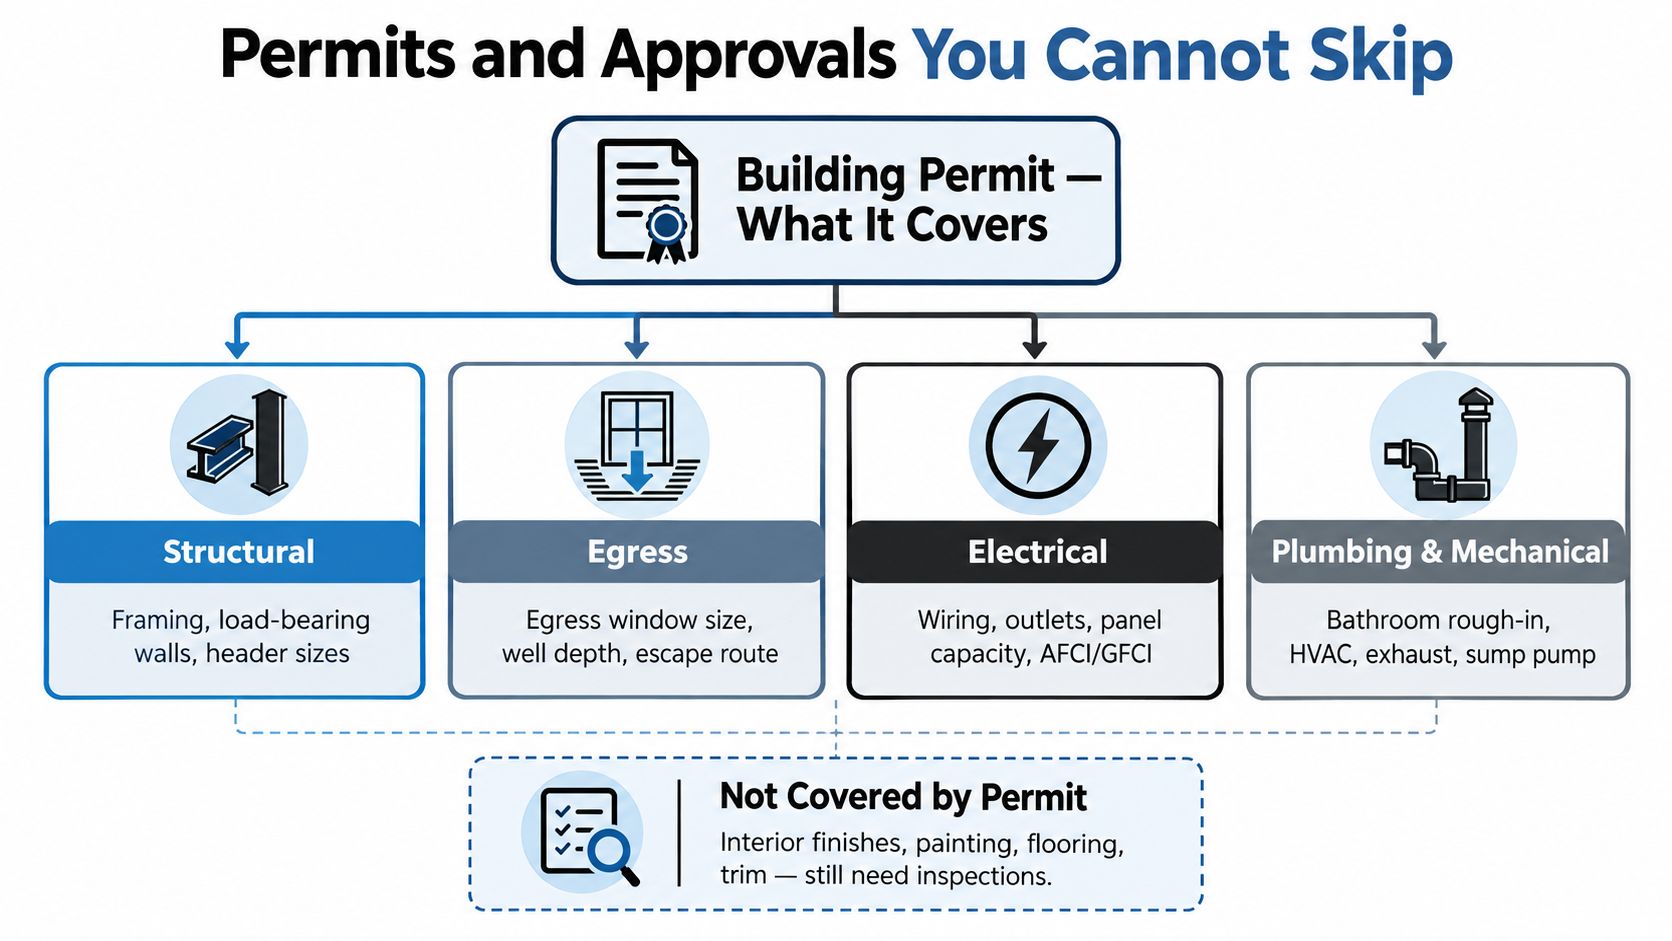
A building permit generally addresses work that affects structure, life safety, or building systems. In a basement, that often includes new framing, structural changes, emergency escape openings and wells, electrical alterations, new plumbing, bathroom additions, and mechanical or ventilation work. Paint, flooring, and ordinary decorative trim usually don't carry the same filing implications, but they also don't erase the permit obligations created by the work behind them.
New York City should be treated as its own regulatory environment. The applicable Department of Buildings filing, inspection, and sign-off requirements depend on the scope and property conditions. A generic International Residential Code checklist can help identify questions, but it can't replace review of current local rules.
Match the filing to the work
Before signing a construction contract, write down every scope that changes the basement:
- Framing: New partitions, headers, fire blocking, soffits, or structural reinforcement.
- Egress: New or enlarged windows, window wells, ladders, steps, drainage, or excavation.
- Electrical: New circuits, panel changes, lighting, receptacles, and required protective devices.
- Plumbing: Bathroom, laundry, wet bar, floor drain, sump, or relocated water and waste lines.
- Mechanical: New duct runs, returns, exhaust fans, combustion-air provisions, or equipment changes.
The person preparing the filing should work from the actual layout, not a rough verbal description. Co-op and condominium owners should also review alteration agreements before demolition. Those agreements can control work hours, insurance, elevator use, dust protection, shutoffs, and inspections independently of municipal requirements.
For a practical review of contractor qualifications and responsibilities, use this guide to hiring a licensed contractor in NYC. Starting work before approvals can expose the owner to stop-work action, correction costs, and documentation problems later. The safe point to proceed is when the scope, filing path, property approvals, and inspection responsibilities are written down.
Moisture, Mold and Radon Before a Single Stud
A basement can look dry during a sunny inspection and still take on water during the next storm. Before design decisions are made, establish how the space responds to rainfall, groundwater, plumbing use, temperature, and ventilation.
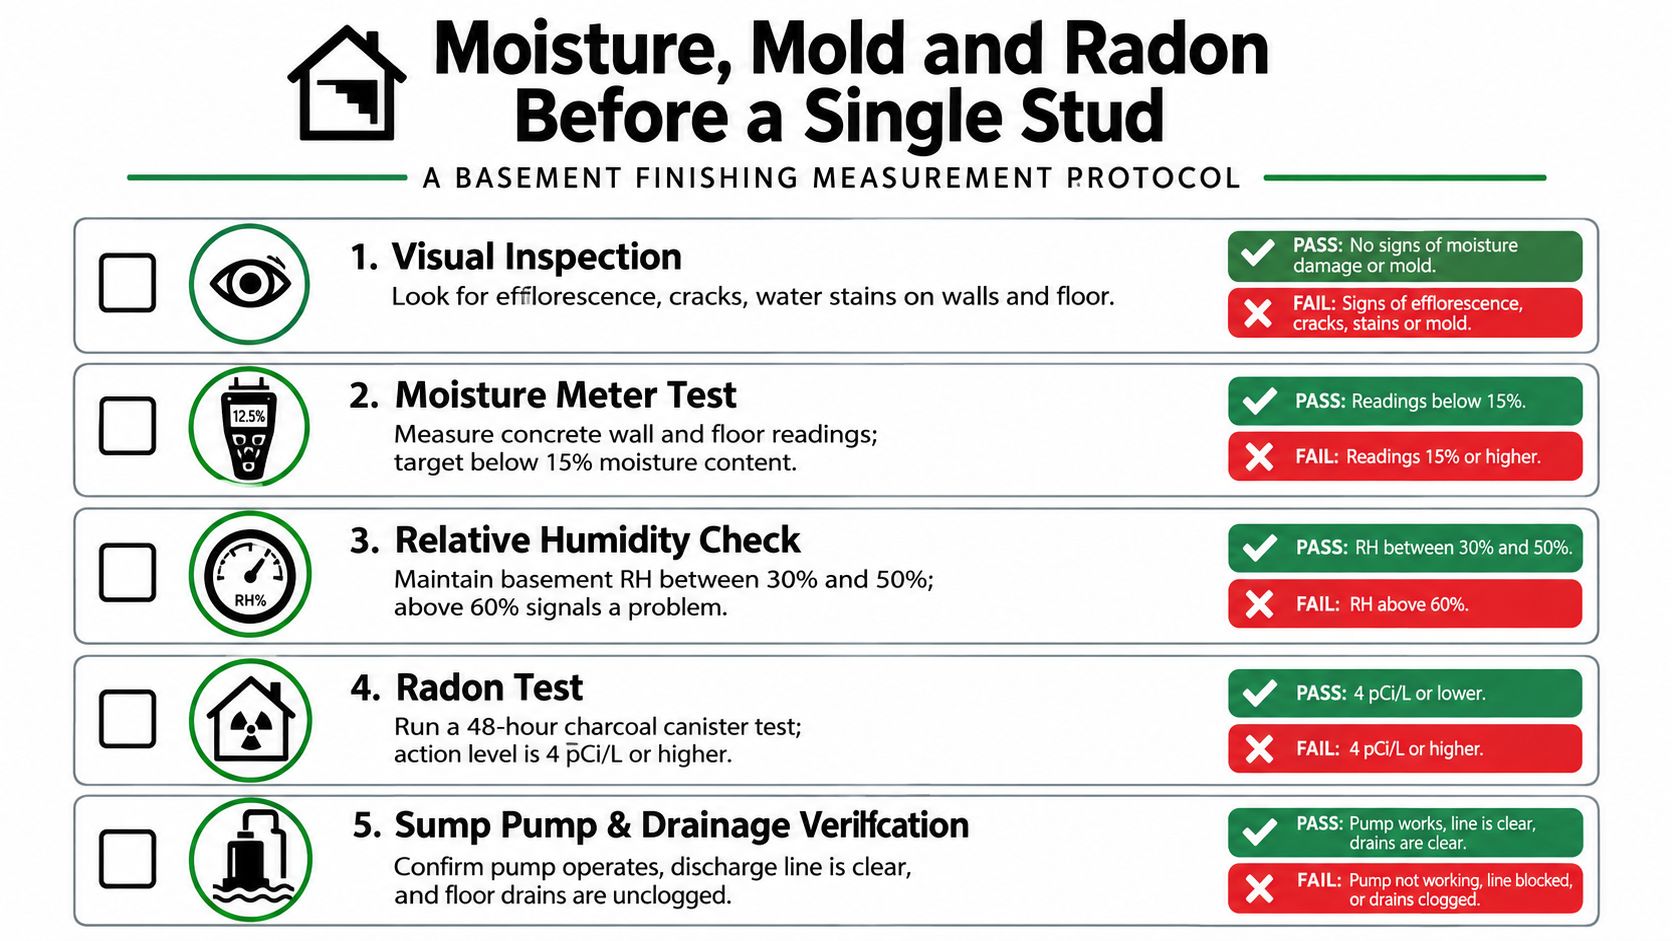
Start a pre-construction moisture log. Photograph the floor and foundation after significant rain, record staining and efflorescence, note sump-pump activity, inspect window wells and downspout discharge, and use a hygrometer to track temperature and relative humidity for several days. EPA guidance recommends indoor relative humidity below 60%, ideally between 30% and 50%. (EPA remodeling guidance)
Diagnose conditions before choosing finishes
Efflorescence indicates that water has moved through masonry. A musty odor can point to persistent dampness, concealed mold, or inadequate air exchange. Condensation on a cool wall calls for a different response than bulk water entering through a crack, so identify the source before selecting insulation or wall finishes.
Check the following during the investigation:
- Liquid water: Inspect cracks, wall-floor joints, plumbing, window wells, and sump discharge.
- Slab vapor: Use a plastic-sheet observation as an indication of slab moisture, not a complete diagnosis.
- Indoor humidity: Log relative humidity and temperature instead of relying on how the room feels.
- Drying behavior: Record how long surfaces stay damp after rainfall or a plumbing event.
- Contaminants: Before demolition or enclosure, investigate asbestos-containing materials, lead paint, pests, and other hazards.
Radon also belongs in the pre-design decision. The EPA states that nearly 1 in 15 homes in the United States has radon levels that should be reduced, so test the lowest occupied level while the floor, walls, and ceiling remain accessible. (EPA radon information)
New York City area projects need a flood-risk review as well. Federal Reserve Bank of New York analysis identifies the East Bronx among areas with concentrated basement flood risk, and approximately 10% of low-income and immigrant New Yorkers live in census tracts with high concentrations of basement apartments at high risk of flooding. (Federal Reserve Bank of New York analysis)
The decision gate is clear: do not frame, insulate, or install drywall until the moisture source, measurements, remedy, and post-repair verification are documented.
Choosing the Right Moisture Remedy
Waterproofing paint is often the first product a homeowner sees and the wrong first response. The correct remedy depends on where the water comes from, when it appears, and how the building handles it.
Start with the least disruptive cause that fits the evidence. A downspout discharging beside the foundation calls for drainage correction, not immediate interior demolition. A leaking supply line needs plumbing repair. Condensation may require air movement and dehumidification. Repeated wall seepage may justify an interior drainage system, sump improvements, or exterior work after a proper diagnosis.
| Symptom | Likely Cause | First Remedy | Last Resort |
|---|---|---|---|
| Staining after rain near an exterior wall | Roof drainage, grading, or downspout discharge | Redirect roof water and correct surface drainage | Exterior excavation and waterproofing |
| White powder on masonry | Water moving through the wall or slab | Trace the water path and improve drainage | Full foundation treatment |
| Damp slab with no wall leak | Vapor migration or poor drying | Test slab conditions and improve moisture control | Remove and rebuild the floor assembly |
| Frequent sump operation | Groundwater load or drainage pressure | Verify pump, discharge, backup, and drainage | Larger drainage or foundation system |
| Musty odor with no visible leak | Elevated humidity, concealed mold, or contaminated materials | Measure humidity and investigate enclosed areas | Remediation and assembly replacement |
The construction response should follow the diagnosis. Use a capillary break at the sill and bottom plate, keep paper-faced materials away from persistent dampness, and choose assemblies that can tolerate the basement's actual conditions. Closed-cell insulation, mold-resistant gypsum, sealed base details, and moisture-resistant flooring can reduce vulnerability, but they won't repair a leaking foundation.
For wet rooms and bath areas, coordinate substrate protection and drainage with the broader enclosure plan. The bathroom waterproofing guide is useful for understanding why surface finishes aren't a substitute for a continuous waterproofing assembly.
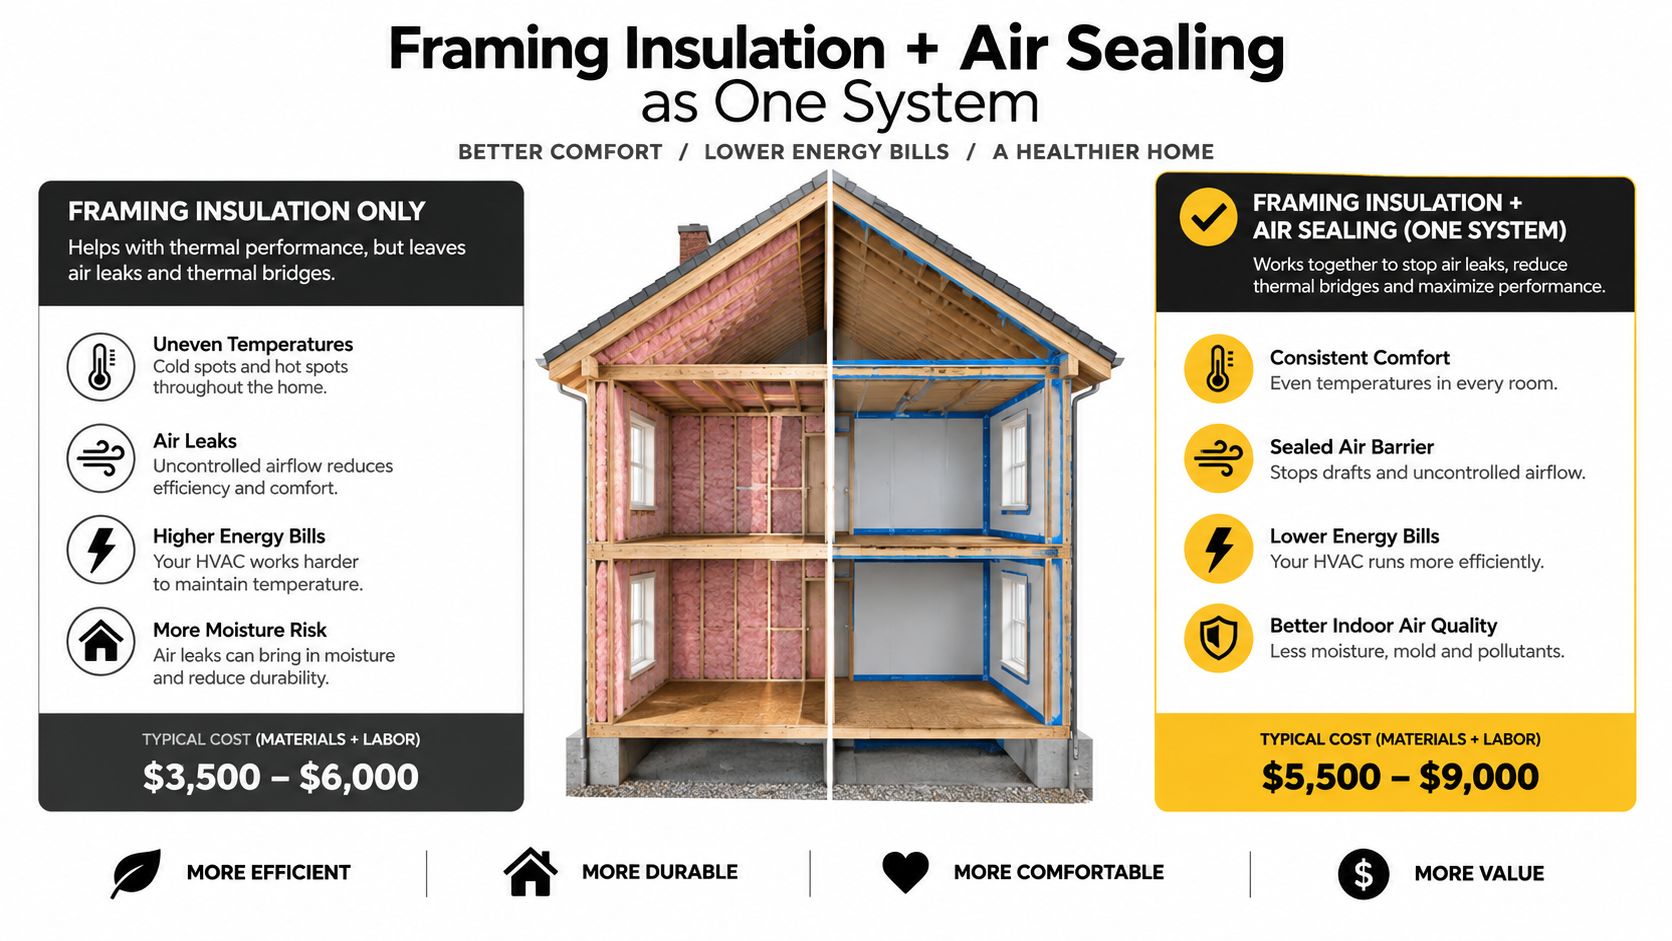
Framing Insulation and Air Sealing as One System
A basement can feel finished while its walls remain vulnerable. The framing, insulation, air barrier, and service clearances must be designed together before the first stud is fastened. Otherwise, drywall may conceal cold cavities, blocked equipment, inaccessible shutoffs, and air leaks that are expensive to correct.
Start by setting the wall line around the foundation's actual conditions. Use pressure-treated material where the assembly requires contact with concrete, install a capillary break, and preserve access to pumps, valves, clean-outs, shutoffs, and electrical equipment. Keep framing clear of masonry where the design calls for a service gap. Confirm that partitions do not obstruct an emergency escape route or maintenance panel.
Build the air barrier before closing the walls
Seal the rim joists, sill-plate joints, foundation-wall cracks, top plates, utility penetrations, and duct and pipe transitions before insulation covers them. DOE guidance calls for continuous, sealed rim-joist insulation at applicable local energy-code levels. ENERGY STAR recommends caulk for gaps up to 1/4 inch and spray foam for larger openings, as summarized in PNNL building guidance.
Choose insulation according to the location and moisture conditions:
- Rim joists: Rigid insulation with sealed joints or closed-cell spray foam can maintain continuity around irregular framing.
- Foundation walls: Rigid insulation against the foundation, paired with a properly detailed stud cavity, can reduce thermal breaks.
- Fiberglass batts: These suit dry assemblies, but they do not correct moisture problems. Air leakage can carry damp air into cold cavities and reduce performance.
- Interior partitions: Acoustic insulation improves privacy. It does not replace fire blocking or air sealing.
The tighter the enclosure, the more carefully ventilation and combustion safety must be reviewed. Exhaust fans, dryers, combustion appliances, and return-air paths can change pressure relationships. Confirm those interactions before the walls become airtight.
Leave removable access panels wherever future service is likely. Reaching a valve or clean-out through a panel costs less than opening a finished ceiling. Coordinate the wall as one assembly between the framer, insulation installer, electrician, plumber, HVAC contractor, and drywall crew.
Egress Windows Wells and Sleeping Rooms
Egress determines the layout before the first stud is installed. Adding a sleeping room can require a larger window, a deeper well, drainage work, a ladder or steps, foundation excavation, and a wall location that preserves the escape path.
Widely adopted International Residential Code provisions generally require a basement and every basement sleeping room to have at least one operable emergency escape and rescue opening, subject to limited exceptions. The usual benchmark is a 5.7-square-foot net-clear opening, while a grade-floor opening may qualify at 5 square feet. The clear opening must generally be at least 24 inches high and 20 inches wide, with the bottom no more than 44 inches above the finished floor. (Boulder County emergency escape guidance)
Measure the finished condition
Inspectors care about the clear opening available after the window, frame, trim, flooring, and wall finishes are installed. Rough framing dimensions don't prove compliance. The unit must open from inside without keys, tools, or special knowledge, and the route must lead directly to a public way or an adequately sized yard or court.
Below-grade windows also need a well that allows the window to open fully. Common benchmarks include 9 square feet of horizontal area, with at least 36 inches of width and projection. The well must drain properly and remain usable during an emergency. Local amendments can change these requirements, and New York City projects must be reviewed against applicable construction, fire, housing, and Department of Buildings rules rather than assuming a generic IRC checklist controls.
Don't label a room a bedroom just because it has a door and a closet. A noncompliant label can affect appraisals, insurance, resale descriptions, and future approvals. If the intended use requires sleeping, settle the egress design before partitions, ceiling bulkheads, and mechanical routes are fixed.
Electrical Plumbing and HVAC Rough-Ins
Rough-in week is where a basement plan either proves itself or exposes its conflicts. The electrical panel, plumbing drain, ductwork, ceiling height, access doors, and wall layout all compete for the same limited space.
Start with the electrical plan. Confirm service and panel capacity, circuit locations, receptacles, lighting, smoke and carbon-monoxide alarms, data pathways, and required AFCI or GFCI protection. A bathroom, wet bar, laundry area, entertainment system, or high-load equipment may change the circuit plan.
Plumbing follows the approved layout. Establish the toilet, shower, sink, laundry, floor drain, clean-out, and sump locations before framing blocks access. A drain route can dictate the ceiling bulkhead, while a clean-out hidden behind permanent cabinetry becomes a maintenance failure.
HVAC coordination comes next. Map supply runs, returns, exhaust fans, and equipment clearances before closing the ceiling. In older New York City homes, review gas lines, combustion air, flue paths, and existing furnace or water-heater conditions with the qualified trades responsible for those systems.
Use a rough-in drawing or marked-up plan at the site:
- Electrical: Panel capacity, device locations, protective devices, alarms, and low-voltage routes.
- Plumbing: Water, waste, vents, clean-outs, shutoffs, drains, and pump discharge.
- HVAC: Supply, return, exhaust, equipment access, and ceiling impact.
- Access: Removable panels for valves, junctions, pumps, and serviceable equipment.
Rough inspections must pass before walls and ceilings are covered. Moving a switch or drain after drywall is installed costs more than resolving the conflict while the framing is open.
Inspections That Protect the Project
Before drywall covers the work, treat each inspection as a release decision. The filing and local authority determine the exact requirements, but the practical question stays the same: who has confirmed that this assembly can disappear safely?
Start with a shared inspection log showing the scheduled date, responsible trade, result, corrections, and reinspection status. Keep the approved drawings beside it.
The release sequence usually follows access:
- Before cover: Check framing, dimensions, fire blocking, egress, structural work, and service access.
- Rough trades: Have the electrical, plumbing, and mechanical work inspected while wiring, pipes, ducts, exhaust, equipment clearances, combustion provisions, and ventilation remain visible.
- Insulation and air sealing: Request review after penetrations are sealed and before insulation is concealed.
- Final approval: Test fixtures, alarms, windows, doors, ventilation, finishes, and required sign-offs.
A failed inspection needs a precise correction. Record the location, the code issue, the responsible trade, and the path to reinspection. “Fix the rough-in” leaves too much room for a repeat failure.
Use photographs before closing walls, especially around concealed framing, fire blocking, penetrations, and repairs. Retain inspection reports, approved drawings, correction notices, photographs, and final sign-offs with the project records.
Older homes require a separate dust and contaminant review. If pre-1978 materials may be disturbed, an EPA Lead-Safe Certified Firm may be relevant, particularly while the home remains occupied. Coordinate that requirement before demolition, not after cleanup.
Close a wall only after the responsible trade and the authority having jurisdiction have released the work.
Finishing Touches That Hold Up Below Grade
Finishes should support the moisture and enclosure decisions already made. A basement doesn't become risk-free because the walls are painted, so select materials that tolerate the room's measured conditions and remain serviceable.
For walls and ceilings, use an appropriate gypsum assembly and finish level for the lighting and use of the room. A higher finish level can reduce visible joint lines under strong, low-angle lighting, but it won't correct movement, dampness, or poor framing. Keep base details sealed without trapping water against the wall, and use removable access panels where service requires them.
Flooring deserves more caution than appearance boards suggest. Sealed concrete, tile, and luxury vinyl plank are often practical below grade because they handle residual humidity better than moisture-sensitive solid wood. The right choice still depends on slab condition, vapor control, comfort, acoustics, and the room's use.
Finish for the actual room
- Bathrooms and laundry areas: Provide effective exhaust, waterproof transitions, and easy-to-clean surfaces.
- Low ceilings: Coordinate lighting with ducts and beams before selecting fixtures.
- Rooms below living areas: Add acoustic treatment where noise transfer matters, while preserving access to utilities.
- Trim and baseboards: Use details that can tolerate cleaning and occasional humidity without swelling.
- Paint: Prepare and prime surfaces properly, then choose a finish suited to the room's ventilation and use.
A dedicated project manager should give homeowners regular updates during this phase, especially when the household remains in the property. At closeout, collect product information, inspection records, access-panel locations, and warranty documents. Excellent Home Improvement describes a 7-year written workmanship warranty as part of its completed-project documentation, but any contractor's warranty should be read for coverage, exclusions, and the process for reporting a defect.
For the drywall portion, review this New York drywall installation service as an example of how framing, board installation, and finish quality can be handled as one scope rather than disconnected visits.
Quick Reference Checklist You Can Print
Keep this page with the drawings and inspection records. The owner can track decisions, the contractor can assign responsibility, and each trade can see what must be verified before the next phase starts.
| Phase | Task | Owner | Verification |
|---|---|---|---|
| Pre-design | Define room use and identify any sleeping rooms | Owner and designer | Layout identifies egress and access needs |
| Pre-design | Log moisture, inspect drainage, and test radon | Contractor and qualified specialists | Written measurements, photographs, and remedy decision |
| Pre-design | Inspect for contaminants before demolition | Contractor and qualified specialists | Hazard assessment and required remediation |
| Design | Draw walls around windows, wells, beams, ducts, and utilities | Designer and contractor | Dimensioned plan with service access |
| Approvals | Confirm NYC filings and building or co-op requirements | Owner and filing professional | Written approval path and responsibility list |
| Demolition | Protect occupied areas and remove materials safely | Contractor | Dust controls, cleared work area, disposal record |
| Remediation | Correct leaks, drainage, humidity, or foundation conditions | Contractor and specialists | Source repaired and post-repair conditions documented |
| Framing | Install partitions, fire blocking, plates, and access panels | Framing crew | Pre-cover review and applicable inspection |
| Rough-ins | Coordinate electrical, plumbing, HVAC, alarms, and ventilation | Licensed trades | Rough inspections passed |
| Enclosure | Complete air sealing and insulation | Contractor and insulation crew | Insulation inspection and photo record |
| Drywall | Close only released walls and ceilings | Drywall crew | Approved inspection record |
| Finishes | Install flooring, trim, paint, fixtures, and hardware | Finish trades | Functional testing and punch list |
| Closeout | Collect approvals, warranties, manuals, and final records | Owner and contractor | Final sign-off package complete |
Local amendments, property rules, and the intended use of the room can change the answer at several points. If a checklist item has no named verifier, it isn't finished yet.
Excellent Home Improvement coordinates basement finishing in New York City, including moisture control, egress planning, framing, insulation, electrical coordination, and finish installation. Visit Excellent Home Improvement to discuss your basement conditions, approval path, and construction sequence before the first stud goes in.