Bathroom Remodeling Bronx: A Step-by-Step Homeowner Guide
Plan your Bathroom Remodeling Bronx project step by step: budget, DOB permits, waterproofing, ventilation and hiring a licensed contractor.
By Excellent Home Improvement & Remodeling

You've saved tile photos, measured the vanity, and started wondering how long you can manage without a working bathroom. Then a contractor asks whether the shower valve is moving, whether your building requires an alteration agreement, and where the exhaust fan will discharge. Suddenly, the job isn't just about replacing dated finishes.
For bathroom remodeling in the Bronx, the safest starting point is a written plan that treats permits, demolition safety, and ventilation as budget decisions. Those details determine what you can build, who needs to approve it, and when the room can go back into service.
Table of Contents
- Planning Layout, Materials and Design Before Demolition
- Setting a Realistic Budget With Published Price Ranges
- Clearing Permits for Co-ops, Condos and Landmarks
- Hiring a Licensed Contractor and Setting Realistic Timelines
- Construction Phases From Demolition to Waterproofing
- Tile, Fixtures and Ventilation Done Right
- Pre-Project and Post-Project Checklists With Common Pitfalls
Planning Layout, Materials and Design Before Demolition
Start with what doesn't work during your normal morning routine. Maybe the door hits the vanity, the shower lacks storage, or the room stays damp long after someone bathes. Separate those functional problems from finishes you merely dislike.
Keeping fixtures in place is worth evaluating before drawing a new layout. A different vanity configuration or shower enclosure might solve the problem without moving the toilet. Don't assume that keeping the same footprint makes every part of the project cosmetic, though. Record proposed valve changes and wall openings separately.
Turn Preferences Into a Written Scope
Build a scope that distinguishes what stays, what goes, and what needs investigation.
- Existing conditions: Photograph the room, accessible piping, ceiling, trim, and any visible damage.
- Layout decisions: Mark fixture locations, door movement, storage, and access for maintenance.
- Material selections: Identify tile, vanity, fixtures, lighting, and accessories by actual specification rather than inspiration photos alone.
- Household arrangements: Decide where occupants will bathe and use the toilet while the bathroom is unavailable.
Use a material board to compare finishes together. Use a measured drawing or 3D design to evaluate space. A rendering helps you understand the room, but it doesn't confirm that a concealed pipe can move or that a proposed exhaust route exists.
For an apartment, brownstone, or townhouse, ask what your selections require behind the finished surface. A wall-mounted vanity, recessed cabinet, or shower niche needs more coordination than its showroom appearance suggests.
Resolve the Painted-Surface Question Early
Before anyone removes old walls, ceilings, doors, or trim, ask whether the work will disturb potentially lead-containing paint. NYC reports 73 residential lead violations per 1,000 residential units in the Bronx and identifies the borough as having the highest concentration; its housing data also explains the significance of the city's 1960 paint ban and the federal 1978 cutoff (NYC Council's lead-in-housing analysis).
Request a project-specific determination of testing needs, applicable renovation requirements, contractor qualifications, containment, cleanup, and occupant protection. Ask specifically how children under six affect that plan. Don't accept a universal checklist without an explanation of how it applies to the surfaces being disturbed.
Setting a Realistic Budget With Published Price Ranges
A useful budget distinguishes a finish update from reconstruction. Calling both a bathroom remodel doesn't make their labor, approval, or concealed-work requirements comparable.
National spending data illustrates that distinction, but it isn't a Bronx estimate. Harvard's housing research reports average homeowner expenditures of $4,136 for minor bathroom remodels and $25,377 for major bathroom remodels in 2023, across categories containing different levels of work (Harvard's remodeling expenditure findings). Those historical national averages shouldn't be presented as current local contractor price ranges.
Match the Price Category to the Actual Work
Treat a published range as a screening tool, not an offer. Confirm that it applies specifically to bathrooms, your building type, and the work you intend to authorize. A general renovation tier may cover a different project scale.
Published Bronx bathroom renovation ranges by tier
| Tier | Published range | Typical scope |
|---|---|---|
| Refresh | Confirm a bathroom-specific range in writing | Selected finish and fixture updates, with retained elements clearly identified |
| Full Remodel | Confirm after a site walkthrough | Broader replacement work, with concealed systems and approval responsibilities defined |
| Gut Renovation | Obtain a project-specific proposal | Removal to exposed construction and coordinated rebuilding of the room |
The practical difference lies in the exclusions. A refresh proposal that excludes substrate repair, valve replacement, and ventilation correction may not suit a bathroom that needs those improvements. Conversely, complete demolition may be unnecessary if the existing room can support the intended upgrade.
Budget rule: Compare the price of the same finished scope, not the totals printed at the bottom of different proposals.
Price Uncertainty Separately
Ask the contractor to distinguish fixed work, selection allowances, and concealed-condition decisions. An allowance needs a clear description of what it covers. An unknown condition needs an agreed process for investigation, pricing, and authorization.
Keep a separate contingency line without pretending there's a universal percentage suitable for every bathroom. Its size should reflect what remains uncertain after the walkthrough and any permitted investigation.
Request transparent line items for protection, demolition, rough work, waterproofing, finishes, approvals, and close-out. A fixed-price agreement is most useful when it names the drawings, selections, exclusions, and change-order procedure. It doesn't eliminate uncertainty behind a wall, but it should prevent the contractor from treating an undefined scope as an open-ended authorization.
Clearing Permits for Co-ops, Condos and Landmarks
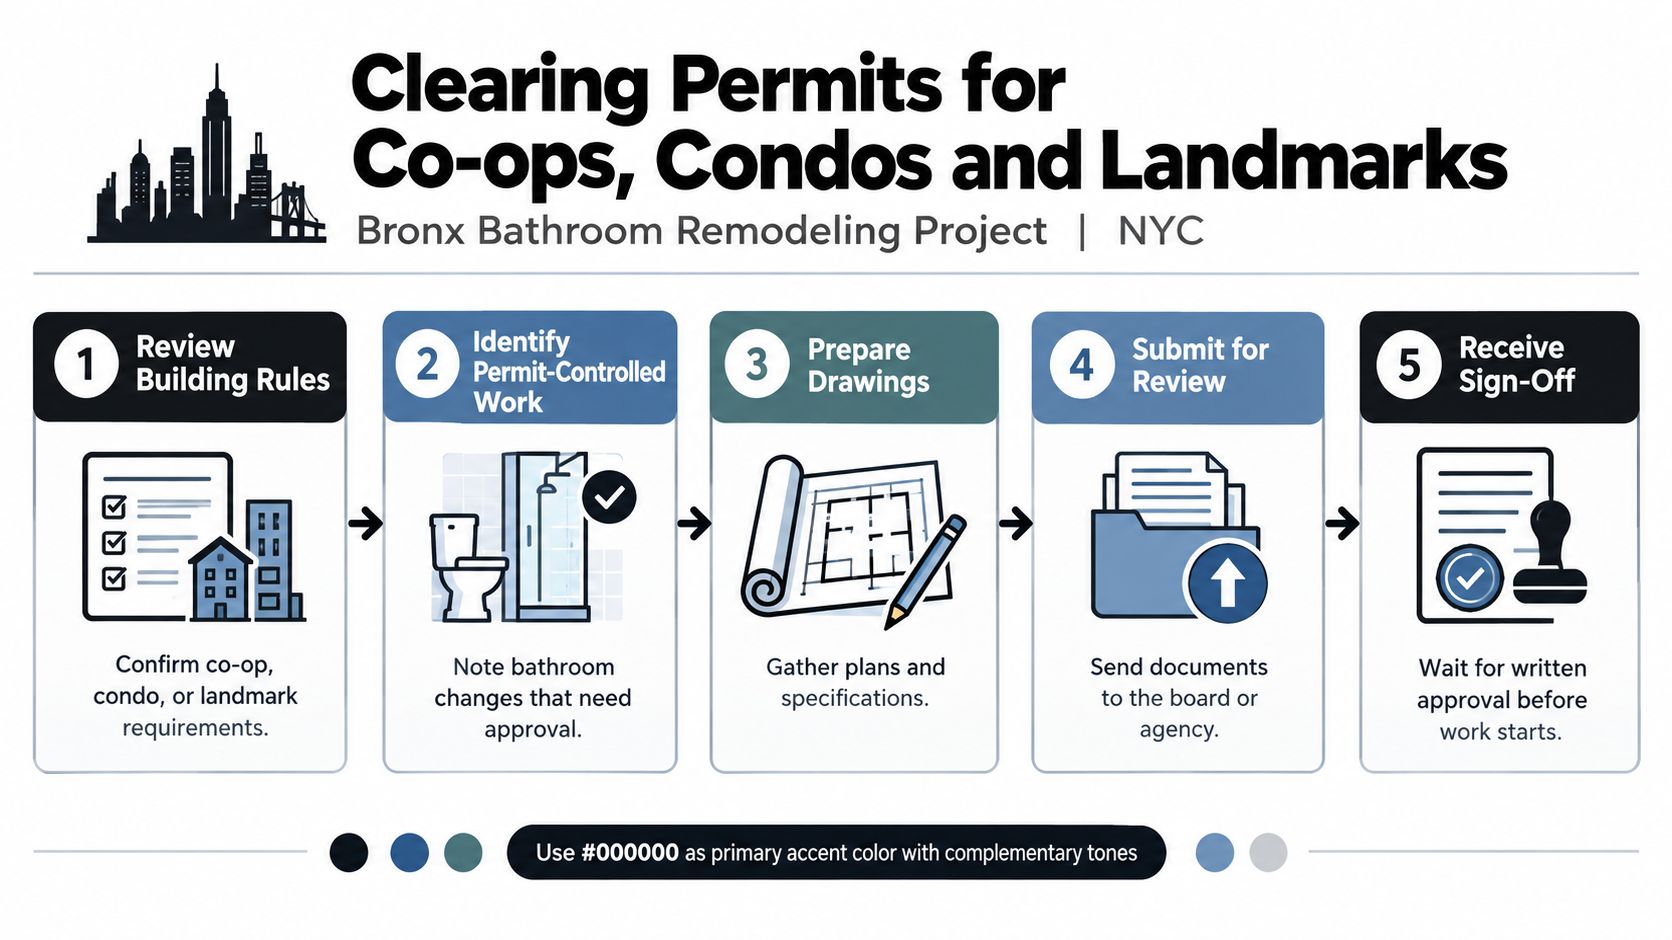
Permit classification belongs before demolition. Opening the room first and asking about approvals later leaves the homeowner responsible for resolving a problem after the bathroom is already unusable.
For planning purposes, treat fixture relocation, a new shower valve, and altered water, waste, or gas piping as permit-controlled work. NYC requires plumbing alterations to be supervised by a Licensed Master Plumber, who obtains the plumbing permit and arranges required tests and inspections; work beyond a limited alteration may also require drawings filed by a Professional Engineer or Registered Architect (NYC plumbing permit and application requirements).
Separate Agency Approval From Building Permission
Direct replacement of an existing toilet, sink, or faucet can qualify as minor work only when shutoff valves, traps, and piping aren't changed. Have the responsible professional document that classification rather than relying on the phrase “like for like.”
A co-op or condo review is a separate coordination task. Request the building's current alteration package and ask management to identify submission requirements, work restrictions, protection requirements, and the person authorized to release the project for construction. Use this NYC co-op renovation approval guide to organize that conversation.
For a brownstone or property with historic restrictions, have the design professional establish whether the proposed work needs landmark review. Don't assume either that every interior change requires it or that a bathroom project is automatically exempt.
The approval path should be visible before the contractor mobilizes.
Assign Responsibility at Each Handoff
- Before demolition: Document existing conditions, determine the filing route, and obtain applicable written approvals.
- Before concealment: Complete rough work and the required inspection milestones.
- Before final payment: Collect the applicable inspection results and close-out records.
A board's acceptance of an alteration agreement isn't a substitute for an agency permit. Likewise, a plumbing permit doesn't answer every question about building access or permitted working hours.
The strongest protection is a responsibility list: who prepares each submission, who pays the associated charges, who schedules inspections, and who supplies the final records. That prevents a homeowner from discovering late in the job that everyone assumed someone else was handling close-out.
Hiring a Licensed Contractor and Setting Realistic Timelines
A low bid can reflect an efficient approach. It can also reflect missing work. You can't tell which until you compare the proposals against the same scope.
Ask each bidder to explain how the room gets from its current condition to a usable, documented finish. Listen for named responsibilities rather than assurances that everything is included. If permit filings, protection, or ventilation are absent from the proposal, ask for a written clarification before comparing totals.
Compare Evidence, Not Presentation
| Evaluation point | What to request | What needs clarification |
|---|---|---|
| Licensing | Current contractor credentials and the responsible licensed trades | A general statement that everyone is licensed |
| Insurance | Current documentation appropriate to the project and building | An expired certificate or unclear coverage |
| Trade responsibility | Names or roles for critical work and supervision | No clear answer about who performs rough work |
| Project oversight | A designated contact and communication procedure | Updates available only when you chase them |
| Warranty | Written coverage, exclusions, and claim procedure | A verbal promise without supporting terms |
Use the guide to hiring a licensed NYC contractor as a reference when assembling your comparison.
Whether a contractor uses employees or subcontractors, ask who checks the work before it's concealed. An integrated team still needs inspection checkpoints; a subcontracted team still needs someone accountable for coordination.
Build a Schedule Around Release Conditions
A credible schedule separates preconstruction, active construction, and close-out. Ask what must happen before each phase starts rather than accepting an unexplained completion date.
- Procurement readiness: Confirm that specified fixtures and concealed components are available and compatible before scheduling their installation.
- Building access: Establish delivery arrangements, work windows, and any shared-service coordination.
- Inspection readiness: Identify who requests inspections and what work must remain exposed.
- Household disruption: Agree when the bathroom becomes unavailable and what must be complete before it returns to service.
A promised finish date means little if nobody has confirmed when the job is allowed to start.
Ask how the contractor handles a backordered selection or an unexpected repair. The useful answer identifies who makes the decision, how alternatives are approved, and how cost and schedule changes are recorded. Don't accept an unreviewed substitution just because it keeps the crew moving.
Construction Phases From Demolition to Waterproofing
Before demolition begins, walk the protection route from the building entrance to the bathroom. Identify occupied rooms, material storage, debris movement, and surfaces that must remain usable. Confirm that the approved painted-surface safety plan is in place wherever relevant.
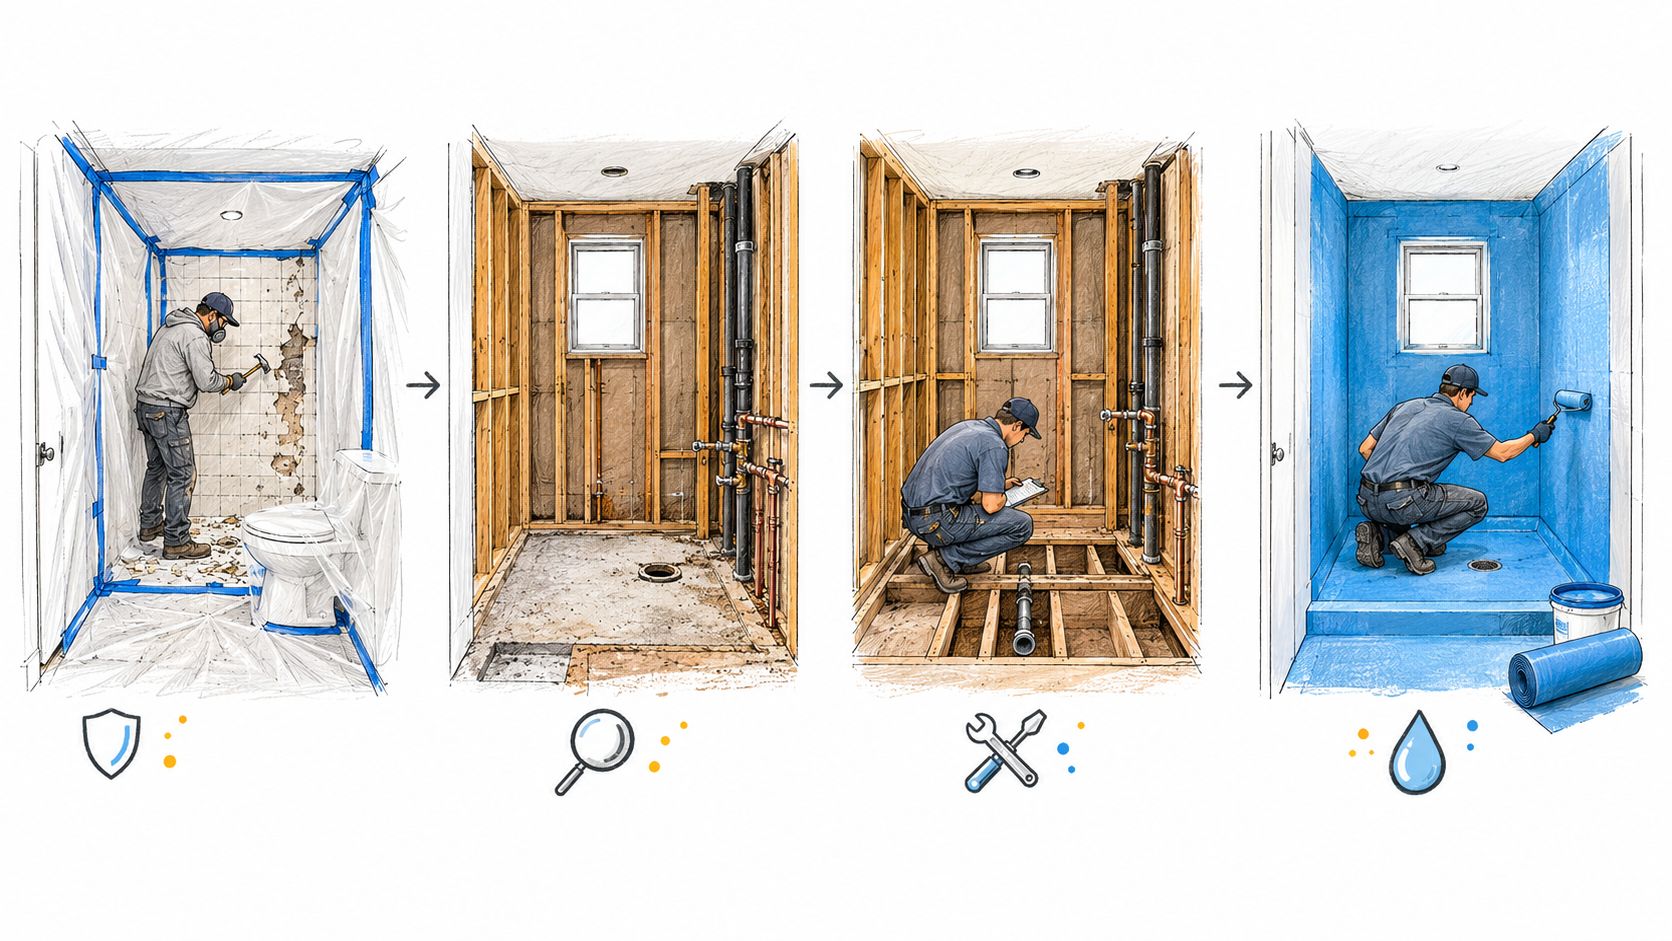
The work should proceed through visible checkpoints, not through a rush to cover everything with new board. This construction sequence highlights where to pause.
Open the Room and Verify Conditions
Protection and controlled removal come first. Have the contractor explain which services will be isolated, what will be removed, and where demolition stops. Don't authorize indiscriminate removal just because the room is being renovated.
Once the relevant construction is exposed, review conditions before rebuilding. Ask the contractor to identify deterioration, unsuitable backing, and conflicts between the proposed layout and existing services. Photograph findings and approve necessary scope changes in writing.
Rough work follows the approved plan. Plumbing, electrical, backing, and coordinated ventilation work should reach the required inspection stage before concealment. Confirm the inspection status rather than treating a newly boarded wall as evidence that everything behind it was accepted.
Inspect the Shower as a Complete Assembly
A tiled shower needs a waterproofing system, not confidence in tile and grout. Recognized shower methods include waterproof membranes covering solid backing throughout the tiled area, with compatible details at seams, corners, penetrations, and drains (Tile Council of North America shower guidance).
Use the selected method and manufacturer's instructions as the acceptance criteria. Ask the contractor to identify the substrate, membrane, drain connection, and required watertight test where applicable. For bonded wet-area membranes, ANSI A118.10 is the relevant specification referenced in that guidance.
Before setting tile, verify:
- Continuous coverage: The specified assembly extends through the intended wet area.
- Transitions: Corners, niches, thresholds, and changes of plane match the selected method.
- Penetrations: Pipe openings and fasteners receive the specified treatment.
- Drain connection: The membrane and drain are compatible and detailed together.
- Documentation: Photographs and applicable test records are saved before concealment.
Changes of plane and drain connections deserve close attention because tile will hide them. Don't allow a substitute membrane or accessory without written confirmation that it's compatible with the assembly and preserves applicable warranty coverage.
The bathroom waterproofing guide provides a useful basis for discussing those checkpoints. The homeowner's role isn't to redesign the assembly on site. It's to require the contractor to identify the method, follow it, and document the work before the next trade covers it.
Tile, Fixtures and Ventilation Done Right
A finished bathroom should be easy to use and maintain, not merely easy to photograph. Before tile installation, review the layout at visible edges, niches, the threshold, and plumbing openings. Ask where cuts will fall and how the installer will handle transitions.
Choose grout and any sealer according to the selected materials and their maintenance instructions. Don't accept a blanket claim that every surface needs the same treatment. Request cleaning guidance before buying products for the finished room.
Check the Installation Beyond Its Appearance
A vanity review should include attachment, usable drawer space, plumbing access, and the relationship between the faucet and basin. Open doors and drawers with the room's other fittings in place. A design that looked generous on a drawing may need adjustment when hardware and door swings share the space.
Coordinate lighting, mirrors, and ceiling equipment before installation. Ask whether each item remains accessible for maintenance and whether the proposed positions interfere with one another.
- Tile acceptance: Review alignment, cuts, transitions, and the agreed finish details.
- Fixture operation: Run the fixtures and inspect accessible connections.
- Service access: Confirm that maintenance doesn't require unnecessary removal of finished work.
Evaluate the Whole Exhaust Route
For a single-water-closet room mechanically ventilated by exhaust, NYC specifies at least 50 cubic feet of air per minute, with provision for replacement air through an undercut, louvers, transfer ducts, or similar openings (NYC bathroom ventilation provisions). Have the responsible professional confirm the requirements applicable to your room.
A fan rating alone isn't an installed ventilation plan. Require confirmation that the exhaust discharges outdoors, not into a wall or ceiling cavity. The contractor should establish the route, termination, replacement-air provision, and maintenance access before closing the ceiling.
In a prewar apartment or interior bathroom, ask what route is available and who must approve its use. In a brownstone, trace the proposed path rather than assuming the nearest exterior wall is accessible.
Choose the fan after the exhaust route is understood, not as an isolated decorative purchase.
A quiet fan with a blocked or poorly planned duct won't address the underlying problem. At handover, ask for an operational check, an explanation of the controls, and maintenance instructions. The system also needs to be used consistently; an attractive grille doesn't remove moisture when the fan stays off.
Pre-Project and Post-Project Checklists With Common Pitfalls
The most useful renovation checklist connects each decision to evidence. A box marked complete should mean there's a drawing, approval, photograph, test result, or written instruction behind it.
Keep those records in a shared project folder. Separate preliminary selections from approved documents so nobody orders from an outdated layout or mistakes an early estimate for the signed scope.
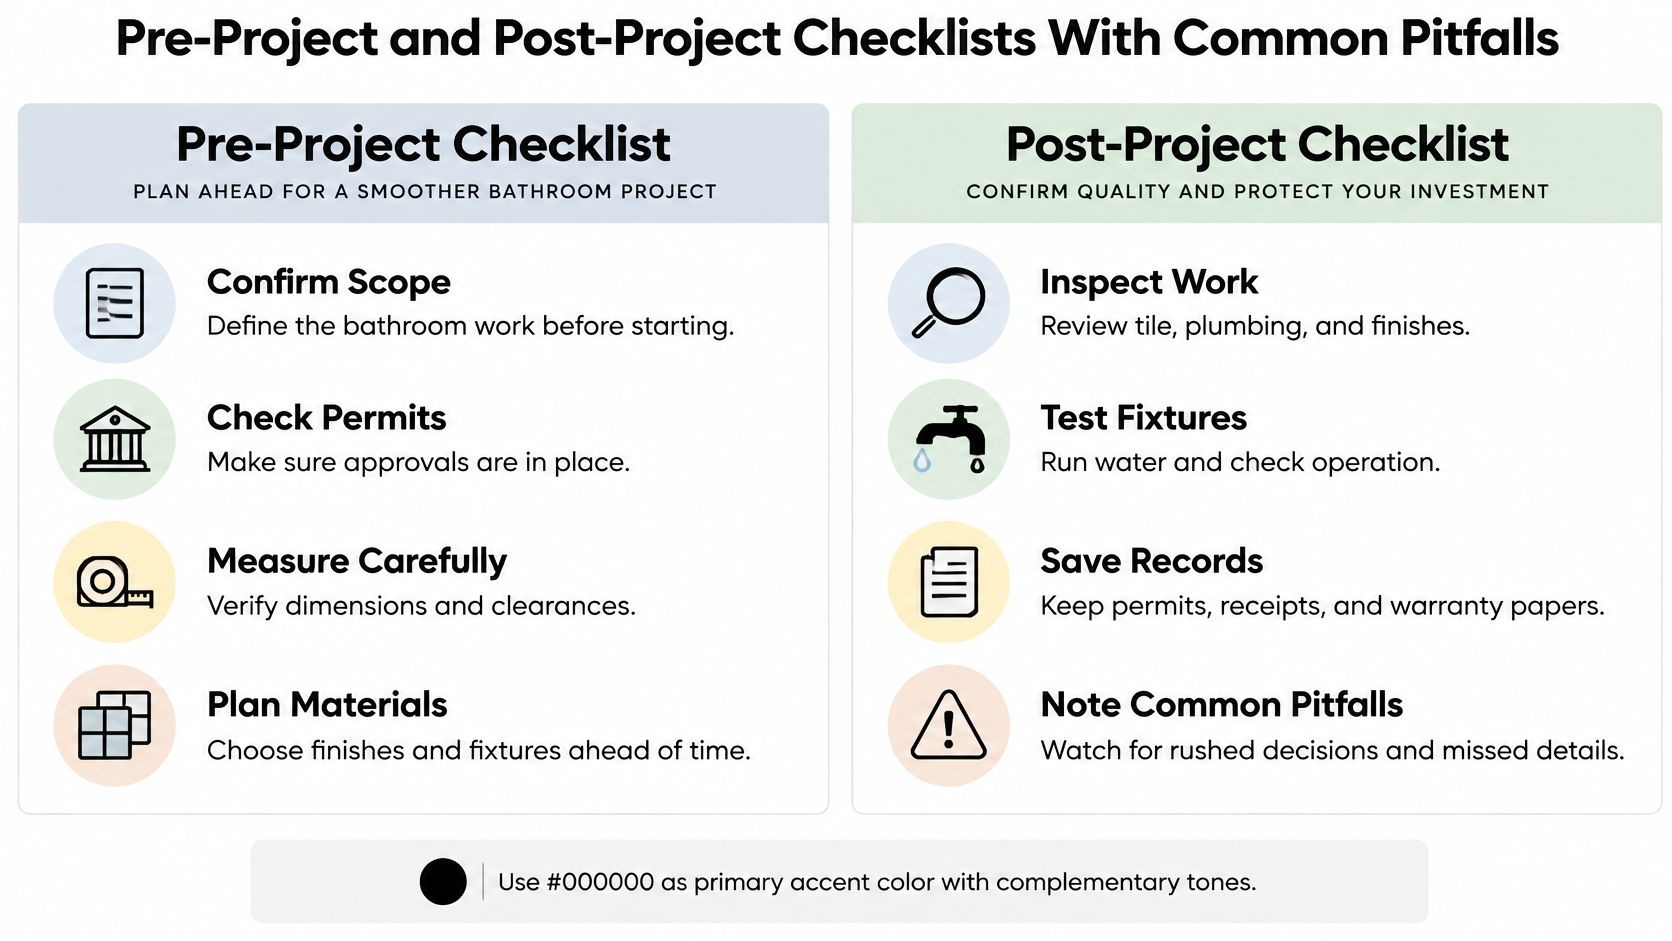
Before You Authorize the Start
- Scope and measurements: Confirm the layout, retained elements, fixture specifications, and clearances.
- Approval status: Save the permit classification, applicable building permissions, and responsible professional's details.
- Safety preparation: Obtain the project-specific testing, containment, cleanup, and occupant-protection documentation.
- Construction checkpoints: Identify when rough work and waterproofing must be reviewed.
- Commercial terms: Confirm line-item pricing, allowances, exclusions, payment milestones, and written change authorization.
- Material readiness: Establish which selections are approved and which deliveries control the start.
The common mistake is treating a scheduled demolition date as proof that preconstruction is complete. It isn't. The readiness review should determine whether the start date holds, not the other way around.
Before You Accept Completion
Walk the bathroom with the project manager and record outstanding items in writing. Distinguish cosmetic corrections from operating problems and missing documentation.
- Working fixtures: Operate the shower, faucet, toilet, lighting, and controls; inspect accessible connections.
- Finish review: Check the agreed tile details, vanity operation, trim, and cleaning.
- Moisture-control verification: Confirm the exhaust check and collect concealed-work photographs.
- Close-out package: Obtain applicable permit and inspection records, product information, receipts, and written warranty terms.
- Maintenance handover: Ask how to clean surfaces, maintain the fan, and report a concern.
Starting demolition too soon, tiling before assembly review, accepting incompatible substitutions, and ignoring ventilation operation are different mistakes with a common cause: someone advanced the job without closing the previous decision.
Request a site walkthrough and a written, line-item proposal before signing. Compare the proposal against these checks, and ask the contractor to resolve omissions while you still have a functioning bathroom and time to make decisions.
Excellent Home Improvement offers bathroom design, material sourcing, and construction coordination for Bronx homeowners. Visit Excellent Home Improvement to request a site walkthrough and a written proposal that addresses permit responsibilities, demolition protection, waterproofing, and ventilation before work begins.