Drywall Finishing Steps: From Coats to a Perfect Surface
Master drywall finishing steps with our guide. Learn taping, compound application, sanding, and level distinctions for professional results at home.
By Excellent Home Improvement
You've finished hanging the boards, filled the room with joint compound, and reached the stage where the wall looks almost ready for paint. Then the light changes, a glossy color goes up, and every seam, fastener dimple, ridge, and shadow suddenly becomes visible. That result usually isn't caused by one bad sanding pass. It comes from choosing the wrong finish level or rushing one of the drywall finishing steps between coats.
A professional finish starts with a decision about the final appearance. Flat paint in ordinary lighting doesn't demand the same preparation as a dark, glossy wall beside a large window. The work below follows that distinction from the first tape coat through the Level 5 inspection, with attention to the small motions that prevent visible defects later.
Table of Contents
- A Brief Evolution of Drywall Finishing
- Understanding Drywall Finish Levels
- The First Coat and Taping Process
- Feathering and Building Subsequent Coats
- Sanding, Skim Coating, and Final Inspection
- Common Finishing Mistakes to Avoid
- Final Quality Check Before Priming
A Brief Evolution of Drywall Finishing
A wall can look ready for paint while still carrying the limits of its board and finish level. Drywall finishing makes more sense once you understand how the material was designed to receive joint treatment. Earlier board products did not all support the same straightforward process. In 1916, a paper-faced gypsum product replaced earlier board types, creating a surface that could accept joint treatment and paint more consistently. The paper face became part of the finishing system, not merely a covering over the gypsum core. The history of advanced gypsum products describes that transition and its influence on modern construction.
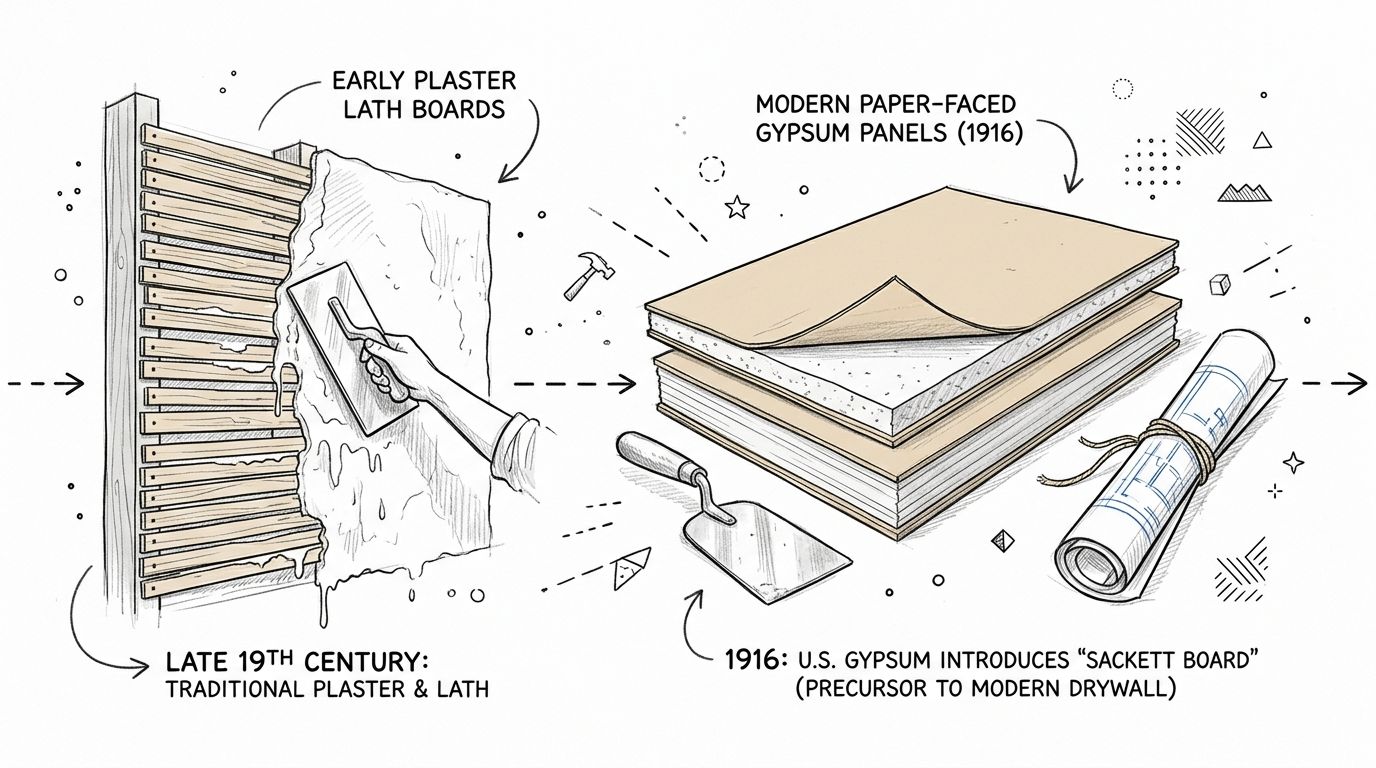
As board production expanded and contractors used it on larger projects, finishers needed a repeatable method. The Gypsum Association was founded in April 1930, during a period of rising industry demand and manufacturing capacity. By 1945, the U.S. government had used approximately 2.5 billion square feet of gypsum board in buildings and installations. That wartime use helped establish gypsum board as a practical interior wall system. The same industry history documents those figures and dates.
Why the paper face changed the work
Paper-faced board gave finishers a predictable field surface, but it also created a condition that still determines whether a painted wall looks uniform. Joint compound and gypsum paper absorb paint differently. If the seam has a different texture or porosity from the surrounding board, the coating can reveal it as a band, flash, or shadow.
The finish therefore has to be built in layers. Tape reinforces the joint. Successive coats widen the transition and reduce the visible edge. A skim coat can equalize the entire wall when lighting or paint sheen exposes variations that a standard preparation would leave behind.
Finish levels describe this preparation, rather than promising identical results under every condition. The selected level determines how much work goes onto joints, fasteners, corners, and the surrounding field, along with how much variation the final coating can conceal. That distinction matters when a homeowner chooses between a routine painted surface and a nearly uniform plane under critical light.
Practical rule: The smoother and more reflective the final wall, the less forgiving the substrate becomes.
Widespread adoption made a shared finishing process useful to builders, painters, inspectors, and homeowners. A finish specification gives everyone the same target before work begins. It prevents “smooth” from meaning one standard painted surface to one person and a nearly flawless wall to another.
Understanding Drywall Finish Levels
A wall can look smooth in ordinary daylight and still show every joint when a window throws light across it. That difference is why drywall finishing starts with a finish level, not a tool list. A finish level is a specification for the amount of preparation applied to board, joints, fasteners, corners, and accessories. It does not promise identical results in every room or under every coating.
The formal system was organized in 1992, when the Association of the Wall and Ceiling Industries worked with the Gypsum Association on five wallboard finish levels. The first document instructing finishers on the levels was GA-214, Levels of Gypsum Board Finish, as described in this overview of drywall finishing standards.
The scale runs from unfinished board to a fully skim-coated surface:
- Level 0: Bare board with no finishing work. It suits temporary conditions or concealed areas where appearance is not required.
- Level 1: Tape is embedded in compound, while the tape and treatment remain visible. This can suit areas above ceilings or inside concealed spaces.
- Level 2: Compound covers the tape and fasteners. The board has basic treatment, but it is not prepared for a refined painted finish.
- Level 3: More compound smooths the treated areas and prepares the wall for heavier texture, which hides ordinary surface variation.
- Level 4: The usual choice for flat paint and light texture. Joints, fasteners, accessories, and corners receive the required coats, followed by sanding to create a smooth substrate.
- Level 5: The highest finish level. Once Level 4 work is complete, a thin skim coat covers the entire panel face, followed by light sanding and inspection.
Match the level to the room
Level 4 is often the sensible choice for ordinary walls with flat paint, particularly where light is diffuse and viewers will not see the surface at a shallow angle. It still demands accurate taping, filling, feathering, sanding, and surface preparation. Choosing it means accepting that normal lighting and flat paint will conceal minor variation.
Choose Level 5 for severe or raking light, large windows washing across a wall, dark colors, gloss or semigloss paint, or a design that depends on an ultra-smooth plane. The skim coat covers the whole wall, so the labor increases beyond joint treatment alone. Trade guidance on Level 5 finishing reflects the practical inspection standard: check the complete surface under harsh lighting for tool marks, ridges, and inconsistencies.
A closet, utility room, or concealed service area rarely justifies Level 5. A media room, long corridor, or wall opposite a large window may expose defects that disappear during routine daytime viewing. Set the level before the first coat. It controls the finishing method, sanding effort, inspection standard, paint choice, and likely rework.
The First Coat and Taping Process
The first coat determines whether the seam becomes a stable reinforced joint or a defect that keeps returning. Before opening the compound, check that the board is firmly fastened, the joint edges are clean, and wider gaps have been prefilled. Compound can't compensate for loose board or movement behind the seam.
Apply a bed of compound over the joint, keeping enough material beneath the tape to create full contact without leaving a thick ridge. Set one end of the tape, then draw the knife along its length while applying steady pressure. The motion should press the tape into the compound and squeeze out excess material, not scrape the seam dry.
Paper and mesh behave differently
Paper tape is well suited to a properly bedded flat joint and inside corner because the compound creates the bond behind it. Crease inside-corner tape cleanly, press it into the corner without stretching it, and make separate passes on each side. Keep the knife controlled at the corner so you don't pull the tape away as you work the second face.
Mesh tape can be convenient, particularly for repairs, but it depends heavily on the compound and the application method. It shouldn't become an excuse for a thin, hurried coat. If the compound doesn't fully fill the mesh and bond it to the board, the pattern can telegraph through later coats or the seam can weaken.
For a more involved renovation, the drywall installation specialists in New York can coordinate board installation, corner accessories, taping, and finish specifications as one continuous scope. That matters because a finisher's best work can't correct framing movement or poorly supported board.
Keep the first coat modest
The tape coat isn't supposed to look finished. Its job is to lock the tape in place and cover it sufficiently for the next coat. Remove side ridges while the compound is workable, but don't keep scraping until you expose the tape or starve the joint of material.
Fasteners need their own attention. Fill each screw or nail dimple, hold the knife nearly flat, and leave the compound slightly proud enough to shrink without creating a crater. Let the coat dry fully before continuing. If the center still looks darker, soft, or cool to the touch, moisture remains inside the compound and the next pass can disturb the bond.
Feathering and Building Subsequent Coats
The second and third coats create the transition from the raised joint to the flat drywall field. The center of the seam needs coverage, but the edges need to disappear gradually. A narrow repair that stops abruptly will remain visible even if its middle is perfectly smooth.
Use a wider knife for each successive pass and extend the compound beyond the previous coat. Load the knife evenly, place the compound over the center, and make a long stroke that leaves the most material over the joint. As the knife reaches the outer edge, increase pressure on the side away from the seam. That pressure thins the edge instead of leaving a hard line.
Build width, not height
A common beginner mistake is to keep adding compound directly over the center. That creates a hump and encourages aggressive sanding later. The better motion is a shallow arc that carries the material outward while the knife remains flexible enough to follow the wall.
For butt joints, the transition generally needs more attention because the board edges don't provide a recessed channel. Feather both sides farther into the field and use the lightest pressure at the perimeter. Tapered factory joints need less spread, but they still require a smooth, gradual edge.
The knife should remove the edge of the compound, not remove the shape of the wall.
Use compound with a workable consistency. If it's too stiff, the knife skips and leaves ridges. If it's too loose, it sags, builds unevenly, and takes longer to dry. Mix or condition only what you can apply cleanly, and keep the pan free of dried crumbs that can drag grooves through a fresh coat.
Respect the drying cycle
Each layer must be bonded and dry before the next pass. Applying new compound over a soft lower layer traps moisture, tears the surface, and makes the seam move under the knife. Drying also allows shrinkage to occur before you decide whether another filling pass is needed.
Inspect between coats with your hand and with side lighting. Your fingertips can find a ridge that your eyes miss, while a light held low across the wall reveals shadows at the feathered edge. Knock down a sharp ridge carefully rather than burying it under more material. Avoid sanding back into sound tape, since exposing or weakening that layer creates a repair problem under the next coat.
Sanding, Skim Coating, and Final Inspection
A wall can look ready under ordinary room lighting and still show every defect after primer and paint. The final inspection must match the finish level you chose. A Level 4 surface may be acceptable with texture or moderate-light paint, while a Level 5 finish requires a more uniform field because the skim coat reduces the visible difference between drywall paper and treated joints.
Sanding should refine a sound surface, not repair careless application. Start by removing knife ridges and hard edges with controlled passes. Keep the block or sponge moving, use light pressure, and stop once the transition feels even. Chasing a tiny mark can expose tape or create a shallow hollow that catches more light than the original ridge. A common mistake is sanding until the joint feels perfect while thinning the surrounding paper face.
Control dust before the abrasive touches the wall. In an occupied home, seal nearby openings, cover floors and furniture, and choose a lower-dust method where practical. Vacuum-assisted sanding, suitable sanding sponges, and limited wet-sanding can reduce airborne debris, but none replaces fully dried compound or a careful visual check. Renovations in pre-1978 homes require lead-safe containment practices, as required for occupied homes and explained in this guide to cleaner drywall finishing and renovation containment.
Apply the skim coat across the field
A Level 5 finish starts with a completed Level 4 substrate. Joints, fasteners, corners, and accessories must be coated and sanded before the field receives its skim coat. Apply a thin, consistent layer across the whole surface rather than building thickness over the seams.
Use a wide knife or finishing tool in manageable sections. Keep the blade angle shallow, maintain a wet edge where possible, and stop reworking material once it begins to set. The skim coat reduces differences in porosity and texture, helping limit joint photography, flashing, and banding under demanding paint systems. Too much pressure leaves thin spots. Too little pressure leaves ridges that become harder to remove after drying.
Let the coat dry fully, then sand gently to remove tool marks without cutting into the paper face. Check by touch and sight. Smoothness alone can hide shallow low spots.
Use light as a diagnostic tool
Hold a work light close to the wall at a low angle, so the beam travels across the surface. Move it along seams, corners, fastener fields, and broad panel areas. Shadows expose defects that disappear under normal room lighting.
Mark each defect, apply a thin correction, and inspect again after it dries. The drywall finishing portfolio demonstrates why a Level 5 result depends on uniform treatment across the full surface, not clean-looking joints alone.
Common Finishing Mistakes to Avoid
A wall can look ready for paint and still fail under angled light. The problem usually starts before sanding. Sanding can soften a ridge, but it cannot restore tape adhesion, replace missing compound, stabilize moving board, or correct moisture damage. Finish levels depend on decisions between coats, not on the final pass alone.
Bubbling and separating tape
Bubbling tape usually means the compound was too thin, dried too quickly, or failed to contact the tape evenly. A small bubble can expand as the seam dries and later becomes more visible under paint. Cut out the loose section, remove failed material, then apply fresh compound with full contact. Rebuild the repair in thin, compatible coats.
Separation and delamination can also come from contamination, insufficient compound, or movement in the assembly. Check whether the board is secure and whether nearby tape remains firmly bonded. Covering only the visible bubble leaves the underlying failure in place.
Cracks and fastener pops
Cracks often follow movement, weak joints, poor tape embedment, or inadequate drying between coats. Nail and screw pops can point to board movement or fastener placement problems. Another swipe of compound may hide the mark briefly, but it will not correct movement behind the surface.
Use this check before applying the next coat:
- Lifted edges: Press lightly beside the seam. Movement means the area needs repair rather than concealment.
- Tool marks: Feel for sharp ridges after drying. Raised lines catch shadows under raking light.
- Shallow coverage: Look for visible tape weave or fastener depressions through the compound.
- Moisture problems: Do not coat soft, discolored, or repeatedly damp compound. Correct the moisture source first.
Recurring defects typically trace to taping, compound thickness, structural movement, contamination, and moisture, as outlined in trade guidance on drywall failure causes. Drying time isn't optional. Each layer must bond, dry, and shrink before the next coat changes the surface. Rushing this sequence can turn a minor repair into a visible defect under a higher finish level.
Final Quality Check Before Priming
Primer shouldn't be the first test of your finish. Before opening the paint supplies, inspect the wall under normal room light and then with a work light held at an angle. The two views answer different questions. Normal light shows how the room will usually feel, while raking light exposes defects that may appear after paint.
Run your hand across every seam and corner. Look for missed fastener dimples, exposed tape, pinholes, hard feather edges, ridges, sanding scratches, and small depressions. Check around corner bead and other accessories, where an uneven edge can stand out once the wall color is uniform.
Use this final sequence:
- Repair: Apply thin compound to remaining defects and let it dry fully.
- Refine: Sand only the repaired areas and blend their edges into the surrounding surface.
- Inspect: Repeat the angled-light check, especially on walls facing windows or strong fixtures.
- Clean: Remove sanding dust from the wall, adjacent trim, floor, and ledges so it can't interfere with primer adhesion.
- Confirm: Make sure the selected finish level matches the paint sheen and lighting conditions.
For homeowners who want the surface preparation and coating handled as one coordinated scope, interior painting services can include the final dust removal, primer preparation, and paint-ready inspection. A clean substrate and the right primer won't hide a failed tape joint, but they will preserve the work when the drywall surface has been finished correctly.
Excellent Home Improvement offers drywall installation through Level 5 finishing, repairs, skim coating, and interior painting as part of residential renovation work. Visit Excellent Home Improvement to discuss the finish level, lighting conditions, and paint system your walls need before work begins.