Drywall Installation Steps: Your Complete Guide
Master drywall installation steps from framing to finish. Learn expert tips, avoid common mistakes, and achieve a professional result in your NYC renovation.
By Excellent Home Improvement
You've probably seen the problem before: a renovation reaches the point where the old walls are open, several trades are still moving through the rooms, and someone suggests hanging drywall to keep the project moving. In a New York apartment or brownstone, that decision can create trouble fast. A pipe still needs access, an electrical box sits too far back, or settled framing leaves a wall that looks acceptable until the afternoon light exposes every uneven joint.
Professional drywall installation steps start before the first panel is lifted. The quality of the finished wall depends on preparation, trade coordination, panel selection, fastening, and finishing in the right order. Get those decisions right, and the drywall crew can work efficiently. Skip them, and the project may require opened walls, patched seams, extra sanding, or callbacks after painting.
Table of Contents
- Preparing for Successful Drywall Installation
- Measuring, Cutting, and Hanging Drywall Panels
- Choosing the Right Drywall Type for Your Project
- Taping and Mudding: Building Joints That Disappear Under Paint
- Sanding and Achieving the Perfect Finish Level
- Common Drywall Installation Mistakes to Avoid
- Planning Your Drywall Installation Timeline
Preparing for Successful Drywall Installation
The most common pre-installation mistake is treating drywall as a cosmetic cover instead of the final layer of a working wall assembly. Once panels hide the framing, rough plumbing, wiring, insulation, and ductwork, correcting a missed item becomes slower and more expensive.
Complete the wall before covering it
Start with a room-by-room inspection. The framing doesn't need to be perfect, but it must provide a stable, reasonably flat surface for the board.
- Check the framing: Confirm stud locations, spacing, plumb, level, and flatness. Older NYC buildings often have settled or modified framing, so sight down the wall and use a long level or straightedge to find bows.
- Confirm backing: Every panel edge and planned joint needs reliable support. Add backing where an edge would otherwise float, especially around openings, corners, soffits, and transitions between old and new framing.
- Inspect rough-ins: Electrical boxes, plumbing lines, heating runs, ventilation ducts, and low-voltage wiring should be installed, pressure-tested where applicable, and reviewed before the wall closes.
- Protect penetrations: Mark pipes and cables clearly, and install the required protection where fasteners could reach them. A drywall screw should never be allowed to become a plumbing or electrical repair.
- Prepare the floor line: Keep the bottom edge of the panel above the floor so it isn't sitting in construction moisture or absorbing water during cleaning.
In a bathroom, basement, or wall near a recurring leak, identify the moisture source before choosing board or closing the cavity. Drywall won't correct poor waterproofing, inadequate ventilation, or a damp foundation. If the renovation involves a co-op, condo, or permitted alteration, coordinate the inspection and approval requirements with the project team. A licensed NYC contractor hiring guide can help owners understand what to verify before work begins.
Practical rule: If another trade still needs to drill, pull cable, pressure-test, or reach a valve inside the wall, the drywall phase hasn't started yet.
Store panels flat, dry, and protected from traffic. Stage screws, knives, lifts, corner materials, and joint compound before installation so the crew isn't improvising in a narrow hallway or occupied apartment. Good setup prevents the rushed cuts and unsupported seams that cause visible defects later.
Measuring, Cutting, and Hanging Drywall Panels
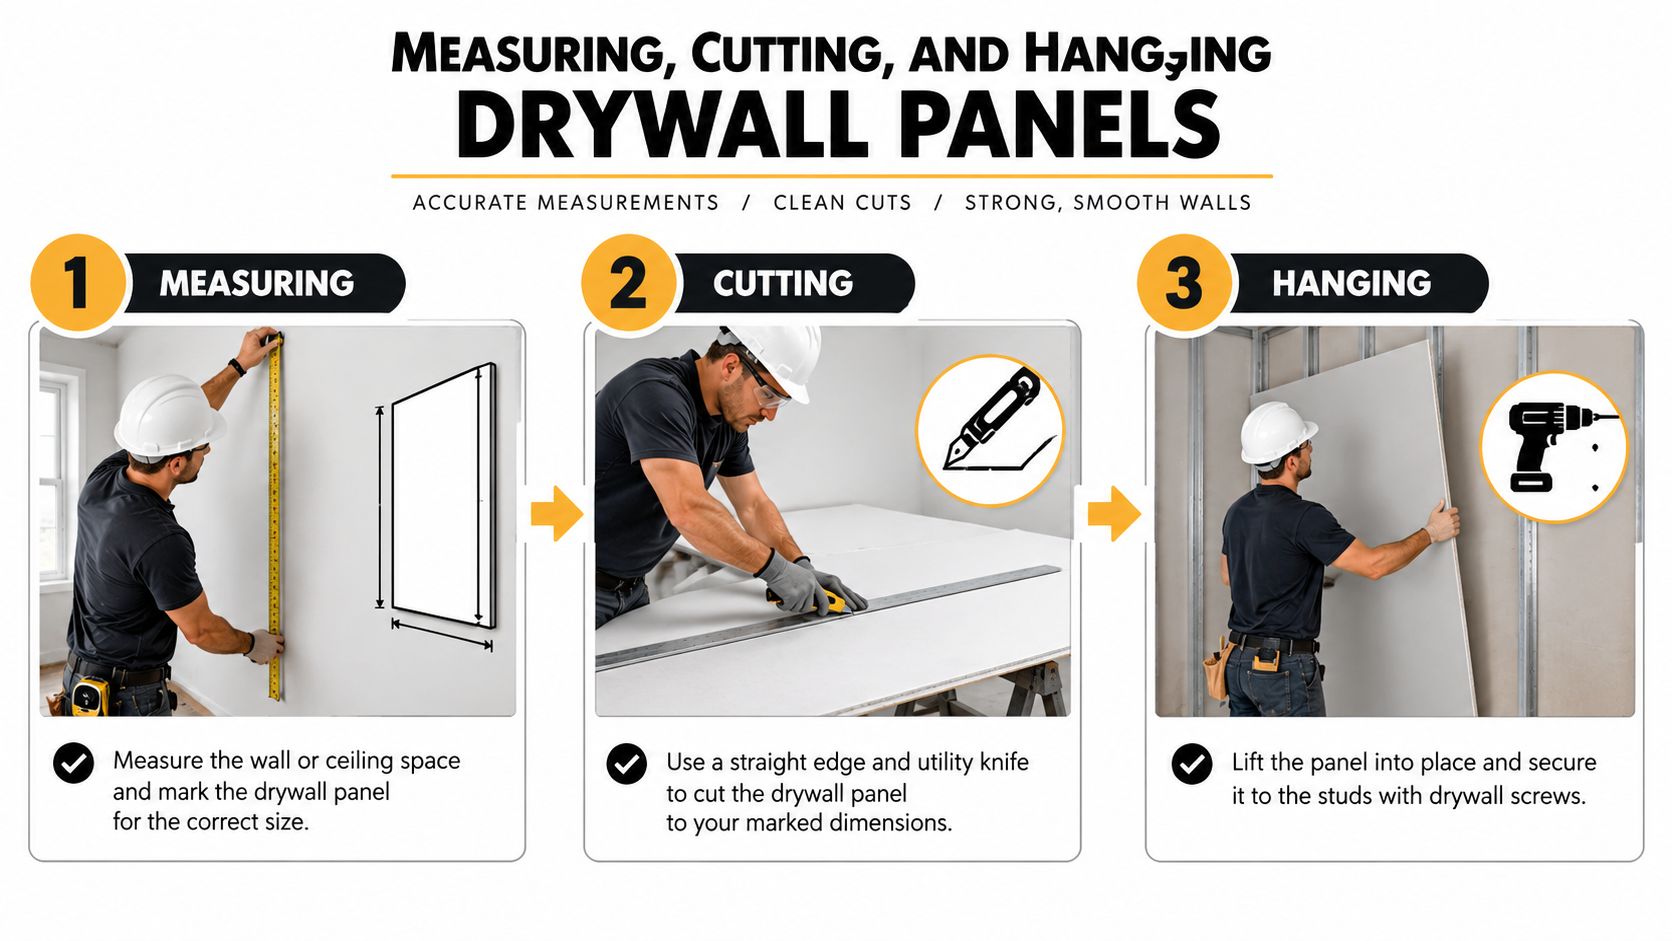
In a NYC brownstone, a wall that looks straight from the doorway may have framing that shifts from one end to the other. In a co-op renovation, old repairs can leave several wall planes in the same room. Measure the actual opening at the point where each panel will sit, rather than trusting an old plan or assuming matching walls have matching dimensions. Accurate layout keeps the finisher from hiding preventable errors under joint compound.
Mark stud centers on the floor and ceiling, then transfer those marks clearly to adjacent surfaces before lifting a sheet. Measure receptacles, switches, plumbing, and vents from fixed reference points, such as a corner or framing line. Do not measure a cutout from the edge of the panel alone. A misplaced opening can leave a weak strip of gypsum, collide with framing, or create an oversized patch.
Make panels fit without forcing them
Cut sheets about 1/4 inch short of the measured opening. That clearance makes the panel easier to position and keeps a tight edge from buckling, crumbling, or pressing against uneven framing. This is our standard field practice, and the same dimension appears in this drywall installation guide as a useful reference.
Score the face paper, snap the board, and cut the back paper cleanly. Refine rough edges with a rasp or sharp knife, but keep gaps controlled. Support the sheet while cutting. Label the room side and orientation when several pieces have similar shapes, especially around a crowded kitchen or narrow apartment corridor.
Hang for fewer, stronger joints
Horizontal hanging often suits residential walls because it can reduce the number of joints and place seams at a workable height. Stagger joints between courses, keep every panel edge supported, and avoid continuous seam lines. Ceilings, soffits, and irregular brownstone layouts may call for a different orientation, so align the installation with the framing and the planned finish.
Fasten panels from the center outward. The sheet settles against the framing instead of trapping a bow in its middle. Set field screws about 16 inches apart. Add screws at every framing member along butt joints and panel ends so no edge floats.
Set screw heads slightly below the paper face without breaking the paper. Overdriving damages the gypsum and weakens the fastener's holding strength. Keep the panel 1/2 inch or more above the floor to limit moisture wicking and allow room for movement. Use a drywall lift or a second person for large sheets, particularly on stairwells, in tight corridors, or above finished flooring.
Choosing the Right Drywall Type for Your Project
Standard gypsum board works for many dry interior rooms, but board selection should follow the room conditions and the required wall assembly. In NYC co-op and brownstone renovations, confirm the alteration drawings, building requirements, fire rating, and moisture exposure before ordering. Changing board after delivery can delay the job and create inspection problems.
Compare the board before ordering
| Type | Best For | Moisture Resistance | Fire Rating | Typical Cost |
|---|---|---|---|---|
| Standard gypsum board | Dry bedrooms, living rooms, and halls | Low | Standard unless part of a rated assembly | Lower |
| Moisture-resistant board | Areas with intermittent humidity, when approved for the assembly | Higher than standard board | Not automatically fire-rated | Moderate |
| Fire-rated gypsum board | Walls and ceilings requiring a rated assembly | Varies by product | Designed for specified fire-resistant assemblies | Higher |
| Specialty moisture and fire board | Locations with both moisture concerns and assembly requirements | Product-specific | Product-specific | Highest |
Moisture-resistant does not mean waterproof. In a bathroom, the board is only one part of the wall system. Wet-area waterproofing, sound transitions, ventilation, and sealed penetrations determine whether the assembly handles regular exposure. A colored face paper cannot protect a wall from standing water.
Fire-rated board must also match the tested assembly. Layer count, board thickness, fastener type, framing, joint treatment, penetrations, and finish details can affect the required rating. A board labeled fire-rated is not automatically suitable for every rated wall or ceiling.
Review the gypsum board market report for industry context, but use the project documents to make the selection: gypsum board market report. The practical decision belongs with the design team, expeditor, contractor, and building requirements, not with general market demand.
Plan for future repairs
In an occupied home, select board with maintenance access in mind. A lower-cost material that fails behind a vanity, on a damp basement wall, or beside a service chase may cost more to replace than the original upgrade. Ask the contractor to document the board type, location, installation method, and required inspection before material reaches the site. This record helps when a leak, electrical repair, or future alteration exposes the wall.
Taping and Mudding: Building Joints That Disappear Under Paint
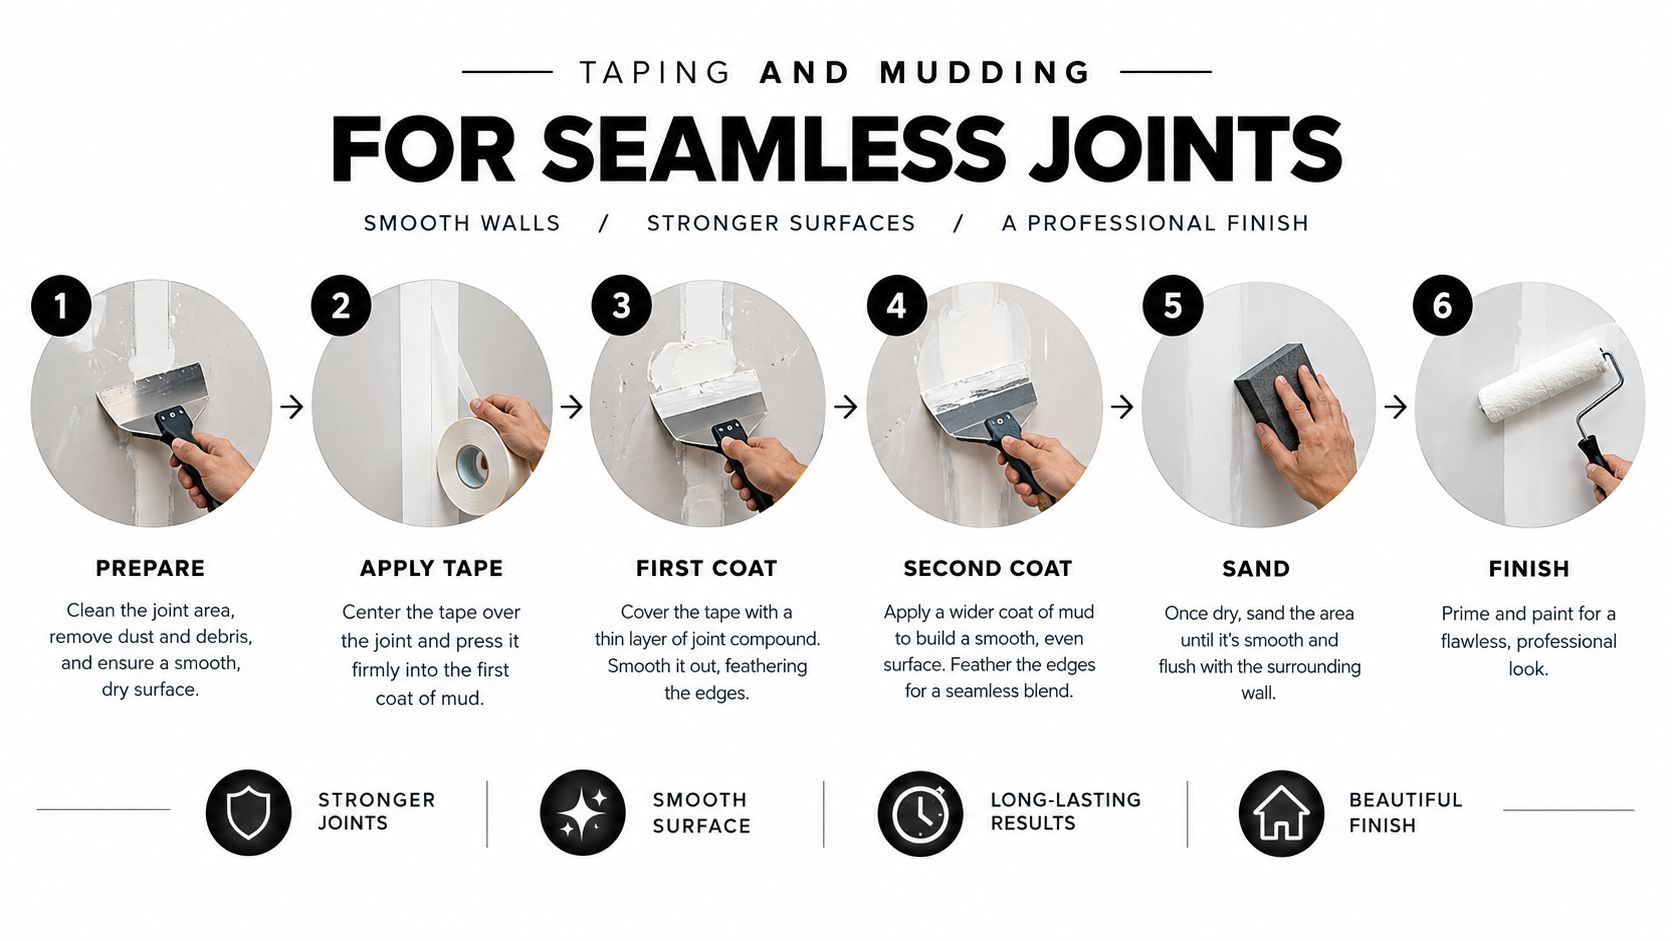
Hanging establishes the wall plane. Taping and mudding determine whether that plane still looks flat after primer and paint. In NYC co-op and brownstone renovations, rushed preparation often shows up as raised seams, cracked corners, and fastener pops. The finisher must reinforce each joint, fill its recess, feather the transition, and leave a surface that does not reveal the panel layout.
Start with a clean, supported joint
Remove loose paper, crumbs, and dust from every seam. Renovation dust is especially common around demolition areas, service chases, and patched framing. Fill deep gaps or damaged edges before taping, but avoid creating a thick ridge that will require aggressive sanding. Use a clean mud pan, a taping knife wide enough to control the material, and compound with a workable consistency.
Spread compound along the joint, then press the tape into the wet material. Center it carefully and draw the knife over the tape with firm, even pressure. The knife should bed the tape and push out air while leaving enough compound beneath it to bond properly.
If bubbles appear, check causes in order of likelihood. Dust on the board is most common in renovation spaces. A dusty strip often leaves a loose section that lifts cleanly from the surface. Next, check whether the compound was thinned too far, leaving a dry-looking area beneath the tape. Finally, consider timing. Tape pressed after the mud has begun to skin over may not bond even when the surface looks wet. Cut out a loose bubble after the compound dries, apply fresh compound, and reset that section instead of covering the defect.
Build the joint in controlled coats
Use a tape coat, a fill coat, and a finish coat. Let each coat dry according to the compound manufacturer's instructions. Rushing traps moisture, softens the layer below, and makes a straight edge harder to maintain.
The second coat widens the joint and fills the tape recess. Hold the wider knife so the center carries compound while the edges feather into the board. On the finish coat, use less material and extend those feathered edges farther. Butt joints need extra widening because they lack the factory recess found on long edges.
Inside corners require a clean fold and consistent pressure. Outside corners need straight corner bead or specified reinforcement, secured so it cannot shift while the compound dries. Fill screw dimples separately, and check each fastener for a broken paper face before covering it.
A smooth joint comes from a thin center and wider feathered edges, not from piling on compound and sanding aggressively later.
Between coats, use a damp sponge or controlled sanding to remove ridges. Do not polish the board paper or expose the tape. If a ridge remains, shave it carefully, spot-fill, let it dry, and inspect the joint under angled light. Careful sequencing takes less time than repairing a cracked seam after primer and paint.
Sanding and Achieving the Perfect Finish Level
In a NYC co-op or brownstone renovation, sanding starts with site preparation. Close or seal doorways, protect floors and millwork, and plan dust collection before opening the first abrasive. Fine gypsum dust travels through occupied apartments, settles on trim, and can contaminate nearby work areas. Good setup prevents cleanup delays and protects the primer stage.
Sand only after the compound has dried fully. Use a fine drywall abrasive or sanding sponge with light pressure. Work across the feathered edge, keeping the abrasive moving so it does not dig into the joint or damage the board paper. A sanding pass should refine a properly built surface, not compensate for ridges, hollows, or rushed compound work.
Vacuum or wipe the wall carefully after sanding. Residual dust can weaken primer adhesion, especially around repaired joints and fastener dimples. Check the wall before priming, because defects are easier to correct while the surface remains uncoated.
Match the finish to the light
Finish levels indicate how much joint and fastener treatment the wall receives and how demanding the final appearance can be. A concealed service area does not need the same preparation as a living room with glossy paint, large windows, or strong recessed lighting.
- Level 1: Suitable for hidden areas above ceilings or inside service spaces.
- Level 2: Appropriate for utilitarian surfaces receiving limited finish treatment.
- Level 3: Used where heavier texture or a less demanding finish will hide minor variation.
- Level 4: The common painted-wall finish, with completed joints, corners, and fasteners.
- Level 5: Adds a full-surface skim coat over a Level 4 base to reduce joint telegraphing under critical or raking light. Specify it for galleries, long hallways, and rooms with floor-to-ceiling windows.
Level 4 can perform well in a bedroom with soft, diffuse light. The same finish may show joint shadows beside a large window or where light runs along a hallway wall. Level 5 does not correct bad framing, but it provides a more uniform base for demanding conditions.
Inspect under the room's actual lighting. Hold a work light at a shallow angle, view the wall across its surface, and mark defects before primer. Discuss trim, window exposure, paint sheen, and finish expectations early. A contractor providing interior painting and surface preparation can coordinate primer and final sheen with the drywall finish instead of treating them as unrelated handoffs.
Common Drywall Installation Mistakes to Avoid
In a NYC co-op or brownstone renovation, a wall can look ready for drywall while framing, rough-ins, or backing still need attention. Closing it too early turns a small coordination error into opened drywall, damaged finishes, and another visit from several trades. Most failures cluster at three control points: measurement, fastening depth, and unsupported edges.
Stop errors before the finisher arrives
- Measure every opening in place: Older framing is rarely perfectly square, and two rooms that appear identical may differ at the corners. Transfer reference marks, confirm ceiling and floor conditions, and test-fit difficult panels before applying compound.
- Control screw depth: Set each screw head just below the paper without breaking it. A torn face weakens the hold and can telegraph through the finish. Replace or supplement damaged fastening points according to the wall assembly.
- Support every joint: Install backing before hanging wherever panel edges, corners, or transitions do not land on framing. Joint compound can finish a seam, but it cannot support a floating edge.
- Stagger seams: Avoid continuous vertical or horizontal joints that concentrate movement and create a visible path for cracking. Plan the layout around openings and the framing grid.
- Check the plane: Correct bowed studs and shim uneven framing before panels go up. Finishing compound will not straighten a wall built out of plane.
- Protect the floor gap: Keep panels raised slightly from the floor and shield the lower edge from water during plumbing, flooring, and cleanup work.
Reviewing the trade guidance on drywall installation mistakes can reinforce these checks, but the jobsite inspection remains the authority. Mark every pipe, cable, box, and penetration before closure, then confirm that required rough work and inspections are complete.
The most expensive mistake is covering work inside the wall before it has been verified. A short pause can expose a leaking fitting, misplaced junction box, missing backing, or blocked service route while access is still easy. In renovation work, sequencing is a quality-control measure, not an administrative delay.
Planning Your Drywall Installation Timeline
A homeowner once asked whether drywall could be hung in a kitchen while the electrician and plumber finished “just a few small items.” Those items included a box that needed repositioning, a vent that had to be aligned with the new layout, and a water connection that hadn't been tested. Hanging the board immediately would have made the room look farther along, but it would've created rework before the cabinets could be installed.
A dependable sequence starts with approvals, demolition, framing corrections, and rough-in completion. The project manager then confirms insulation, backing, penetrations, and inspections before the drywall crew stages material. In an occupied apartment, the team also needs a plan for cutting, dust containment, elevator access, daily cleanup, and keeping residents away from active work areas.
Build the schedule around dependencies
The hanging phase can move quickly when the room is ready. The finishing phase can't be compressed safely by just adding more compound. Each coat needs to set or dry, and the crew must sand, inspect, correct defects, and prepare the surface for primer without trapping moisture or damaging the paper.
Coordinate the sequence with the trades that follow:
- Complete rough work: Plumbing, electrical, HVAC, insulation, and required inspections come before closure.
- Hang and secure panels: Confirm layout, backing, openings, screw depth, and floor clearance.
- Finish in stages: Tape, apply successive coats, allow drying, sand carefully, and inspect under useful lighting.
- Prime before finish work: Remove dust and verify that the surface is ready for paint, tile, millwork, or cabinetry.
- Protect the finished wall: Control traffic and prevent later trades from cutting or fastening without approval.
A co-op or condo renovation may also need board coordination, alteration-agreement compliance, building access windows, and elevator reservations. Brownstones bring different constraints, including stair transport, uneven existing walls, multiple floor levels, and occupied rooms that can't all be isolated at once. The contractor's renovation process should show who approves each transition and how the team handles changes discovered behind the old walls.
Patience at the drywall stage protects every finish that follows.
Excellent Home Improvement offers drywall installation from framing and hanging through taping, sanding, and Level 5 finishing, with project coordination for NYC residential renovations. If your co-op, condo, brownstone, or Westchester home needs careful sequencing around rough-ins and occupied spaces, visit Excellent Home Improvement to discuss the wall assembly and finish standard before work begins.