Egress Requirements for Basement in NYC
Egress requirements for basement work in NYC: the 6 sq ft opening, 36-inch sill, window wells, ADU doors, and DOB permit checks.
By Excellent Home Improvement & Remodeling
Buying an “egress window” isn't the first step in making a Bronx basement bedroom legal. A catalog label doesn't tell you whether the installed sash opens far enough, whether someone can reach it, or whether the opening faces a usable yard instead of a trapped areaway. The job starts with a measured escape path, not a window order.
For homeowners sorting through egress requirements for basement renovations, the useful question is whether the proposed room, opening, exterior space, and exit route work together. Draw those conditions before demolition. A window can fit the masonry opening perfectly and still fail the plan examiner's measurements.
Table of Contents
- Which Basement Uses Trigger an Egress Opening
- NYC and IRC Clear Opening Sizes
- Window Wells Ladders and Drainage
- Doors Stairs and the Route Outside
- Measure the Escape Path on Site
- Escape Path Checks Before Framing
- DOB Filings Inspections and Close-Out
- Lock the Use and Scope Before Demolition
Which Basement Uses Trigger an Egress Opening
The intended use sets the egress question. A basement sleeping room needs an emergency escape and rescue opening, while storage, recreation, and separate dwelling uses raise different review requirements. The plan should identify what the space will be used for before the opening or approval scope is chosen.
What each basement use must provide
Use this table to define the proposed scope. It does not establish that an existing basement is approved for that use.
| Intended use | What triggers review | Egress package |
|---|---|---|
| Storage or mechanical only | No sleeping and no dwelling | The NYC sleeping-room framework does not trigger an emergency escape opening solely because the space is below grade; confirm the building's applicable requirements |
| Recreation room, no sleeping | Finished habitable use without a bed | Review the existing exit stair, light, ventilation, and ceiling conditions; the stated use does not trigger a bedroom opening |
| Bedroom in a one- or two-family house | A room intended for sleeping | An emergency escape and rescue opening for each sleeping room, leading to a yard or public way |
| Basement apartment or ADU | Proposed separate occupancy, independent entrance, or kitchen | For a basement ADU, an exterior door directly outdoors with access to a public way, plus separate emergency escape and rescue openings for sleeping rooms |
A recreation room, a bedroom connected to the main house, and an independently occupied apartment call for different reviews. Their finished appearance may be similar, but filing, fire separation, ventilation, and exit questions depend on the proposed use. Label each room by its function on the plan, rather than relying on a broad term such as “den.”
The apartment row calls for particular care. The NYC Department of Buildings ADU FAQs state that the city's ADU laws became effective June 16, 2025. For a basement ADU, the requirements described include an exterior egress door with access to a public way, interior and exterior landings, and separate emergency escape and rescue openings for sleeping rooms.
That scope involves more than an enlarged window. Earlier renovation advice may not match the approval pathway for the project being proposed now.
Describe the occupants before the layout
Write a short use statement before selecting a window:
- Occupants: Identify who will use the basement and whether anyone will sleep there.
- Sleeping locations: Mark each proposed sleeping room, rather than labeling an entire floor plan “guest space.”
- Independent facilities: Identify a kitchen, separate entrance, and any proposed rental or independent household use.
- Existing approval: Establish the basement's approved use, rather than relying on how a previous owner furnished it.
A separate entrance or kitchenette signals that the dwelling-unit pathway needs review. It does not establish that the basement qualifies as an apartment. Egress compliance is one part of that approval, not a determination that the proposed dwelling is permitted.
Practical rule: Set the use the city is being asked to approve before choosing what opening to cut.
If the intended use remains unsettled, hold off on product selection. A recreation-room plan may not support the bedroom or apartment the owner intends to build.
NYC and IRC Clear Opening Sizes
For Bronx and five-borough work, use the NYC opening criteria as the local design test, subject to confirmation of the code provisions applicable to the building. Don't substitute a generic residential-code chart because the window supplier calls a product suitable for basement egress.
The 2022 NYC Building Code emergency escape and rescue provisions require 6 square feet of net clear area, minimum clear dimensions of 24 inches wide and 30 inches high, and the bottom of the clear opening no more than 36 inches above the floor. Those are usable-opening measurements under normal operation, not frame dimensions.
Basement emergency opening sizes, IRC and NYC
The comparison below separates the NYC criteria from the commonly referenced IRC provisions. The IRC figures describe a different code framework, not an alternative set of dimensions a NYC homeowner can elect to use.
| Check | 2021 IRC, typical outside NYC | 2022 NYC Building Code |
|---|---|---|
| Net clear area | 5.7 sq ft; 5.0 sq ft for a grade-floor opening | 6 sq ft |
| Minimum clear width | 20 inches | 24 inches |
| Minimum clear height | 24 inches | 30 inches |
| Bottom of clear opening | No more than 44 inches above the finished floor | No more than 36 inches above the floor |
| How it is measured | Usable opening in normal operation, not the frame or rough opening | Normal operation, not nominal sash size |
| Where it must lead | Emergency escape and rescue to the exterior | Directly to a public way or yard |
| When it applies | Basements and every sleeping room | Sleeping rooms below the fourth story and below-grade stories containing sleeping rooms |
Every applicable dimension must pass. Meeting the minimum width and minimum height doesn't automatically establish that the opening provides enough area. A wide but short opening can fail the height requirement, while an opening that meets both minimum dimensions can still fail the area requirement.
Measure what a person can actually pass through
Open the proposed window as it would normally be operated. Measure the unobstructed passage, accounting for the sash position and hardware that remain within it. For an existing unit, use a tape measure and photograph the measurement with the window open.
For a proposed unit, request the manufacturer's net clear opening information for the exact configuration. A product family can include different operating styles and sizes, so a dimension copied from another unit isn't sufficient. Put the selected model and its actual clear-opening dimensions on the drawing.
A double-hung window doesn't provide the entire glazed area as an escape opening. A casement may offer a useful opening arrangement, but hinges, sash position, and the surrounding areaway still matter. Choose the operating style after checking the installed geometry.
The exterior destination belongs in the same review. A sufficiently large sash facing an unusable lot-line condition doesn't settle compliance. Mark the yard or public way on the plan and show the physical relationship between it and the opening.
Write pass, fail, or not yet verified beside each check. Treat an unverified manufacturer dimension as a purchasing hold, not as an assumption the installer can sort out later.
Window Wells Ladders and Drainage
A below-grade window needs usable space outside it. The well or areaway must accommodate the open sash, the person escaping, and any climbing arrangement without turning into a narrow pocket against the foundation. That exterior geometry deserves a plan view and a section drawing.
For comparison, Boulder County's summary of the 2021 IRC emergency escape provisions describes wells with at least 9 square feet of horizontal area and minimum 36-inch width and projection, alongside the IRC opening dimensions shown in the comparison table. These are IRC reference dimensions, not a substitute for verifying the NYC areaway design.
Establish the footprint before excavation
As a hypothetical layout, a square well drawn at the minimum IRC width and projection has no spare footprint. An inward-projecting obstruction or a sash that occupies the standing space can make that bare-minimum arrangement impractical. Don't assume that a nominal well size equals usable interior space.
Measure between finished interior surfaces. Include retaining-wall thickness, waterproofing protection, and the actual position of the window rather than measuring only the excavation.
- Lot line: Establish where construction can legally sit before placing the outside wall of the well.
- Window operation: Draw the sash fully open so it doesn't collide with the retaining wall or climbing route.
- Obstructions: Show pipes, hose connections, meters, and other items that occupy the exterior pocket.
- Access at grade: Identify where someone arrives after climbing out and what surrounds that landing point.
Excavation can affect an existing foundation or neighboring construction. Have the design team resolve support and retaining conditions before treating the well as a landscaping task.
Coordinate climbing, water, and protection
Show the actual well depth and have the applicable ladder or step requirements resolved on the design. Don't rely on a movable household ladder or assume a person can pull themselves over a retaining wall. The climbing arrangement must work with the window open.
Drainage needs a destination. Draw the proposed drain and discharge arrangement, then have it checked for approval and compatibility with site conditions. Gravel alone doesn't establish where collected water will go.
A well that collects water is a poor escape space and a direct threat to the finishes you're installing inside.
If the design includes a cover or security grille, demonstrate how an occupant releases it from inside. Ask the design professional to verify the applicable release requirements and show the operation rather than leaving security hardware to a later purchase.
Guards address a different issue: someone falling into the opening from outside. Coordinate fall protection with escape access so a protective barrier doesn't become an obstruction.
Finally, draw the interior finished-floor elevation against the exterior grade. The well depth and the interior opening height are separate measurements. Passing one doesn't establish that the other works.
Doors Stairs and the Route Outside
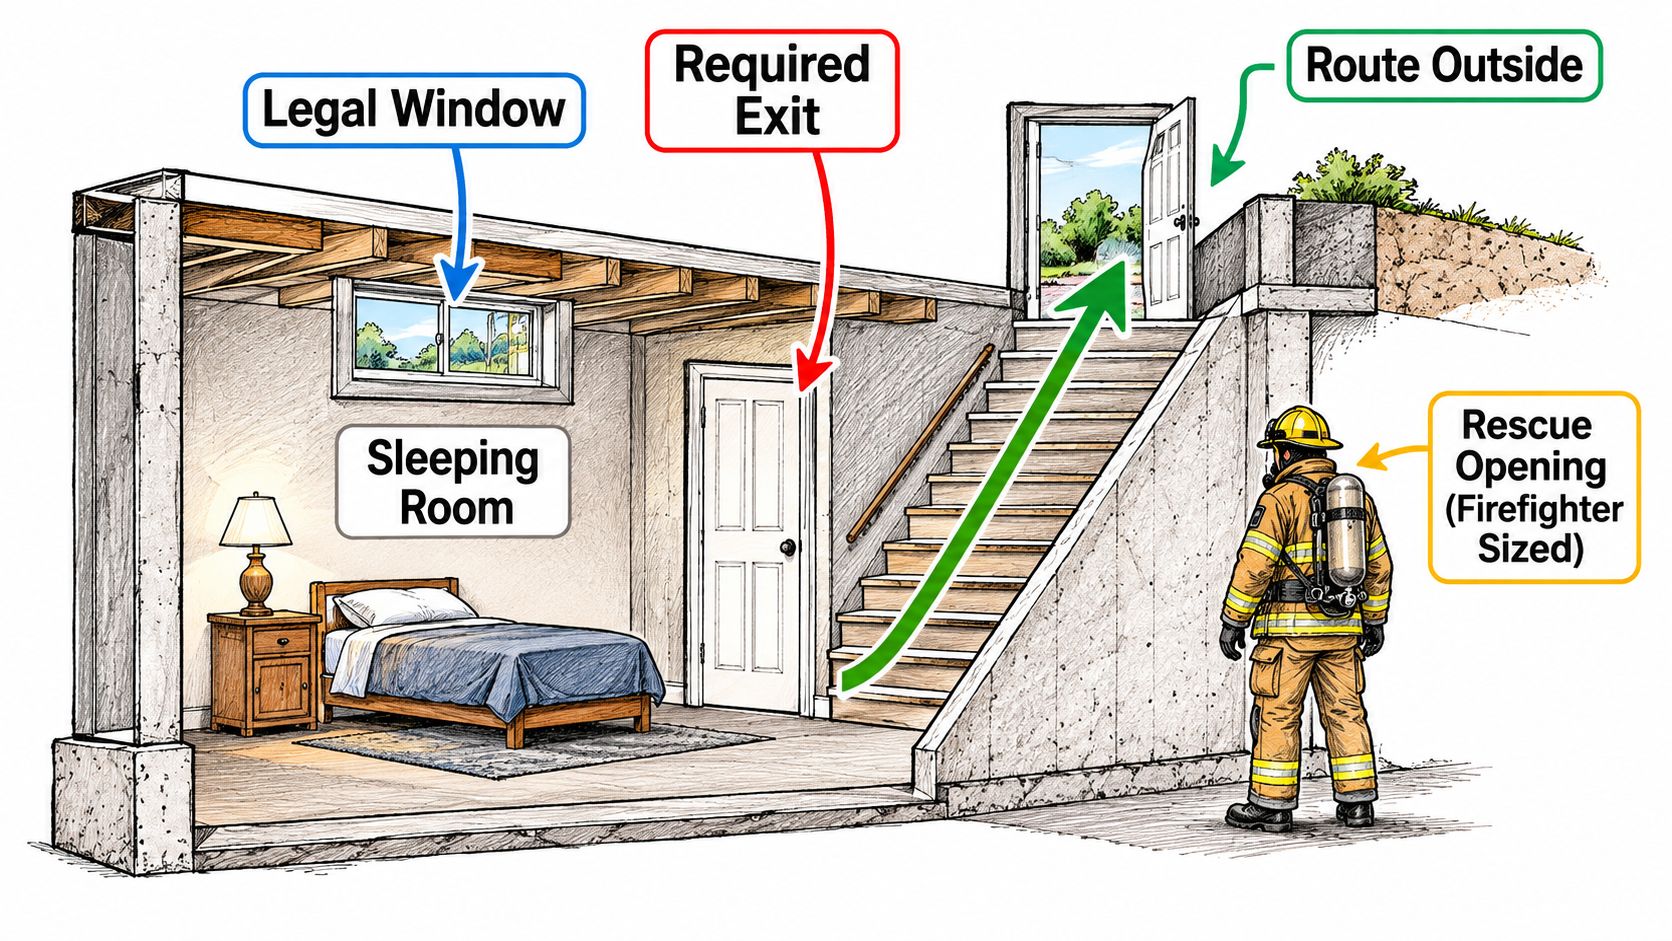
An emergency escape opening isn't automatically the required exit from a basement dwelling. A sleeping-room window serves escape and rescue functions. The dwelling's means of egress is a separate design question involving doors, stairs, landings, and the route outside.
The NYC Department of Buildings basement-apartment project requirements distinguish sleeping-room emergency openings from the basement ADU exterior-door requirement: at least one means of egress must open directly outdoors with access to a public way, with an inward-swinging door and compliant interior and exterior landings, subject to stated exceptions.
The distinction is easier to understand when the sleeping-room opening and the ordinary exit appear on the same drawing.
Trace the exterior door beyond the threshold
Start inside the proposed dwelling and trace the ordinary walking route through the exterior door. Draw its swing, the interior standing surface, and the exterior landing. Continue the line through the yard or passage to the public way.
A door drawn against an exterior stair can conceal a landing problem. A gate drawn as a thin line can conceal an access problem. Show how each component operates.
- Door swing: Check its relationship to nearby fixtures, partitions, and standing space.
- Landings: Show both sides, including changes in elevation and the start of any stairs.
- Passage: Identify fences, retaining walls, stored equipment, and narrow turns.
- Gate operation: Record how a person opens it while leaving the property.
- Public-way connection: Make the destination visible instead of ending the route at the edge of the basement plan.
A walled areaway requires careful evaluation, not an automatic pass because it's outdoors. The drawing must establish the applicable yard or public-way relationship and explain how occupants and rescuers use the space.
Keep the stair in the review
For a basement bedroom connected to the main house, assess the existing stair as part of the ordinary circulation route. The new emergency opening doesn't repair a compromised stair, an obstructed landing, or inadequate headroom.
Draw low beams, ductwork, handrails, and turns where they affect passage. A floor plan alone may hide an overhead obstruction, so add a section through the tightest point. Measure the condition rather than writing existing stair and leaving its adequacy unresolved.
Design distinction: Review the sleeping-room rescue opening and the dwelling exit as related systems, not interchangeable features.
Where an exterior door is part of the required package, settle its location before laying out the bathroom, kitchenette, or storage wall. Moving cabinetry is easier on paper than relocating a completed exit.
Measure the Escape Path on Site
A window catalog cannot decide whether a basement escape path works. The field sketch has to show the existing conditions, the proposed finished layout, and the measurements that let someone check the route against the applicable limits. Bring a tape measure, laser measure, level, graph paper, and camera. Use the same units throughout, and keep existing and proposed information distinct. Combining them without clear labels is how a good field measurement becomes a misleading construction drawing.
Start by identifying the room's intended use and marking its fixed features. Label the walls, current slab, existing stair, entrance, and kitchen facilities where present. Assign each photograph a location and direction so it can be matched to the plan. Use the opening-size and window-well checks to assess those components; this field record is for capturing their location and relationship to the rest of the basement.
Build a field record that can be checked
Work in a consistent sequence: establish the room outline, locate the window on its wall, then record the exterior features and changes in level needed to understand the route. Label each measurement with the point it starts from and the point it ends at. Mark unclear or concealed conditions as unresolved instead of filling gaps with assumptions.
- Interior elevation: Mark the existing slab and proposed finished-floor line.
- Window position: Locate the opening horizontally and vertically in relation to fixed walls.
- Exterior pocket: Record the areaway's width, projection, depth, and surrounding grade for review against the well requirements.
- Water management: Note visible drains, discharge connections, and signs of ponding.
- Site restrictions: Mark fences, gates, retaining walls, neighboring construction, and overhead obstructions.
- Walking surfaces: Note steps, uneven paving, headroom restrictions, and handrail conditions relevant to the route.
Record the planned floor build-up separately. Moisture-control layers, insulation, subfloor, and finish flooring affect the finished room geometry. Raising the floor changes its relationship to a fixed window and may also affect headroom, stair risers, and door clearances. Keep these effects visible on the drawing rather than relying on a note that says floor to be raised.
Turn measurements into a buildable sketch
Prepare a room plan and a section through the window and well. Use a consistent scale, label existing and proposed conditions, and identify the finished surfaces used as measurement references. The plan shows where features sit; the section clarifies vertical relationships. Photographs support the record, but they cannot replace a dimensioned drawing.
Basement finishing includes moisture control, insulation, framing, and finishes. Account for those assemblies before settling the proposed layout, so the drawing reflects the completed basement rather than bare masonry.
A concealed drain connection or unestablished lot line belongs on the sketch as an item to investigate. The person reviewing or building from it should be able to distinguish measured facts from assumptions and see what remains unresolved.
Escape Path Checks Before Framing
A catalog window can meet its listed dimensions and still fail as an escape path. Treat the measured drawing as a construction hold point: confirm the planned assembly against the approved details before framing or finishes make changes difficult. The sketch, not the product label, should govern the work.
Use this checklist for framing-stage conditions and inspection timing.
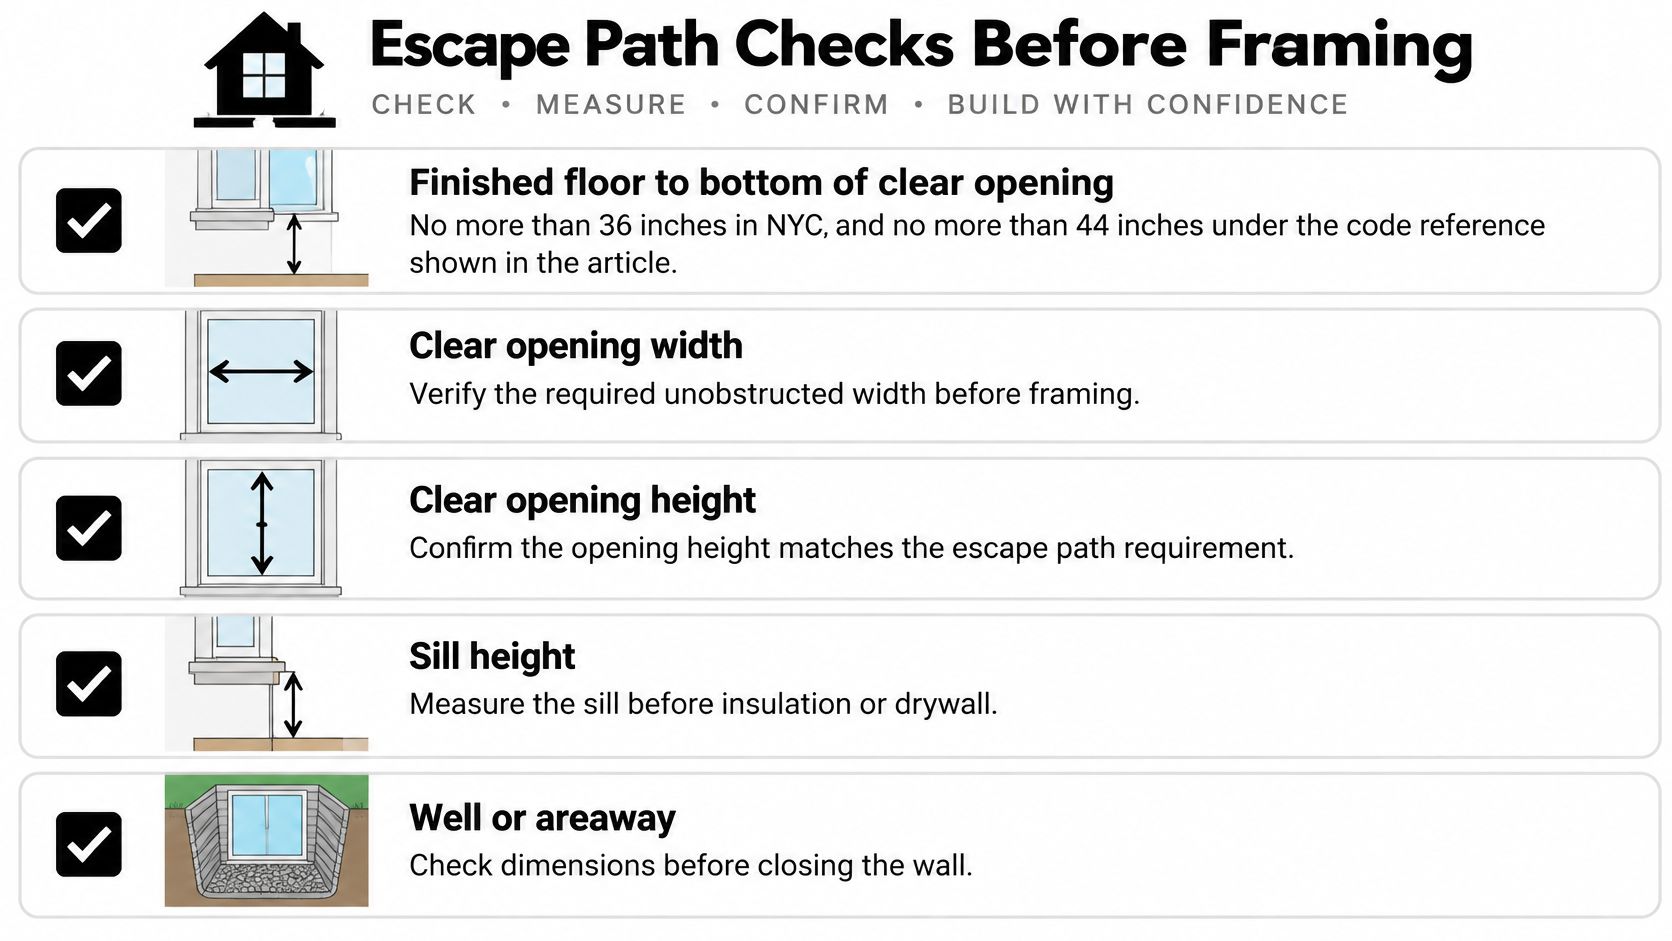
Check the assembly before closing walls
- Finished-floor datum: Mark the planned finished-floor level on the wall before framing fixes the opening's position.
- Framing and opening: Compare the framed opening and any structural work with the approved drawing before concealing them.
- Exterior space: Confirm that the well or areaway is built as drawn, with space for the sash to operate and the climbing arrangement to remain usable.
- Drainage and hardware: Check that the proposed water route is in place and that covers or protective hardware operate as intended.
- Dwelling exit: Where the plan includes a door and stairs, verify the connected route before finishes restrict access.
- Inspection timing: Identify required inspections and arrange them before the relevant work is covered.
Record the measurement, photograph the condition, and name the person who accepts it. Keep the evidence with the project drawing so the inspection can be coordinated with the actual construction sequence.
Resolve changes while the work is open
A substituted window can change how the assembly fits the framed opening or exterior space. Compare the delivered configuration with the approved project details before installation, and resolve any mismatch before work proceeds.
The planned route also needs protection during construction. Materials stored in a well or along an exit can obstruct access, while a changed fence or other site work can interrupt the route shown on the drawing. Mark the required area clearly so it stays available to the trades completing the work.
Revisions to the floor build-up can affect the opening's position relative to the finished floor, as well as headroom, stair transitions, and door clearances. Update the elevation marks and drawing before framing or installation continues.
Our renovation process coordinates project decisions with drawings, procurement, and construction sequencing. Use that coordination to settle unresolved details before authorizing work that would make a correction destructive.
If a field check fails, revise the detail and verify the changed work before it is concealed.
DOB Filings Inspections and Close-Out
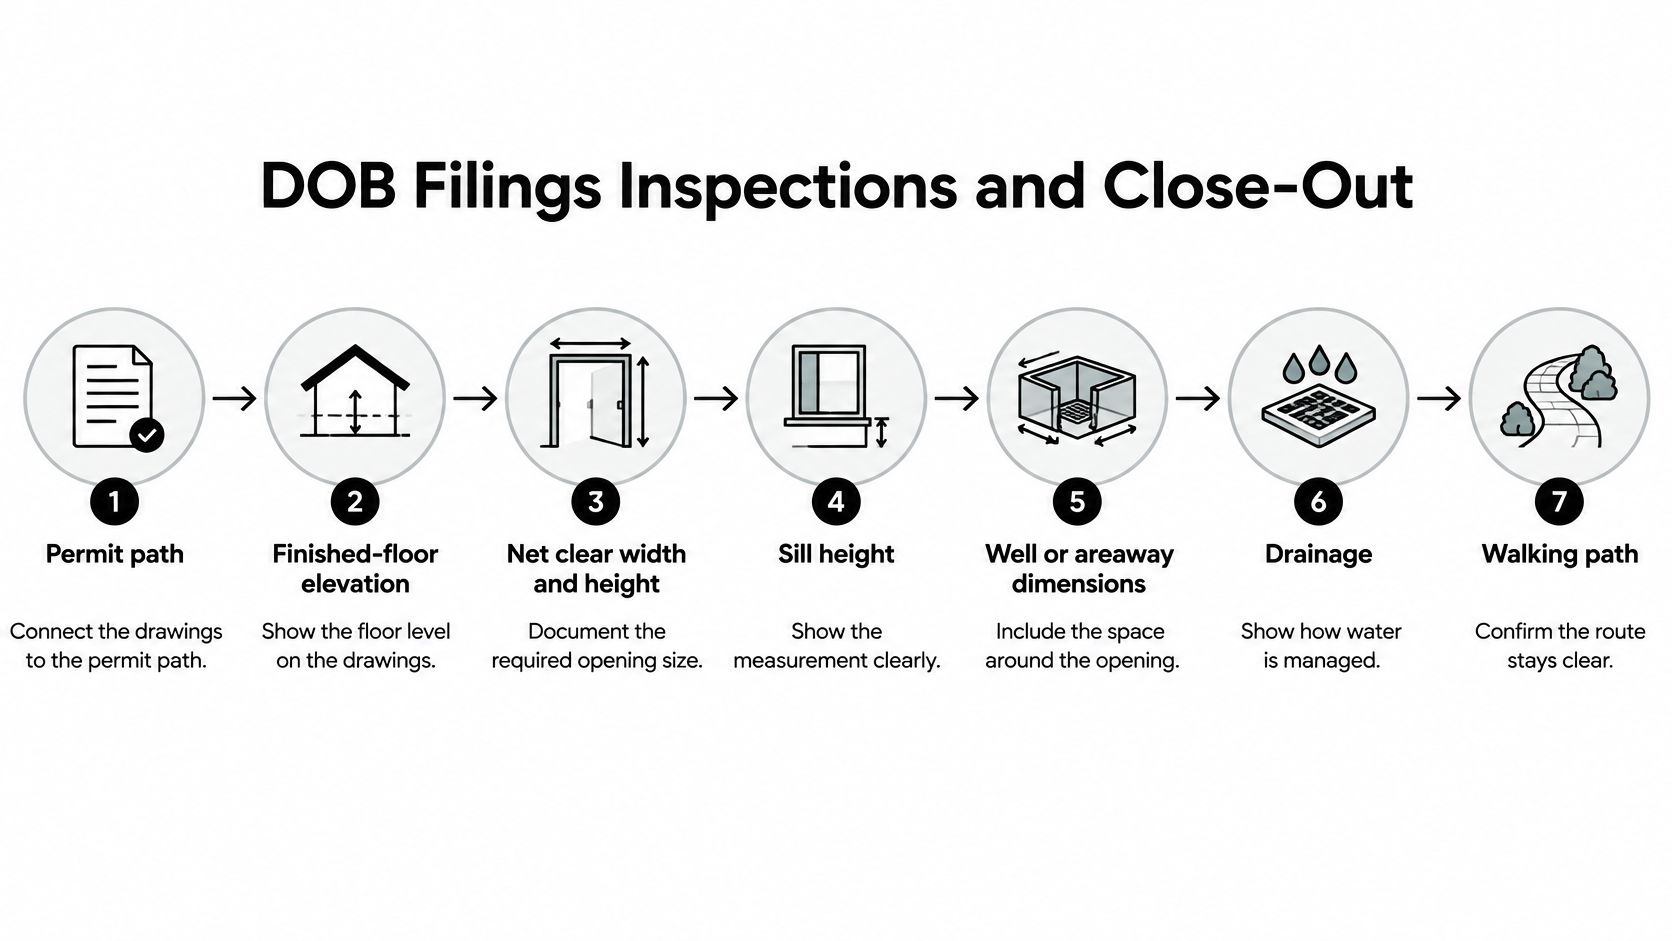
The window catalog does not decide whether a basement exit passes. The filed plans must connect the proposed use to the building's DOB requirements and show a measured escape path. A design professional should confirm the applicable filing pathway for the building, occupancy, and scope.
The drawing package should identify the finished-floor elevation, usable opening dimensions, opening height above the floor, exterior-space geometry, drainage proposal, and walking route. If the work enlarges a masonry opening, show and address the structural work in the construction scope.
Separate the scopes on the application
A basement conversion can involve building, plumbing, and electrical work. List each scope clearly, including a proposed bathroom or kitchenette, and make sure the room labels reflect the intended use. The opening enlargement is one part of the project, not a description of the entire renovation.
Excellent Home Improvement files Type 2 DOB permits, plumbing LAA filings, and electrical permits through licensed professionals, and handles sign-offs and close-outs. The filing pathway must still reflect the actual work. For help assessing responsibility, permits, and documentation, review this guide to hiring a licensed contractor in NYC. Confirm who prepares the drawings, files each trade scope, and tracks outstanding approvals.
Inspect before concealing the evidence
Plan the inspection sequence before excavation or interior closure. Ask the filing team what must remain visible and which inspections apply. Backfill, wall finishes, and completed floor assemblies can make verification and correction more disruptive.
- Before closure: Keep structural, drainage, and opening details accessible when they need inspection.
- During changes: Send layout or use revisions to the design and filing team for review, and document approved changes.
- At completion: Gather applicable inspection results, sign-offs, and close-out records.
- For building-managed properties: Coordinate alteration approval, access, work hours, and common-area protection.
Co-op and condo projects may require alteration packages and coordination to protect shared areas. For pre-1978 NYC buildings, lead-safe containment and dust control may also apply. Excellent Home Improvement is an EPA Lead-Safe Certified Firm.
Approval attaches to the use shown on the filed plans, not to the finished room. Egress compliance is one part of the legal review, alongside other occupancy requirements. Keep the close-out records with the approved plans so future work can refer to the documented scope.
Lock the Use and Scope Before Demolition
Before foundation work or stair-enclosure removal, put the project's acceptance conditions in writing. The scope should tell the homeowner, designer, filing professional, and site crew what must be built, reviewed, and documented. “Finish basement and install egress” leaves key decisions open.
Write the acceptance conditions
List specific deliverables, not broad promises:
- Measured design: Attach the plan and section, and identify the selected window's operating information.
- Construction boundaries: Describe masonry work, exterior excavation, drainage, structural support, and restoration where applicable.
- Approval responsibilities: Name the filing team, trade scopes, required inspections, and close-out duties.
- Change procedure: Require review before the window is substituted, the floor assembly altered, or the exit relocated.
Keep unresolved conditions visible in the agreement. If the exterior route, discharge arrangement, or permitted use still needs confirmation, mark it as a preconstruction item. Otherwise, the crew may discover after demolition that the written scope does not cover the work needed to meet the acceptance conditions.
A catalog window can meet its listed dimensions and still fail the project if the opening, exterior relationship, or route outside does not work. The plan and section should show how those parts fit together, and the scope should state who must confirm them before construction proceeds.
Set an acceptance checklist
Before signing, confirm that the contract identifies the drawing set, the selected opening, the limits of excavation and restoration, approval responsibilities, and the process for reviewing changes. Attach field measurements, photographs, and existing plans where available. This gives the project team a shared reference when site conditions differ from assumptions.
For an independently occupied basement, make the dwelling entrance and interior arrangement part of the documented scope. If the planned arrangement cannot meet the stated acceptance conditions, revise the design before work begins rather than leaving the issue for the crew to resolve in the field.
Excellent Home Improvement's basement renovation planning coordinates moisture control, framing, insulation, finishes, and egress with the project scope. At the walkthrough, bring the measurements, photographs, and existing plans, then have the agreed deliverables and unresolved items recorded in a signed scope checklist before demolition.