Interior and Exterior Painting Jobs: A NYC Homeowner Guide
Plan interior and exterior painting jobs with prep, materials, timelines, costs, lead safety, and seasonal tips tailored to NYC homes and brownstones.
By Excellent Home Improvement

You're standing in a Brooklyn brownstone with two paint problems competing for attention. The parlor needs a clean new finish, but outside, the window trim is peeling and the woodwork is beginning to soften. One contractor talks about color, another talks about scaffolding, and neither has explained how the two scopes affect each other.
That confusion is common because interior and exterior painting jobs are often sold as separate cosmetic upgrades. In practice, they're two environments connected by one building envelope. Paint workers handle a substantial skilled trade, with approximately 326,900 construction and maintenance painter jobs reported for 2025 and a median annual wage of $49,400 according to the U.S. Bureau of Labor Statistics occupation overview. A sound plan accounts for preparation, labor, access, occupant protection, moisture, lead safety, and finish quality before anyone opens a paint can.
Table of Contents
- Why Interior and Exterior Painting Jobs Deserve One Plan
- How Interior and Exterior Painting Jobs Actually Differ
- Surface Preparation That Drives Real Cost and Longevity
- Choosing the Right Paint System for Each Side of the Wall
- Timelines, Sequencing, and the Best Season to Paint in NYC
- What a Real Painting Estimate Should Include
- Maintenance, Lead Safety, and When to Repair Instead of Repaint
- A Homeowner's Checklist Before the Crew Arrives
Why Interior and Exterior Painting Jobs Deserve One Plan
A brownstone owner may schedule the parlor first because it's visible to guests. The exterior seems like a separate project, perhaps something to handle after the weather improves. That approach can create avoidable rework. Window replacement, exterior scraping, masonry repair, and scaffold access can affect freshly painted interior trim, floors, and window coverings.
The shared asset is the building envelope. A failed exterior joint can allow water into a wall that later stains interior plaster. A window opened during exterior preparation can bring dust into a finished room. On an older property, decades of opening and closing those windows may also mean that exterior and interior coatings need to be evaluated together.
Safety belongs in the first conversation
Age changes the planning rules. The Environmental Protection Agency's lead-paint summary states that about half of homes built before 1978 contain lead-based paint. The likelihood is higher in older housing, including approximately 87% of homes built before 1940, compared with 24% of homes built between 1960 and 1978, according to the same EPA material.
That matters in NYC apartments, brownstones, and townhouses because sanding, scraping, trim replacement, and window work can disturb more than the visible finish. If the work falls under the federal Renovation, Repair, and Painting framework, the firm generally needs appropriate certification, trained workers, containment, dust control, and documented cleanup.
Practical rule: Treat the parlor, window openings, exterior trim, and façade as one coordinated work zone until the contractor proves they can be separated safely.
Coordination can reduce disruption
Exterior work may involve access equipment, sidewalk protection, building approvals, and neighbor communication. Interior work involves furniture, HVAC registers, floors, occupied rooms, and daily cleaning. Scheduling both scopes under one project manager can reduce repeated mobilization, mismatched color decisions, and the risk that one crew damages another crew's finished work.
The right plan doesn't always mean completing everything at once. It means deciding the sequence before the contract is signed. Exterior repairs may need to precede interior finish work, while interior preparation may be completed before exterior access equipment arrives. The decision should follow the building's condition, not a generic promise of speed.

How Interior and Exterior Painting Jobs Actually Differ
Paint behaves differently because the surfaces live in different environments. Interior coatings face ordinary abrasion, fingerprints, cleaning, cooking residue, lighting, and relatively stable conditions. Exterior coatings face ultraviolet exposure, wind-driven rain, pollution, temperature changes, biological growth, and movement in wood, masonry, and metal.
Start with the exposure, not the brand name
For an exterior wall, the coating system needs suitable flexibility, adhesion, and resistance to moisture. Acrylic-based exterior coatings and specialty flexible systems may work well when matched to the substrate and properly applied. The product alone won't stop blistering if water enters through failed caulk, open joints, defective flashing, or masonry cracks.
Interior rooms need a different balance. A wall coating may be selected for low odor, washability, scuff resistance, and the sheen appropriate to the room. A bathroom, hallway, child's room, and formal parlor don't experience the same cleaning or lighting conditions, so using one finish everywhere can produce disappointing results.
Labor and access change the scope
Interior labor usually centers on moving or protecting belongings, masking, patching, sanding, cutting in, rolling, and cleaning. Exterior labor adds height, weather, access, surface exposure, and public protection. Ladders may be adequate for limited work, while taller or more complex buildings may require scaffold systems or other access equipment.
Inspection also changes. Interior work can be reviewed room by room under controlled light. Exterior work needs inspection from multiple elevations, with attention to caulk joints, trim edges, water-shedding details, and areas that receive different sun and rain exposure.
| Factor | Interior | Exterior |
|---|---|---|
| Main exposure | Cleaning, impact, cooking residue, indoor humidity | UV, rain, wind, temperature changes, pollution |
| Substrate movement | Usually limited, except for settling or moisture damage | Common in wood, masonry joints, trim, and metal |
| Preparation | Patch, sand, seal stains, protect furnishings | Clean, scrape, repair water entry, caulk, prime |
| Access | Rooms, stairs, furniture, occupied spaces | Ladders, scaffolds, lifts, setbacks, public areas |
| Product priorities | Washability, low odor, sheen, scuff resistance | Adhesion, flexibility, moisture management, weather resistance |
| Inspection | Even coverage, edges, repairs, sheen consistency | Coverage, adhesion, drainage, joints, exposed substrate |
A common mistake is to treat exterior paint as a tougher version of interior paint. Exterior products can contain additives and chemistry that aren't appropriate for occupied interiors. The correct system depends on where the coating will cure and what it must withstand.
Surface Preparation That Drives Real Cost and Longevity
The topcoat gets attention because it supplies the visible color. Preparation determines whether that color has a stable surface beneath it. A clean, sound wall and a peeling, moisture-damaged wall may have similar dimensions, but they don't represent similar labor.
Read the substrate before choosing the method
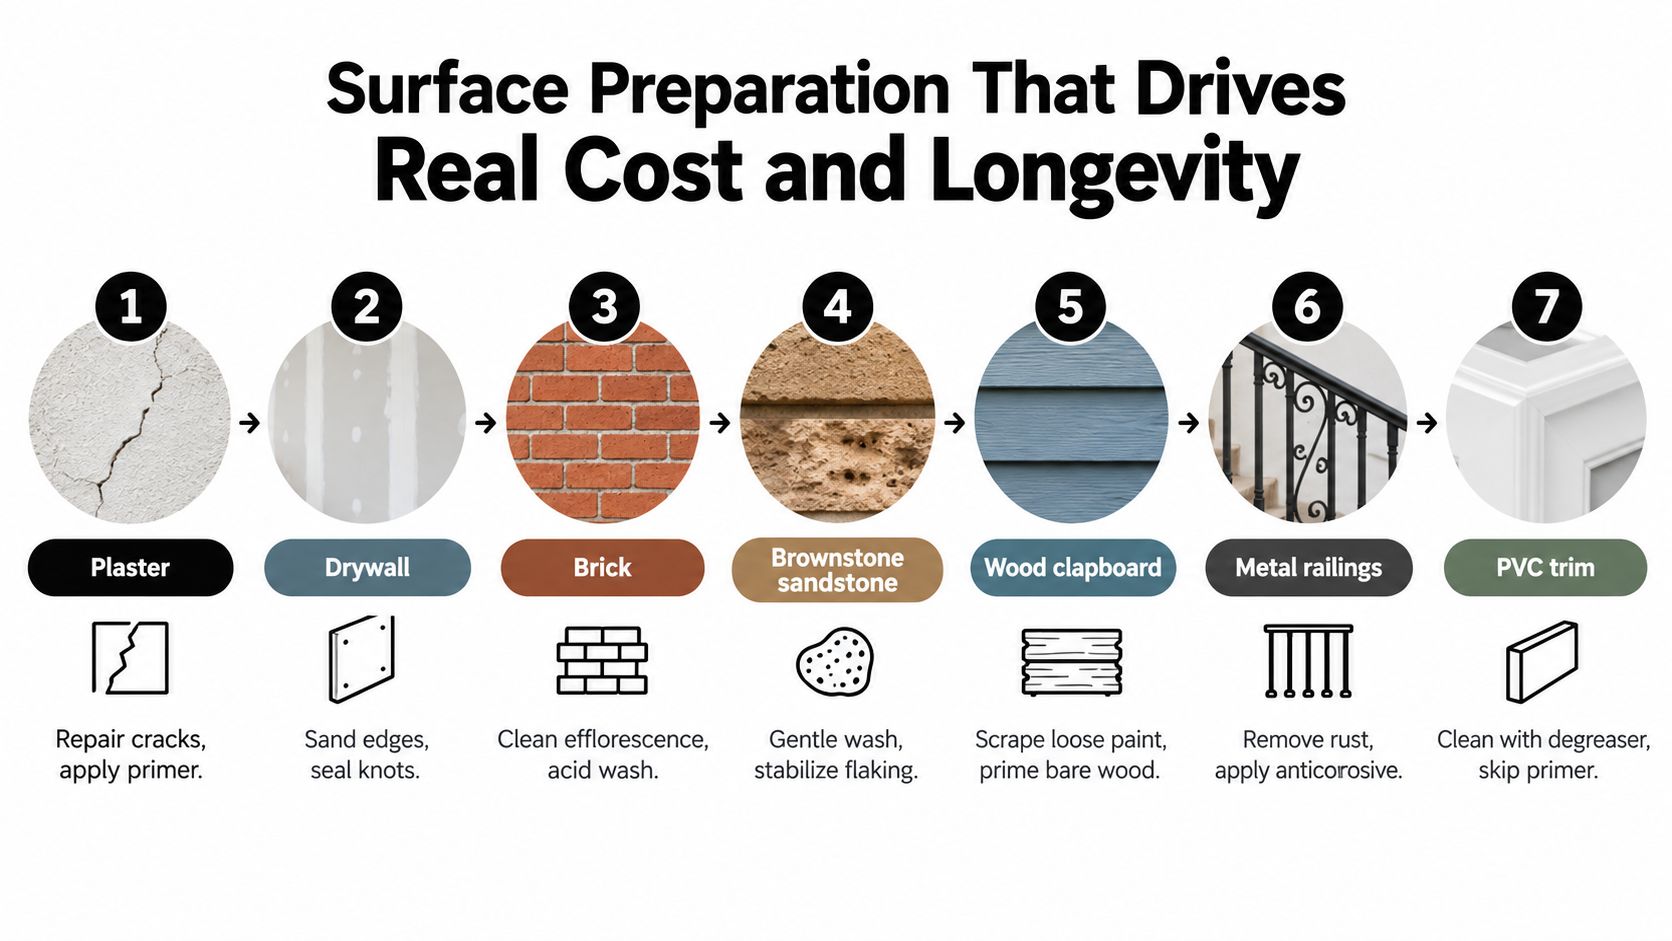
Plaster may need crack repair, consolidation, and a compatible primer. Drywall often needs joint and fastener correction, feathered sanding, and sealing over patches. Brick requires careful cleaning and evaluation of mortar joints. Brownstone sandstone needs gentler treatment than a hard, painted masonry surface, especially where the stone is porous or already flaking.
Wood clapboard may require scraping loose paint, sanding edges, replacing damaged boards, and priming exposed areas. Metal railings need rust removal and an anticorrosive primer. PVC trim must be clean and free of contaminants, with a product system compatible with the plastic. A bid that calls every surface “prep” without naming the method leaves too much room for substitution.
Moisture has to be corrected first
Paint can't compensate for water entering behind the film. Before coating an exterior, the crew should look for failed caulk, open joints, roof or gutter discharge, defective flashing, masonry cracks, and other paths that keep the substrate wet. On interiors, a stained ceiling, bubbling plaster, or recurring mildew may indicate a leak, condensation problem, or moisture migrating through the wall.
A contractor can use visual inspection, probing, and moisture measurement to distinguish surface failure from deeper damage. If the substrate is still wet or moving, applying another coat only hides the symptom temporarily. The estimate should identify the repair, who performs it, and what happens if additional damage appears after loose paint is removed.
Lead-safe preparation changes the worksite
For paid renovation work that disturbs painted surfaces in pre-1978 homes, the EPA RRP program requirements generally call for a certified firm and trained workers using lead-safe practices. EPA guidance specifies that interior containment should extend at least 6 feet in all directions from the disturbed area, while exterior containment should extend at least 10 feet, as described in that program guidance.
That can mean sealed doors and HVAC registers, protected floors and furnishings, wet scraping, controlled sanding, suitable HEPA cleanup, and post-work verification. The preparation and documentation can be a major part of the scope, particularly in an occupied apartment. Homeowners comparing bids should ask whether containment, cleaning, testing, and records are included rather than assuming they are part of ordinary masking.
For a detailed related scope, review the drywall installation service information, particularly when damaged plaster or drywall needs repair before painting.
Choosing the Right Paint System for Each Side of the Wall
A paint specification should identify more than a color and a finish. It should name the substrate, primer, binder type, sheen, number of coats, surface preparation, and application conditions. Those details tell you whether the contractor has designed a system or just selected a product from a color card.
Compare the chemistry to the environment
Interior coatings generally prioritize hardness, washability, appearance, and lower odor during occupied work. Acrylic systems are common, while alkyd or hybrid products may be selected where a harder finish is needed, such as certain trim or doors. Exterior coatings need adhesion and flexibility as the substrate expands, contracts, wets, and dries.
Primer selection should follow the problem:
- Water stains: Use a stain-blocking primer after the moisture source has been corrected.
- Glossy or difficult masonry: Use a compatible bonding primer where the surface lacks a reliable mechanical bond.
- Bare or rusty metal: Use a rust-inhibiting system suited to the metal and exposure.
- Bare wood: Seal exposed areas before finish coats to reduce uneven absorption.
- Brownstone and porous masonry: Confirm that the coating allows the assembly to manage moisture instead of trapping it.
Exterior paint shouldn't be brought inside just because it sounds more durable. Exterior additives and curing requirements may be inappropriate for occupied rooms. Likewise, an interior finish won't provide the weather resistance required on a façade.
| Attribute | Interior | Exterior |
|---|---|---|
| Binder priority | Hardness, cleanability, controlled appearance | Adhesion, flexibility, weather resistance |
| Primer choice | Stain blocking, drywall sealing, bonding | Bare wood, masonry compatibility, corrosion control |
| Sheen | Selected by cleaning, lighting, and room use | Selected with attention to substrate and appearance |
| Moisture strategy | Control leaks and indoor humidity | Correct water entry and allow suitable drying |
| Color decision | Light reflectance and room conditions | Sun exposure, heat cycling, surrounding materials |
| Application limits | Occupancy, ventilation, curing time | Temperature, humidity, wind, rain, substrate condition |
Brownstone decisions require restraint
A breathable coating may be more appropriate for some porous masonry than a dense film-forming product, but the decision depends on the existing coating and condition. On wood trim and fences, a semi-transparent stain can preserve visible grain where a solid color would create a more opaque film. Neither choice is automatically superior. The finish has to match the substrate and the repair strategy.
New York projects also need to comply with applicable local requirements for coatings and indoor air quality. Ask for the product's technical data and safety information, not just a verbal assurance that it is suitable.
Timelines, Sequencing, and the Best Season to Paint in NYC
Painting schedules fail when they're built around the number of rooms instead of the work sequence. A small apartment with extensive patching, occupied furniture, and trim repair can take longer than an empty apartment with more wall area. A brownstone exterior may pause while the crew waits for safe access, dry surfaces, repairs, or suitable weather.
Build the sequence around risk
A practical sequence usually looks like this:
- Inspect and document: Identify substrate defects, moisture sources, lead-related concerns, access constraints, and surfaces included in the scope.
- Complete repairs: Address leaks, failed joints, damaged plaster, rotten wood, masonry defects, and unstable coatings.
- Prepare and contain: Protect occupants and adjacent finishes, then clean, scrape, sand, patch, and prime according to the substrate.
- Apply finish coats: Follow the product's conditions for temperature, humidity, recoat time, and curing.
- Inspect and close out: Review coverage, edges, repairs, cleanup, and touch-ups before final payment.
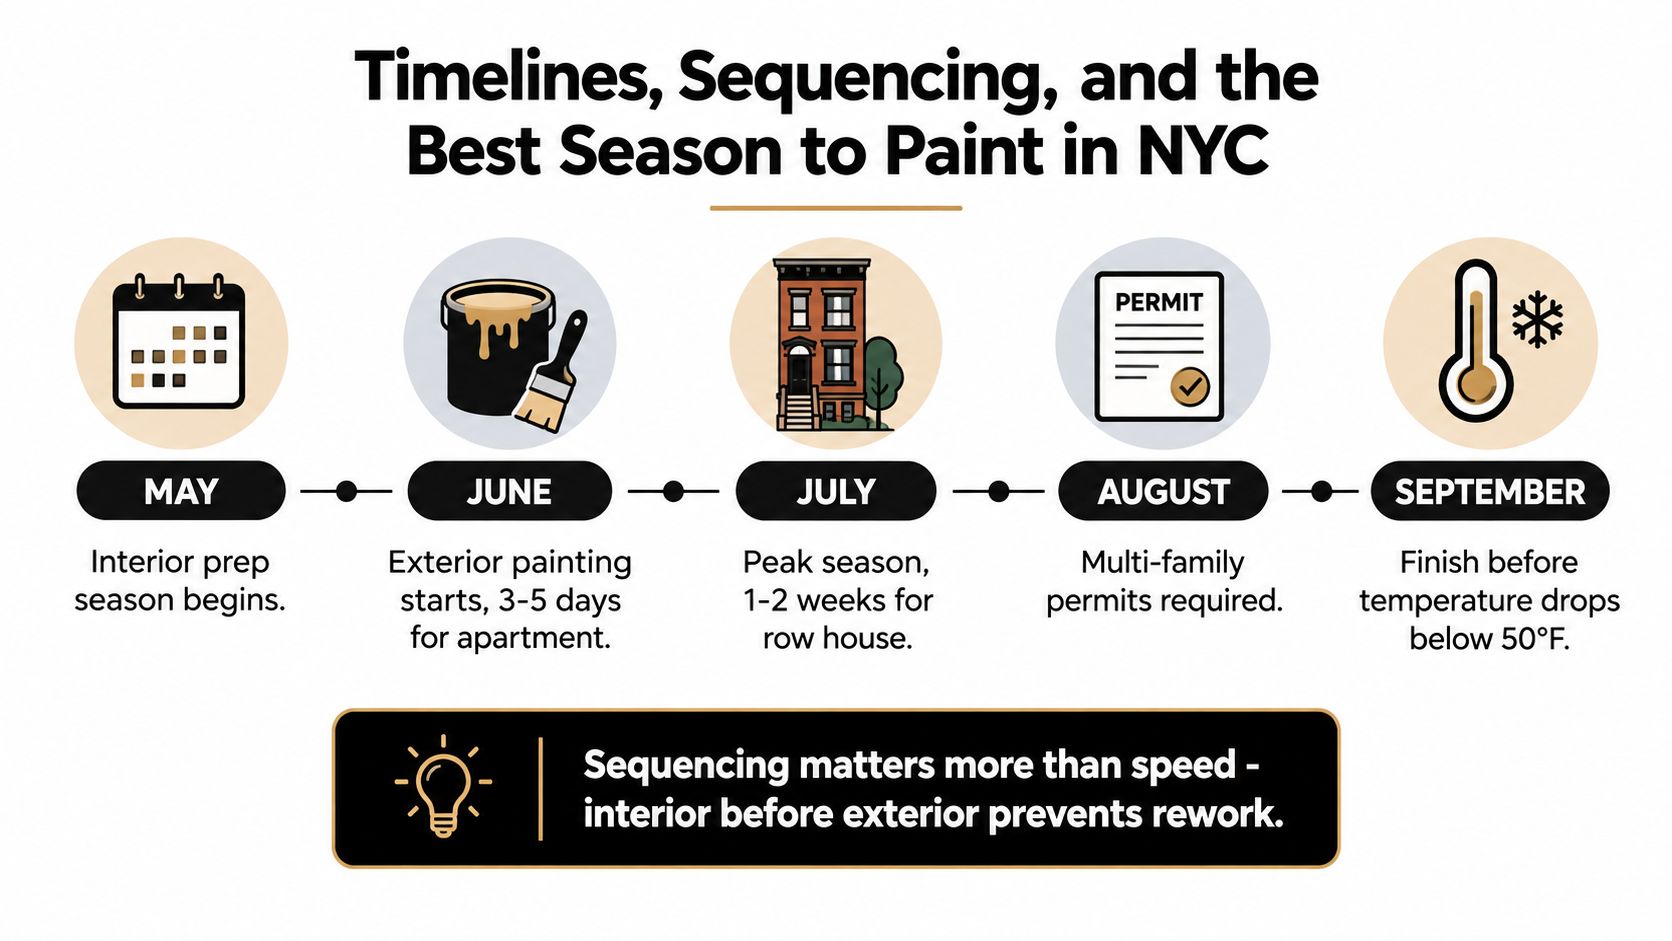
Exterior work generally has a broader weather risk than interior work. Late spring and early fall are often more workable because crews can find steadier drying conditions, while winter can create adhesion and curing problems. A contractor should not promise a fixed exterior finish date without explaining what happens during rain, high wind, damp substrates, or unsuitable temperatures.
Coordinate access and approvals early
Exterior work on a multifamily building may involve building approvals, access equipment, sidewalk protection, and communication with residents or neighbors. The contractor should identify which party handles permits, filings, sidewalk-shed requirements, inspections, and building management coordination.
Bundling interior and exterior work can make sense when the same crew, access setup, and project manager can coordinate both scopes. It can be a poor choice when exterior demolition or heavy scraping would expose a finished interior to dust, vibration, or repeated traffic. In that case, finish the disruptive exterior preparation first, then protect the interior during final work.
A fast crew with a bad sequence doesn't finish faster. It creates touch-ups, delays, and arguments about what the original scope included.
What a Real Painting Estimate Should Include
A credible estimate lets you compare work, not just totals. It should show which surfaces are included, what preparation will occur, how many coats are planned, which products will be used, and what conditions trigger a change order.
Read labor as tasks
“Paint three rooms” isn't a useful labor description. The estimate should separate wall preparation, ceiling work, trim, doors, cabinets, furniture protection, masking, application, cleanup, and inspection. Height, stairs, detailed millwork, occupied rooms, and difficult access all increase labor even when the painted area remains the same.
Materials deserve similar detail. Look for primer, finish paint, caulk, patching compound, abrasives, masking materials, protective coverings, and cleanup supplies. If the proposal names only “paint and labor,” ask what happens when the crew finds stained drywall, loose caulk, rotten trim, or a second finish coat becomes necessary.
| Line Item | What's Included | Red Flag |
|---|---|---|
| Surface preparation | Cleaning, scraping, sanding, patching, repairs identified by area | “Light prep” with no method or limits |
| Primer | Product type and surfaces receiving it | Primer omitted despite stains or bare substrate |
| Finish coats | Product, sheen, color, and coat assumptions | No product name or unclear coat count |
| Trim and doors | Sanding, masking, brushing, spraying, or removal | Included casually under wall square footage |
| Protection | Floors, furniture, fixtures, windows, HVAC registers | Homeowner expected to protect everything |
| Exterior access | Ladders, scaffold, lift, sidewalk protection, permits | Access treated as an unspecified extra |
| Lead-safe work | Certification, containment, cleaning, testing, records | No mention for a pre-1978 disturbance |
| Closeout | Walkthrough, punch list, touch-ups, cleanup | Final payment due without inspection |
Control the places where scope expands
A strong contract explains exclusions and allowances. It should say whether carpentry, plaster repair, masonry stabilization, or drywall replacement is included. It should also state how concealed conditions are priced, who approves additional work, and whether weather delays extend the schedule without penalty.
Payment milestones should correspond to identifiable progress, such as completed preparation, finish application, and final walkthrough. Retainage can be useful when the contract permits a reasonable balance to remain until punch-list items are addressed. Warranty language should identify what is covered, what maintenance the homeowner must perform, and what failures are excluded because of movement, leaks, or uncorrected moisture.
For a planning starting point, homeowners can use the painting cost calculator, then replace any broad estimate with a site-specific written scope. Online ranges can't see your plaster, façade, access, or hidden water damage, so they shouldn't replace an inspection.
The Angi homeowner project data reports that 54% of homeowners struggled to find qualified professionals in 2025, and that more than half of completed projects encountered surprise expenses. Those figures reinforce a practical point: qualification and change-order controls matter as much as the initial price.
Maintenance, Lead Safety, and When to Repair Instead of Repaint
A fresh coat isn't always the right repair. Paint can cover a sound, dry, properly prepared surface. It can't stabilize a failing cornice, stop active water intrusion, replace rotten wood, or correct plaster that has lost its bond to the lath.
Maintain the conditions beneath the coating
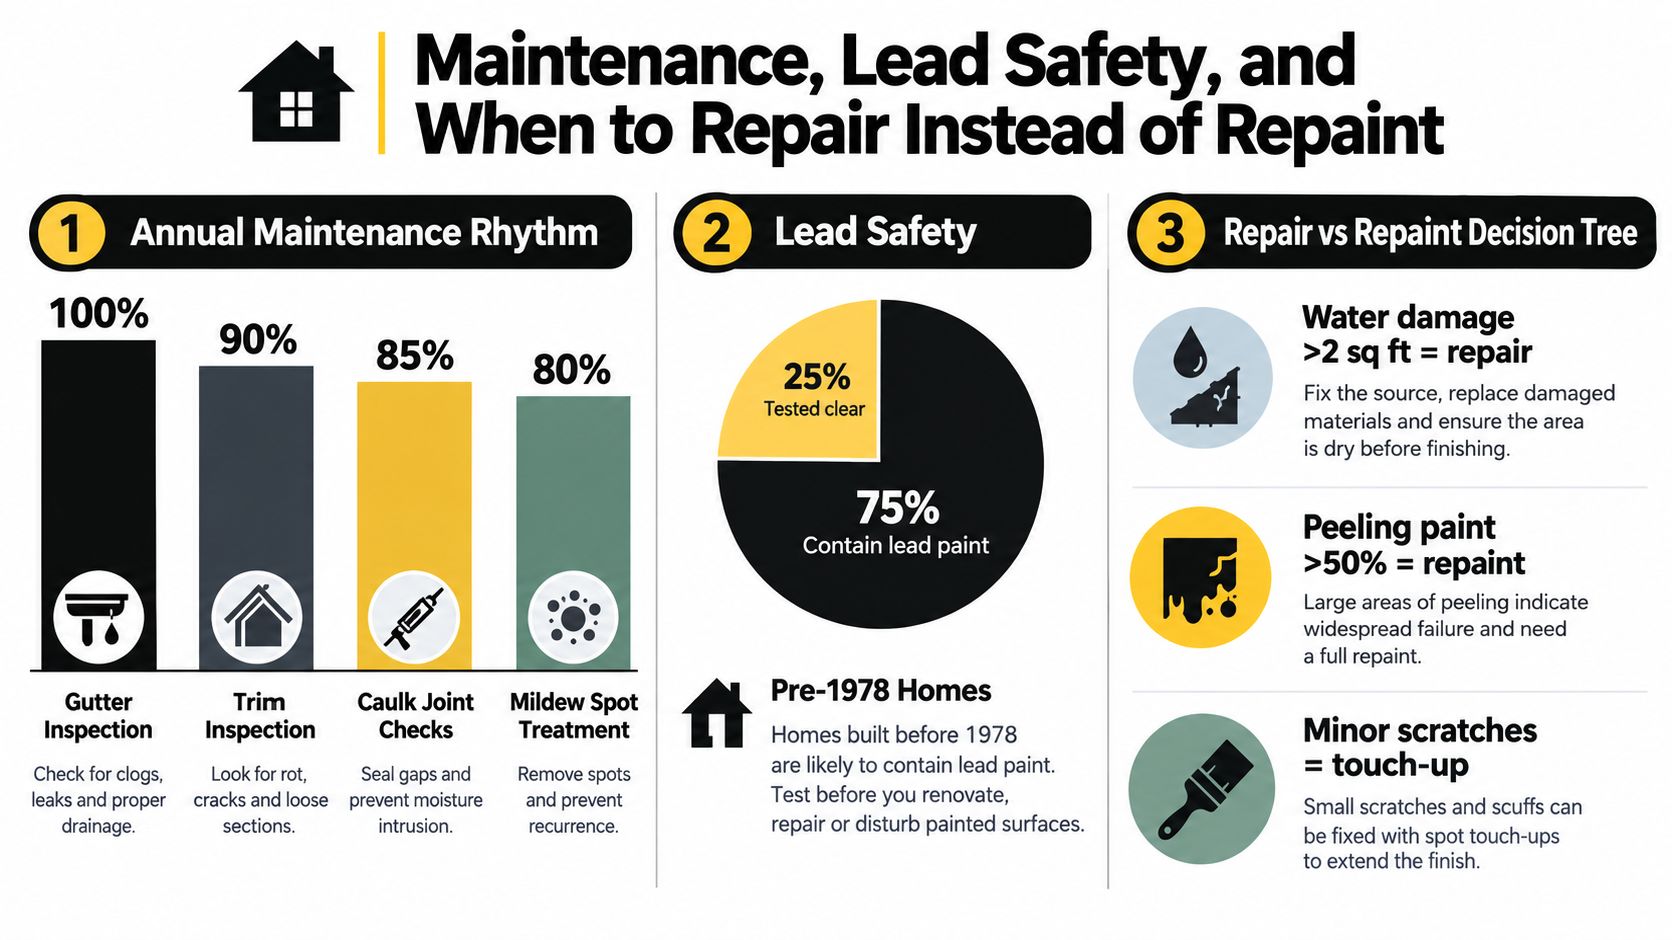
A sensible maintenance rhythm includes inspecting gutters and trim, checking caulk joints, treating mildew spots promptly, and wiping high-touch interior areas with methods appropriate to the finish. The exact repaint interval depends on exposure and substrate. Wood siding, stucco, brick, and metal railings fail differently, so a calendar promise is less useful than a condition-based inspection.
Repair first when you find:
- Active moisture: A recurring stain, damp wall, bubbling coating, or leak path needs diagnosis before painting.
- Structural masonry damage: Spalling lintels, loose stone, and failing brownstone details require compatible repair.
- Rotten or unstable wood: Paint may hide deterioration while leaving the trim unable to hold fasteners or coating.
- Substrate movement: Cracks that reopen, separating joints, or shifting trim need a building-repair solution.
- Widespread coating failure: Loose layers must be removed and the underlying surface evaluated rather than sealed blindly.
Make lead safety specific
The RRP framework generally applies when paid work disturbs painted surfaces in pre-1978 housing. The contractor should explain whether the work is ordinary repainting, regulated renovation, or formal lead abatement. Those categories aren't interchangeable, and repainting isn't automatically remediation.
EPA's federal lead action progress report states that 37,903 renovators were certified nationally in FY2025 and notes that lower dust-lead hazard and post-abatement clearance standards were finalized in November 2024. Homeowners should request certification information, the containment plan, cleaning procedures, test or presumption documentation, and closeout records when the scope triggers the rule.
Exterior work also needs an indoor contamination plan. Chips and dust can travel through doors, windows, footwear, landscaping, and shared building paths. A crew that focuses only on the painted wall hasn't addressed the full occupant pathway.
Decision rule: If the substrate is sound, dry, and stable, paint it. If it's moving, wet, rotten, or flaking beyond the surface, repair it first.
A Homeowner's Checklist Before the Crew Arrives
Use the week before mobilization to close gaps that otherwise become delays or change orders.
Documentation
- Signed scope: Confirm every room, elevation, trim surface, repair, coat assumption, and exclusion.
- Safety records: Request the lead-safe notice, certification information when applicable, insurance certificates, and containment plan.
- Finish schedule: Record colors, sheen, primer, substrate, and product assumptions for each surface.
- Payment terms: Tie installments to visible milestones and define the final walkthrough.
Site access
- Building coordination: Reserve elevators where required and notify management, neighbors, or shared-entry residents.
- Exterior logistics: Confirm parking, access equipment, sidewalk protection, permits, and daily access hours.
- Key control: Decide who holds keys, how the crew enters, and how the property is secured at the end of each day.
Protection and occupancy
- Furniture and belongings: Move fragile items and agree on what the crew will move, cover, or leave in place.
- Children and pets: Arrange a safe area away from dust, tools, wet coatings, and exterior work zones.
- Ventilation: Plan climate control and ventilation without sending dust through the HVAC system.
- Wall contents: Remove artwork, curtains, shelves, and fixtures before the first preparation day.
Verification
- Daily walkthrough: Review completed areas, access changes, and newly exposed conditions.
- Photo log: Photograph moisture concerns, repaired surfaces, concealed conditions, and finished work.
- Punch list: Use a written list for missed coverage, drips, damaged protection, and agreed touch-ups.
- Closeout records: Collect product information, cleaning verification where applicable, warranty terms, and final approval.
A coordinated project brings prep, product, timing, cost, safety, and maintenance into one decision. The interior and exterior painting services you select should reflect that whole-building view, whether the property is a Bronx apartment, a Westchester home, a co-op, or a historic townhouse.
Excellent Home Improvement offers coordinated interior and exterior painting, including surface preparation, repairs, lead-safe containment, trim work, and finish application for NYC homes. If your project involves an older building, moisture concerns, occupied rooms, or several connected surfaces, visit Excellent Home Improvement to request a site walkthrough and written scope.