Interior Painting for Living Room: A Complete Guide
Plan interior painting for living room projects with confidence. Color, sheen, prep, accent walls, trim work, and DIY versus contractor decisions explained.
By Excellent Home Improvement

You've chosen the color, bought the paint, moved the sofa, and started rolling. Then daylight hits the wall and exposes every patch, seam, lap mark, and dull strip beside the window. That's the moment many homeowners discover that interior painting for a living room isn't mainly a color-picking exercise. It's a sequencing and judgment problem.
A durable, clean result depends on the surface beneath the finish, the order of operations, the room's light, the paint's sheen, and the conditions during drying. In older New York homes, the plan also has to account for plaster, pre-1978 painted surfaces, building access, occupied rooms, and co-op requirements.
Table of Contents
- Why Living Room Painting Is Really a Sequencing Problem
- Preparing the Room and Walls Before a Single Drop Goes On
- Choosing Colors and Sheen That Actually Work in a Living Room
- Cutting In, Rolling, and Holding a Wet Edge
- Accent Walls That Earn Their Place
- Trim, Doors, and Ceilings as a Separate Stage
- DIY, Partial DIY, or Hiring a Contractor
Why Living Room Painting Is Really a Sequencing Problem
A living room can look worse after painting when the team starts with the most visible decision, the color, instead of the first necessary decision, the condition of the surface. Premium paint can't hide an unsanded repair, wallpaper paste, grease, chalking residue, or a glossy patch that never received proper preparation.
The project works as a chain:
- Assess the room. Identify plaster, drywall, old coatings, stains, cracks, loose paint, and areas affected by furniture or heating.
- Protect the space. Stage furniture, isolate dust, cover floors, remove plates, and plan access through the building.
- Prepare and repair. Clean, degloss, fill, sand, and remove anything that can interfere with adhesion.
- Prime selectively or completely. Match the primer to the problem rather than treating every wall the same.
- Apply the finish. Cut in, roll while the edge remains wet, and maintain a consistent film.
- Finish trim and inspect. Address doors, baseboards, casings, touch-ups, and daylight defects.
- Allow the coating to dry and cure. Don't push furniture, tape, cleaning, or heavy use back into the room too early.
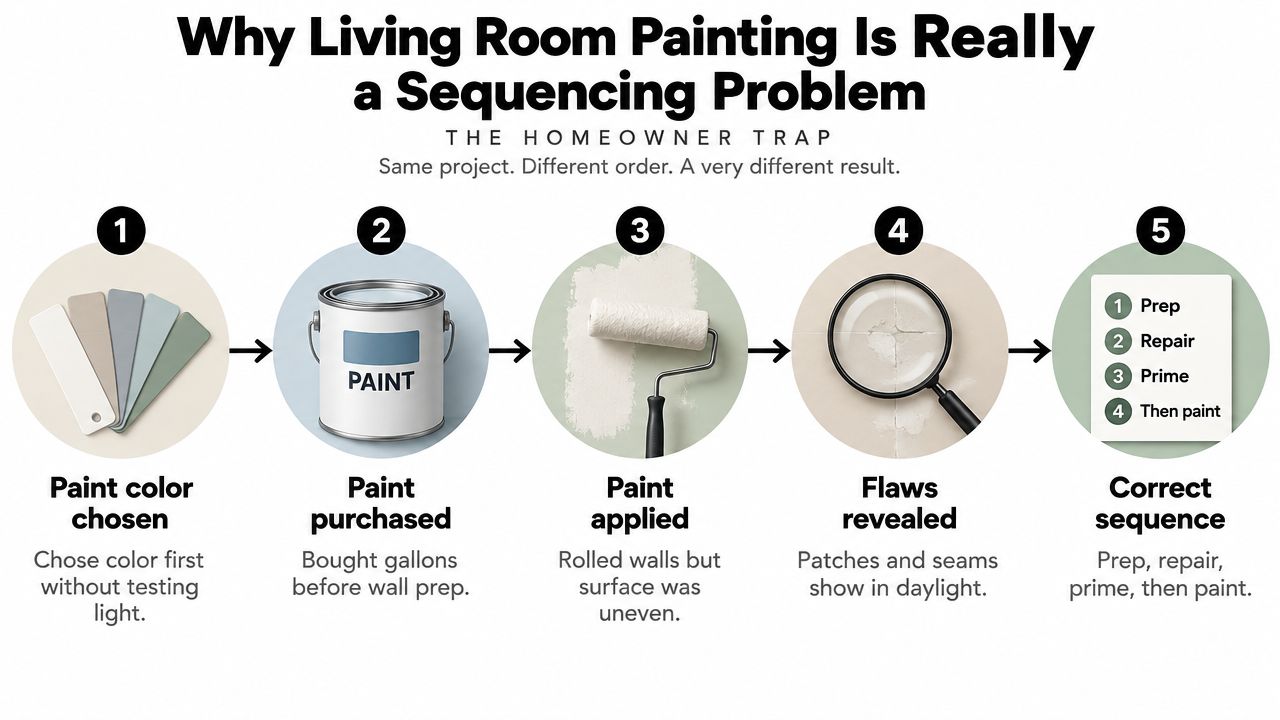
The handoffs determine the finish
A small patched area may need spot-priming. A wall with widespread porosity, odor, water damage, or a dramatic color change may need full priming. Glossy trim usually needs deglossing before a new coating can bond reliably. A chalky wall needs stabilization, not another topcoat.
In an older NYC apartment, plaster may have a harder, more irregular surface than drywall. Hairline movement, skim-coat differences, and previous repairs often show under side lighting. The painting process planning guide should therefore account for inspection and preparation before anyone schedules the finish coats.
Occupied conditions change the order, too. If children, pets, or residents must remain in the apartment, the crew may need to divide the room into controlled work zones, keep pathways open, and schedule sanding or strong-smelling products when the space is empty. Co-op rules can add hallway protection, elevator reservations, insurance documentation, work-hour limits, and freight access to the sequence.
Practical rule: Color is the final design decision, not the first construction decision. A beautiful color on a poorly prepared wall still looks poorly prepared.
Preparing the Room and Walls Before a Single Drop Goes On
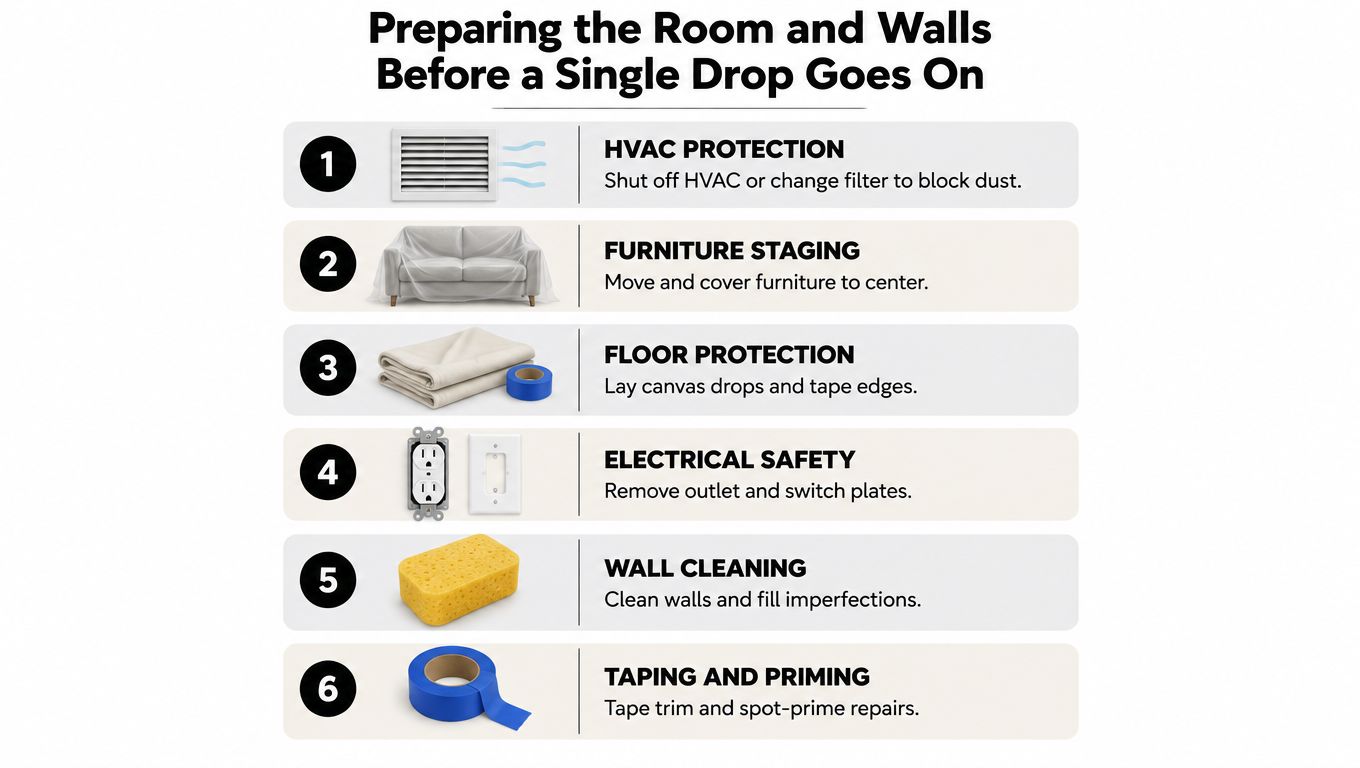
Preparation starts before the wall receives cleaner. The room needs to be isolated from dust, drips, and traffic so the crew can work without contaminating wet paint or damaging finished surfaces.
Build a controlled work area
Begin by protecting the air-handling system. Shut off the HVAC during dusty preparation when practical, or protect the system and change the filter after the work. Move furniture out when possible. If it must stay, place it in the center, wrap it securely, and leave enough clearance to reach the walls without dragging coverings through wet paint.
Use canvas floor protection rather than relying on thin plastic alone. Canvas absorbs small spills and stays more stable underfoot, while taped edges help prevent paint and sanding dust from reaching floor seams. Remove outlet and switch plates, label their screws, and take down wall hardware before cleaning.
Clean before repairing
Technical guidance for interior coatings calls for surfaces to be clean, dry, and free of dirt, chalk, grease, wax, rust, loose paint, and peeling paint. It also recommends sanding glossy or alkyd finishes, removing residue, repairing damage, and spot-priming repaired areas before topcoating, as detailed in this interior coating preparation specification.
A practical wash sequence is simple:
- Wash: Use an appropriate wall cleaner or phosphate-free substitute on dirty areas.
- Rinse: Follow with clean water, because cleaner residue can interfere with adhesion.
- Dry: Give the wall time to dry fully before filling or priming.
- Inspect: Shine a work light across the surface to reveal ridges, flashing, and loose edges.
Old wallpaper paste deserves special attention. A wall can feel smooth while still carrying a thin adhesive film that causes uneven sheen or adhesion failure. Wash, rinse, and test the surface before assuming a new coat will bond.
Repair according to the substrate
Use a setting compound where a repair needs firm filling, then refine the surface with a finer topping material. Sand between coats, remove dust, and prime the repair. On plaster, avoid aggressive sanding that enlarges a small defect or disturbs surrounding texture. On drywall, feather the repair widely enough that the transition doesn't telegraph through the finish.
Pre-1978 homes require a separate safety judgment. The United States prohibited lead-based residential paint effective February 27, 1978, and paints used before 1940 contained about 50% lead on average, according to this history of the lead-paint ban and interior renovation guidance. Older painted surfaces can still exist beneath newer coatings, especially in older NYC apartments and houses.
Don't sand or scrape suspect layers casually. Encapsulation may be more appropriate than disturbing the coating, and scraping that creates dust or debris should be handled by an appropriately trained lead-safe contractor.
Choose primer for the problem
A stain-blocking primer suits water marks and persistent discoloration. A high-build product can help unify uneven plaster. A compatible bonding primer is useful where the existing finish is hard, glossy, or difficult to coat. A tinted primer can support a deep accent color, but it doesn't replace surface repair.
For significant wall damage, the drywall installation and finishing service can address the substrate before the decorative work begins. The finish coat should never be asked to perform the job of a repair material.
Choosing Colors and Sheen That Actually Work in a Living Room
Color should respond to the room's light, furnishings, ceiling height, and sight lines. A swatch that looks balanced in a store can look gray, yellow, green, or muddy once it shares space with a rug, wood floor, upholstery, and evening lamps.
North-facing rooms often benefit from warmer neutrals, creamier whites, warm taupes, muted clay, or restrained terracotta. Cooler daylight can drain warmth from a color, making a room feel flatter than expected. South-facing rooms generally tolerate cooler grays, soft greens, and balanced neutrals because stronger daylight can support those undertones without making them feel lifeless.
Recent design coverage points toward warm neutrals, clay, terracotta, sage, olive, mushroom, and warm whites rather than relying automatically on cool gray and bright white defaults, as discussed in this living-room paint trend overview. Trends shouldn't overrule the room, but the shift makes practical sense in living rooms that need warmth in both daylight and evening lamplight.
Separate color from sheen
Sheen controls how much light the surface reflects and how clearly it reveals defects. A softer finish can disguise minor irregularities, while a shinier coating makes ridges, patch edges, and roller variation more visible.
| Room Condition | Recommended Wall Sheen | Color Direction | Why It Works |
|---|---|---|---|
| Older plaster with visible movement | Matte or low-sheen | Warm white, mushroom, soft taupe | Reduces reflected highlights across uneven areas |
| Smooth drywall with regular use | Eggshell or low-sheen | Balanced warm neutral, muted sage | Provides a practical compromise between appearance and cleaning |
| Dark room with limited daylight | Matte or soft eggshell | Cream, oatmeal, warm white | Prevents the room from feeling colder under weak light |
| Bright room with strong afternoon sun | Matte or eggshell | Soft green, warm gray, clay | Controls glare while keeping enough color depth |
| Nearly perfect walls with a deliberate finish | Low-sheen satin | Carefully tested neutral or earth tone | Adds gentle reflectance without making every flaw dominant |
Semi-gloss on living-room walls is a common mistake. Homeowners choose it because it sounds durable, then discover that every patch, lap mark, and roller edge catches the light. Reserve stronger sheen for trim, doors, and areas that need repeated cleaning.
Test the actual color before buying gallons. Apply two coats to a primed foam board, then move it beside windows, into corners, behind seating, and near the television at different times of day. A wall sample can become part of the room's visual field, while a movable board lets you compare the same color under changing conditions without confusing it with the existing wall.
Low-VOC and zero-VOC choices can matter in occupied homes, but a lower-VOC label doesn't mean the room has no emissions. Ventilation, drying time, product instructions, and the presence of residents still guide the work, particularly in apartments where windows may be limited. Health-conscious planning should also include lead-safe procedures when older painted surfaces are involved, as noted in this living-room paint and indoor-air-quality discussion.
Cutting In, Rolling, and Holding a Wet Edge
The cleanest wall application follows a controlled rhythm. Cut in a manageable section, then roll the adjacent field before the brushed edge dries. If the brush line dries first, the roller can leave a visible boundary where the two application methods overlap.
Start at the ceiling line and inside corners, then work around windows, doors, and baseboards. Use an angled brush to create a controlled band rather than trying to paint the entire perimeter in one pass. Keep the cut-in wide enough for the roller to overlap without touching protected trim.
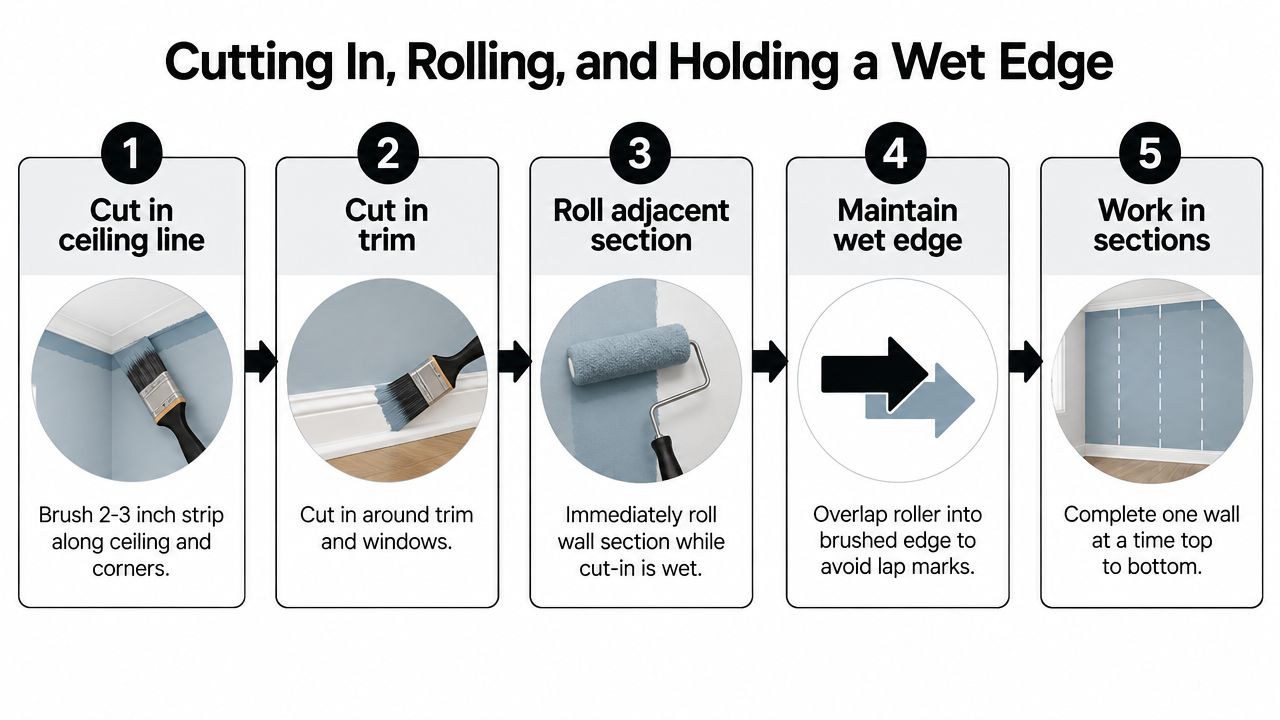
Roll in sections, not random patches
Load the roller evenly. Roll excess paint off against the tray ridges, but don't wring the cover dry. A starved roller creates thin coverage and forces pressure against the wall. Too much paint creates heavy edges, drips, and an inconsistent film.
On most interior walls, a 3/8-inch nap gives a cleaner texture than a 1/2-inch cover, particularly on smooth drywall and lightly textured plaster. The existing texture still determines the final appearance. Use lighter pressure as the roller empties, and finish each section with consistent passes in the same direction.
A long wall above a sofa is where poor technique becomes obvious. Break it into reachable sections, maintain the wet edge, and avoid stopping in the middle of a broad field. The wall behind a television deserves the same care, even though the screen may cover part of it. Light from windows can rake across the exposed area and reveal a stop-start pattern.
Understand why lap marks appear
Lap marks usually develop because one section dries before the next section overlaps it, not because the paint is defective. Heat, airflow, low humidity, porous repairs, and excessive spreading can all shorten the workable period. Work from the wet edge into the dry field, and don't keep reworking paint that has started to set.
Inside corners require discipline. If both adjoining walls are cut in separately and allowed to dry, the corner can show two overlapping brush lines. Keep the application coordinated, or use a deliberate corner sequence that leaves one edge visually dominant.
Application rule: Don't chase perfect coverage by repeatedly rolling a section that's already beginning to dry. Reload, move forward, and correct the surface on the next coat.
Deep colors may benefit from back-rolling to control stipple and unify the texture, especially where the wall has absorbed paint unevenly. The second coat should follow the same direction and sequence as the first rather than becoming a collection of isolated touch-ups.
Accent Walls That Earn Their Place
An accent wall should solve a design problem. It can anchor a fireplace, strengthen a built-in, give a long uninterrupted wall more presence, or add depth when the remaining palette feels too neutral. It shouldn't exist because every room seems to need a contrasting rectangle.
Open-plan rooms create the hardest test. A bold wall in the living room may be visible from the kitchen, entry, dining area, and staircase. If the color has no relationship to those spaces, the accent becomes a competing sight line rather than a focal point.
| Condition | Use Accent | Skip Accent |
|---|---|---|
| Long wall with little interruption | The wall can carry a clear visual statement | Doors and windows break the color into awkward fragments |
| Fireplace or built-in | The color can reinforce the architectural feature | The feature already has strong stone, tile, or millwork |
| Open-plan apartment | The tone coordinates with nearby rooms | The wall competes with kitchen cabinetry or adjoining finishes |
| Room with excessive neutrality | A grounded earth tone can add depth | Furniture, art, and rugs already provide strong contrast |
| Strong daylight on one wall | The color has been tested for glare and undertones | The tone shifts dramatically or looks harsh in direct light |
Judge the wall from the doorway
A color that looks refined from the sofa may lose its weight across the room. Evaluate an accent from the entry, from adjacent spaces, and from the far end of the living room. It needs enough depth to hold its character at a normal viewing distance, not just beside a sample board.
Match the sheen to the surrounding walls unless you have a deliberate architectural reason not to. A different sheen changes how light moves across the room and can make the accent look like a separate material rather than a related color.
Test on a 2-by-2-foot board before committing. Place it near the fireplace, beside upholstery, and on the wall at different times of day. Warm clay, olive, mushroom, and muted blue-green can all work, but their success depends on the room's existing wood tones, textiles, and light.
Design judgment: If the accent wall needs a long explanation to justify its position, the room may be better served by a consistent palette and stronger furnishings.
Trim, Doors, and Ceilings as a Separate Stage
Trim and ceilings deserve their own stage because they use different tools, sheens, and handling requirements from the wall field. Treating them as an afterthought usually produces drips, damaged edges, or a trim color that competes with the room instead of framing it.
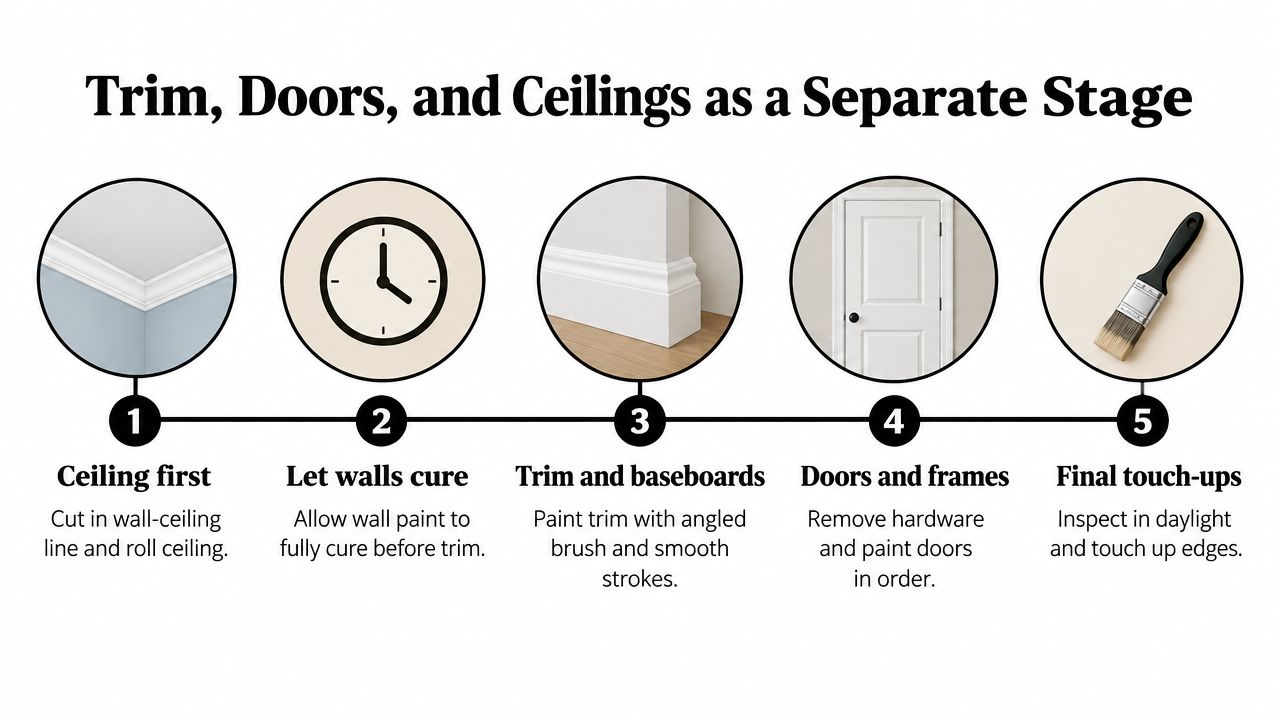
A dependable order is:
- Ceiling first. Cut the wall-ceiling line and roll the ceiling before wall work makes the edge difficult to blend.
- Walls next. Complete the wall field and allow the coating to become sufficiently firm before detailed trim work.
- Baseboards and casings. Use an angled brush, controlled loads, and smooth strokes along the length.
- Doors and frames. Remove hardware where practical and paint rails, stiles, faces, and edges in a deliberate order.
- Touch-ups last. Inspect under daylight and correct small defects after the main surfaces are complete.
Flat ceilings usually make sense because they reduce light bounce and soften minor surface irregularities. Walls can use matte, eggshell, or another low-sheen finish depending on the maintenance trade-off. Satin or semi-gloss trim can provide clean contrast against a quieter wall finish without turning the entire room reflective.
Period molding needs patience, not just a smaller brush. Window casing returns, baseboard corners, door rails, and old joints collect excess paint quickly. Load the brush lightly, lay off in the direction of the profile, and check for sags before leaving the area.
Spraying can create a uniform finish on removed doors or empty rooms with extensive masking. In an occupied NYC living room, overspray protection, ventilation, containment, and access often make brushing and rolling the more sensible approach. The method should fit the room, not a theoretical speed advantage.
Drying conditions matter during this stage. ASTM D1640 provides standardized stages for coating dry and film formation, while an architectural coating reference linked to ASTM reports enamels reaching set-to-touch in 30 minutes to 2 hours and becoming hard in about 18 hours under normal conditions, as summarized in this ASTM drying and film-formation reference. Those are controlled benchmarks, not permission to stack furniture against a freshly painted wall.
DIY, Partial DIY, or Hiring a Contractor
The DIY decision is a trade-off between money saved and risk absorbed. A homeowner may handle a smooth room efficiently, but the difficult part of living-room painting is rarely holding the roller. It's diagnosing the wall, preparing it evenly, cutting a clean line, protecting the building, and recognizing when a defect needs another repair instead of another coat.
Compare the three paths
| Factor | Full DIY | Partial DIY | Full Contractor |
|---|---|---|---|
| Surface preparation | Homeowner handles cleaning, repairs, sanding, and priming | Homeowner prepares, contractor reviews or corrects as needed | Contractor sequences and performs the full preparation |
| Finish application | Homeowner handles cut-in, rolling, trim, and touch-ups | Contractor applies the finish coats and detailed trim | Contractor manages all application stages |
| Building logistics | Homeowner handles protection, access, and scheduling | Responsibilities are divided clearly in advance | Contractor coordinates protection, access, documentation, and crews |
| Risk on plaster or old coatings | Homeowner carries the risk of hidden defects and unsafe disturbance | Contractor can take over technical preparation | Contractor assumes the defined preparation and compliance scope |
| Best fit | Smooth drywall, standard height, light color over light | Capable homeowner who wants to reduce labor scope | Plaster, high ceilings, period trim, co-ops, or occupied projects |
Professional labor can represent 70% to 80% of a living-room painting job in NYC, but that labor includes work homeowners often underestimate, including extensive plaster patching, lead-safe containment in pre-1978 buildings, scaffolding around double-height spaces, and co-op insurance paperwork. That percentage is a market planning benchmark, not a universal quote, and the actual scope depends on the room and building.
A room finished to contractor standard can consume roughly 12 to 20 hours for a 300-square-foot room, including preparation and application, as reflected in the project planning assumptions for this comparison. The time expands when walls need repeated repairs, trim has many profiles, furniture stays in place, or building access limits the workday.
Apply the decision test honestly
Choose full DIY when the walls are smooth drywall, the ceiling is standard height, the new color is light over light, and you accept a visible learning curve. Partial DIY often works well when you can move furniture, clean, fill, and tape carefully, but want an experienced crew to handle finish coats, color consistency, and trim.
Hire the full scope when the room has plaster walls, high ceilings, period molding, a pre-1978 coating history, or co-op requirements. A contractor also makes more sense when the living room connects to multiple finished spaces and a mistake would require repainting a larger area. Before signing, use this guide to hiring a licensed NYC contractor to verify that the proposed scope includes preparation, protection, materials, cleanup, and building documentation.
Excellent Home Improvement offers interior painting with surface preparation, premium finishes, and project coordination for NYC, the Bronx, Westchester, and surrounding residential properties. Visit Excellent Home Improvement to discuss your living-room substrate, occupied-home constraints, color plan, and the level of preparation required for a clean, durable finish.