Paint and Construction: How Finishing Fits Into Renovation
Learn how paint and construction work together on real renovation projects, from sequencing and surface prep to dust control, warranties, and contractor
By Excellent Home Improvement

A kitchen gut renovation is moving fast. Cabinets arrive next week, the electrician has opened several new holes, drywall patches are still unprimed, and nobody has decided who'll repair the nicks left behind by the other trades. The painter may be booked, but the project still isn't ready for paint.
That situation is common because homeowners often see paint as the final decorative layer. On a real remodel, paint and construction are connected through sequencing, substrate preparation, ventilation, dust control, product specification, and warranty responsibility. The color is only one decision. The coating system has to work with the wall surface, the room's moisture level, the work of other trades, and the way the home will be occupied.
Table of Contents
- Why Paint Belongs in the Construction Conversation
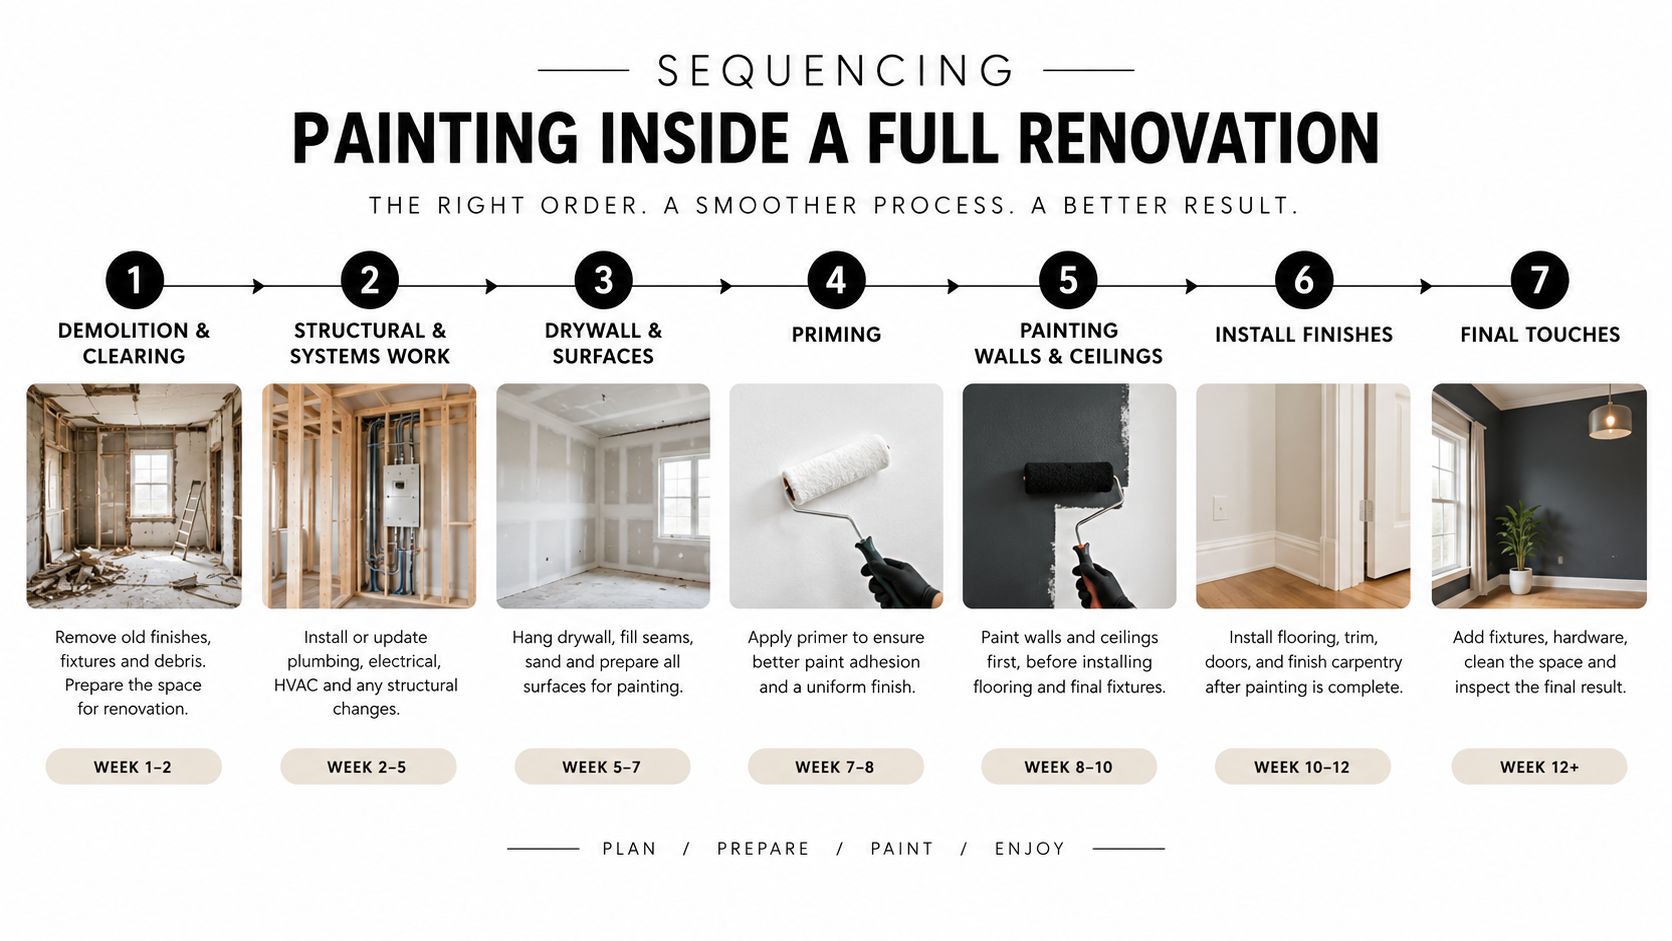
- Sequencing Painting Inside a Full Renovation
- Surface Preparation as a Construction Step
- Moisture, Temperature, and Curing Conditions
- Dust Control and Safety During Occupied Remodels
- Coordinating Painters With Other Trades
- Performance and Specification Choices That Matter
- A Practical Checklist Before the First Roller Goes On
Why Paint Belongs in the Construction Conversation
Paint should appear in the pre-construction meeting, not for the first time when furniture is being delivered. The project team needs to decide which surfaces will be painted, which will be stained, which will be sprayed off-site, and which areas require a higher-performance coating before drywall, trim, and cabinetry are ordered.
The choice affects more than the finish. A smooth wall under a low-sheen coating may require more careful drywall finishing than a textured or higher-sheen surface. A dark cabinet color can make reveal lines and caulk joints more visible. A door and trim system may need a different primer and application method from the walls. If those decisions come late, the crew may have to work around installed cabinets, finished floors, and fixtures that should have been protected from splatter.
The specification starts before the color
A contractor should document the paint system room by room. That record can include:
- Substrate: New drywall, existing painted plaster, bare wood, metal, masonry, or a previously coated surface.
- Primer: Drywall primer, bonding primer, stain-blocking primer, wood primer, or another product suited to the material.
- Sheen: The selected level for walls, ceilings, trim, doors, and specialty areas.
- Application: Brush, roller, spray, back-roll, or a combination of methods.
- Responsibility: The trade responsible for repairs caused after painting begins.
That last item prevents a familiar dispute. If an electrician scratches a freshly finished wall, the agreement should say whether the electrician repairs the surface, the general contractor coordinates the repair, or the painter returns for a defined touch-up. Without that decision, every small defect becomes a warranty argument.
The broader market also shows why coatings deserve early attention. A recent estimate places the global construction paints and coatings market at $62.5 billion in 2025, with a projection of $66.37 billion in 2026 and $85.14 billion by 2030 in the construction paints and coatings market report. Those figures reflect a product category tied to building, renovation, infrastructure, material planning, and recurring maintenance, not a minor finishing expense.
Practical rule: If the team hasn't agreed on the substrate, coating system, protection plan, and repair responsibility, the project isn't ready for final painting.
Late decisions create predictable problems. A patched section may flash under a new sheen. A low-emission product may be selected without considering cure time or ventilation. A manufacturer's warranty may be weakened if the specified primer wasn't used over the prepared substrate. A professional painting scope, such as the one described through residential painting services, should therefore be coordinated with the construction scope rather than treated as an isolated line item.
Sequencing Painting Inside a Full Renovation
The usual residential renovation sequence follows the work that creates, closes, and protects the building:
- Demolition: Remove finishes and damaged materials while protecting areas that remain.
- Framing: Build new partitions, soffits, openings, backing, and structural assemblies.
- Mechanical rough-ins: Complete plumbing, electrical, heating, cooling, and ventilation work before walls close.
- Insulation and drywall: Install insulation, hang board, finish joints, sand, and remove dust.
- Trim and cabinet installation: Install casing, baseboards, built-ins, doors, and cabinets according to the project plan.
- Painting: Prime, apply finish coats, protect completed surfaces, and complete controlled touch-ups.
- Finish installation and punch: Install final flooring or protect it carefully, set fixtures and hardware, then document and correct remaining defects.
The exact order changes by project, but paint generally follows drywall finishing and most trim installation. It should occur before switch plates, decorative hardware, and final fixtures return to the walls. Flooring may be installed before the final paint stage on some projects, especially where cabinet and flooring details demand it, but the contractor must then use a stronger protection plan.
Why the order sometimes changes
A project may use an early prime-and-seal coat after drywall finishing and before mechanical trim, cabinetry, or flooring arrives. This can stabilize porous drywall and reduce loose dust, but it isn't permission for other trades to treat the walls as finished. Later cuts, patches, and fasteners still require proper repair and spot priming.
Stain-grade wood follows a different path. The finish may need to be applied and allowed to cure before installation so the crew can coat edges, backs, and joints that become inaccessible later. Sprayed cabinet components may also be finished off-site, while the surrounding walls are painted in the field.
Ceilings are commonly painted before walls. That lets the painter control the ceiling-to-wall cut-in and avoid dragging a wall color across a fresh ceiling finish. In an occupied apartment, the sequence may be divided by room. The crew can isolate a kitchen, maintain a clean path through the home, and avoid forcing the occupants to leave the entire property.
The biggest schedule risk is not usually the painter's production speed. It's the trade before the painter. A delayed cabinet lead, unfinished tile edge, late inspection, or missing trim profile can leave the painter waiting, then compress the coating work into a period when the home is still full of dust and traffic.
Surface Preparation as a Construction Step
A homeowner can buy a quality paint system and still get a poor finish if the surface is not ready. On a remodel, paint prep is construction work. New drywall, patched areas, and repaired trim all behave differently, and each one needs its own prep so the finish coats bond evenly and dry without flashing or weak spots. That is why a wall built by a drywall installation expert in New York still has to be checked before anyone opens a can of finish paint.
The first issue is absorption. Fresh drywall and patch compound pull paint in fast, while finished wood and older coated surfaces repel it or hold sheen differently. If those surfaces are not sanded clean and primed in the right places, the room can end up with dull patches, uneven gloss, or poor adhesion, as explained in this guidance on priming new drywall and patch areas.
A good painter reads the surface under the same light the room will have after turnover. Side light from a window or a recessed fixture can expose ridges, torn paper, and missed feathering that a jobsite lamp hides. Low-sheen paint makes those flaws easier to see, so the finish standard has to match the lighting plan, not just the wall color.
What proper preparation includes
Preparation is a sequence, not a single cleanup step. It usually starts with sanding joint compound and patch edges until they sit flush with the wall plane. Dust has to come off next, usually with vacuuming and a wipe that does not leave residue behind. Fasteners, corner beads, taped seams, and skim-coated areas need inspection, because each one can telegraph through paint if the substrate is still uneven. Trim-to-drywall joints should be caulked with a paintable sealant where movement is minor and the gap is small. Glossy trim and previously coated surfaces need scuff-sanding so the new coat has something to grip. Bare wood, exposed fasteners, repaired spots, and other mixed materials should be spot-primed. Porous new drywall often needs the specified primer over the whole area so the finish reads uniform instead of blotchy.
The contractor, painter, and drywall finisher should agree on what “ready for paint” means before the first coat goes on. That standard should cover dryness, dust removal, smoothness, corner condition, and how the wall should look under the chosen sheen. If a defect is still open, it should be documented and corrected, not hidden under finish paint.
| Common Substrate Issues and the Prep Step That Prevents Failure | Required Prep Step | Failure If Skipped |
|---|---|---|
| New drywall and joint compound | Sand, remove dust, and apply the specified drywall primer | Flashing, dull patches, and uneven sheen |
| Taped seams and patch transitions | Feather edges and inspect under strong side light | Visible ridges and lap marks |
| Exposed fasteners | Fill, sand, and spot-prime | Rust marks, telegraphing, or uneven absorption |
| Glossy trim | Clean and scuff-sand before bonding primer or finish | Peeling or poor adhesion |
| Trim-to-wall joints | Apply compatible paintable caulk and allow it to set | Cracked-looking gaps and inconsistent lines |
| Damp or uncured repairs | Wait until the material is fully dry before priming | Blistering, soft film, or premature failure |
Paint cannot correct movement in framing or drywall. If a seam keeps opening, the repair belongs with the wall system, not with a thicker finish coat. If a coating fails on an unprepared surface, the warranty discussion should start with the substrate, the primer choice, and the repair record. For projects where that handoff matters, the scope should spell out who handles installation, joint finishing, sanding, and inspection before paint starts.
Moisture, Temperature, and Curing Conditions
A newly renovated room can look ready for paint while its air, substrate, or ventilation still works against the coating. In a bathroom after tile work, a basement with moisture at the slab, or a space recently closed with drywall, the paint schedule is a construction decision, not a cosmetic finish date.
Manufacturer guidance for construction painting emphasizes that temperature, humidity, airflow, film thickness, color, and room conditions affect drying and finishing time. Those variables become more difficult to control in enclosed rooms and during work by other trades. The relevant requirements should be checked in the construction painting specification guidance and in the coating's own technical data.
The HVAC system should run early enough to stabilize the space before application. Starting it only after the first coat is down can move dust across wet film or alter the drying rate. Bathroom exhaust also needs coordination with the project manager. Shower moisture, tile installation, cleaning, and nearby trade work can interfere with film formation.
A room can pass a quick touch test and still be unsuitable for the next coat. Green drywall compound may release moisture into the air, while a basement can have a separate problem at the foundation or slab. Heavy application and poor air exchange can leave the coating soft below a dry-feeling surface.
Watch for cloudy or blush-like areas in humid corners, lap marks where one section dries before the adjoining section, and slow-cured enamel that collects dust or fingerprints. Bubbling or peeling over damp masonry points to a moisture or substrate problem. A surface that marks easily under light contact also needs more curing time.
The application day should be set from the product label and technical data, not from a fixed rule copied from another project. Requirements vary by coating and manufacturer:
- Waterborne wall coating: confirm minimum air temperature, maximum relative humidity, and recoat timing in the product technical data.
- Waterborne trim enamel: use the same product-specific checks, with particular attention to curing before handling or closing doors.
- Solventborne or alkyd coating: follow the stated air, humidity, and recoat limits before allowing other work nearby.
- Masonry or basement coating: confirm both substrate conditions and product requirements before application.
For a basement, evaluate the concrete and surrounding assembly with an appropriate moisture-testing method before choosing the coating system. If readings or test results show unacceptable moisture, address the source and select a compatible system. Adding another coat will not solve the underlying condition.
A rescheduled paint day is cheaper than a failed coating system. Proceed only when the substrate, air, ventilation, and product requirements support proper curing.
Dust Control and Safety During Occupied Remodels
In an occupied brownstone or condo, dust control starts before the painter arrives. During demolition, fine particles can travel through door gaps, return-air paths, stairwells, and shared circulation areas. If the crew waits until the painting stage to think about containment, the home has already accumulated a cleaning and indoor-air-quality problem.
The project manager should establish the work zone before demolition. That can include sealed return vents, plastic zip walls, a defined worker route, negative-pressure containment where appropriate, and HEPA filtration suited to the space. Once drywall work begins, painters inherit that containment system. They shouldn't be expected to solve a building-wide dust migration issue with masking tape at the baseboard.
A representative occupied-remodel week
On the first day, the crew protects the occupied portion of the home and confirms which rooms remain accessible. During demolition, workers use controlled methods, remove debris through an agreed route, and keep the containment boundary closed. The family may continue living in bedrooms or another floor, but the project manager needs to explain when air movement, noise, and access will change.
After rough work and drywall finishing, the painter takes over a cleaner but still vulnerable zone. Sanding should use shrouded tools connected to suitable dust extraction. HVAC returns should be protected or shut off during sanding when the system design allows it. Workers vacuum surfaces, clean ledges and trim, and avoid bringing dusty clothing and tools into occupied rooms.
Older housing adds a separate safety obligation. The EPA identifies old lead-based paint as a significant source of lead exposure and notes that most paints release VOCs that can create indoor-air-quality problems during remodeling. Homeowners should review the EPA guidance on indoor environmental concerns during remodeling before disturbing old painted surfaces.
Testing and containment decisions should happen before scraping, sanding, cutting, or demolition disturbs a concealed layer. Where lead-safe work applies, the contractor should use required containment, wet methods, HEPA cleaning, and the applicable verification process before primer or finish paint covers the surface.
Daily painter practices also matter. Workers should keep sanding dust out of wet rooms, use clean masking materials, vacuum before coating, and use tack cloths or an equivalent surface-cleaning method when appropriate. Families with children, asthma, or remote work needs should receive a written plan for room access, ventilation, cleaning, and the period during which wet or curing coatings must remain undisturbed.
The contract should state who maintains containment, who cleans common areas, who controls HVAC during dusty operations, and who documents clearance or inspection steps. Shared accountability keeps the painter from being blamed for dust created by demolition or later trades.
Coordinating Painters With Other Trades
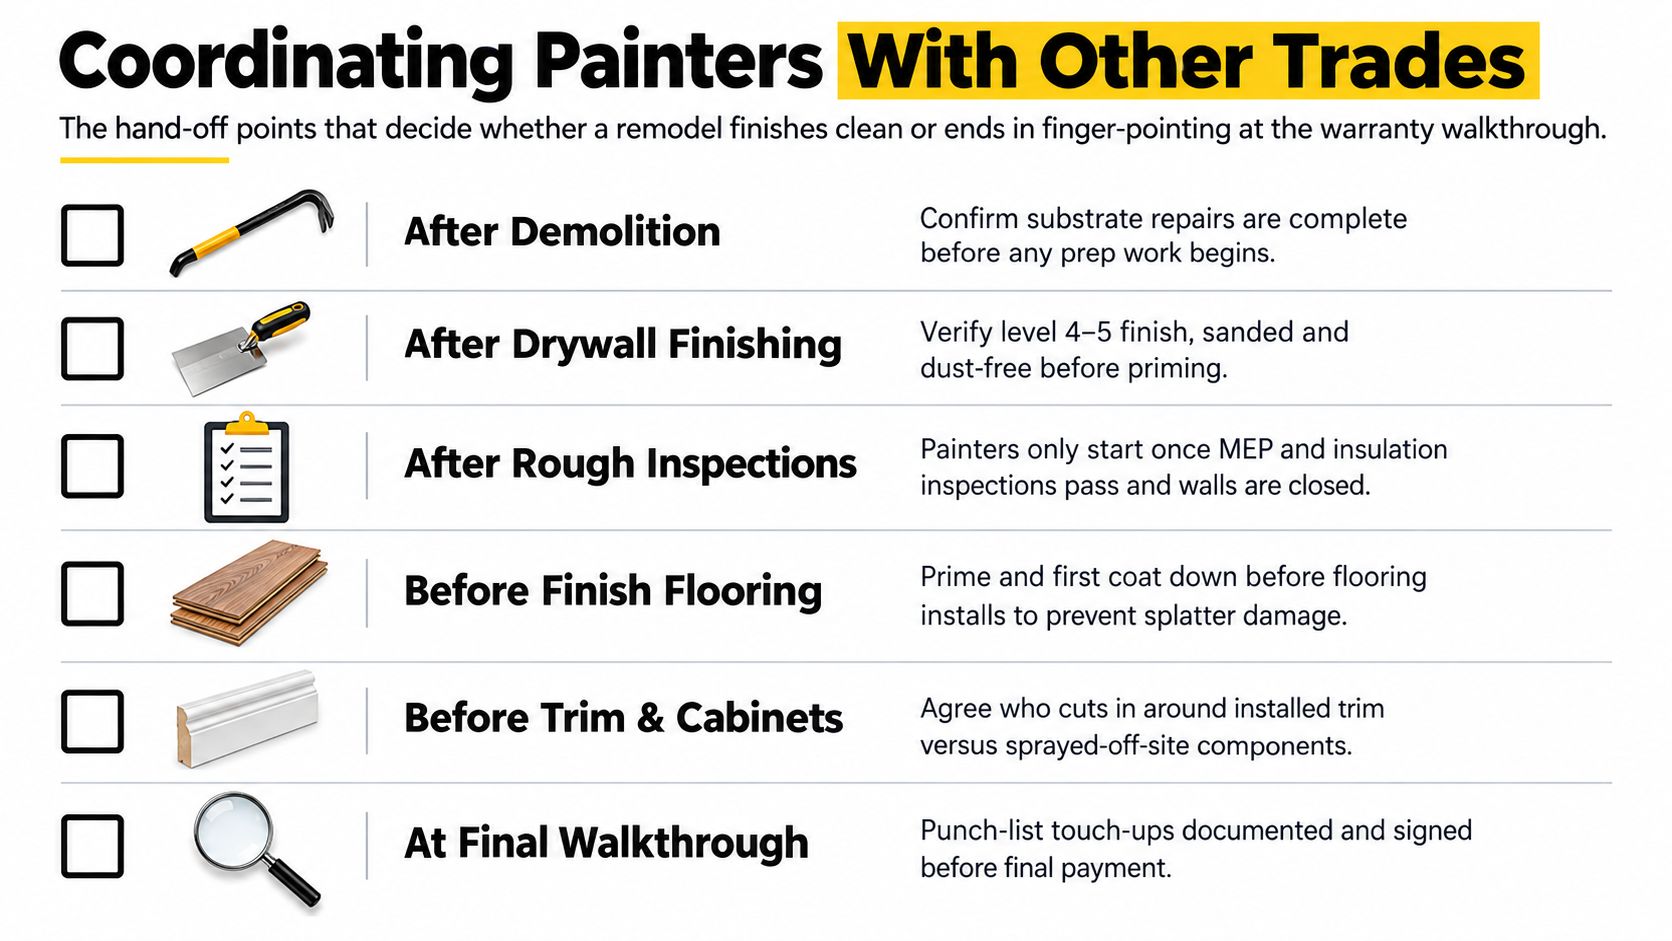
A finished wall can be damaged within minutes of the painter leaving. A cabinet installer may drill through it, a flooring crew may leave adhesive on new baseboards, or an HVAC startup may blow construction dust onto wet trim. Painting therefore belongs in the trade schedule, with clear hand-offs tied to each installation and inspection milestone.
The first hand-off comes after demolition. The general contractor should confirm that substrate repairs are complete before the painter fills, sands, and primes. After rough plumbing, electrical, insulation, and inspections, the team should verify that no further wall openings are expected. Once drywall finishing is complete, the painter and GC should inspect the surfaces together at close range. A quick glance from the doorway is not enough to approve work that will be highlighted by finish paint.
Cabinet and trim sequencing requires a written decision. With cabinets sprayed off-site, the wall painter needs accurate delivery and installation dates, along with the protection requirements for finished units. With trim painted in place, the team must decide whether it will be coated before installation, after installation, or through separate priming and finish stages. Each option affects access, masking, touch-ups, and the risk of damage from later work.
The written scope should settle the following points before materials arrive:
- Room list: Every painted room, ceiling, closet, stair, trim package, and exterior area.
- Coating schedule: Product category, primer, sheen, color, and application method.
- Coat definition: What counts as a full coat and where spot application is acceptable.
- Protection: Who covers floors, cabinets, stone, hardware, and finished fixtures.
- Punch policy: Which touch-ups are included and when a full repaint becomes a change in scope.
- Repair responsibility: Who fixes nail pops, settlement cracks, trade damage, and failed caulk.
- Cure restrictions: How long other workers must wait before returning with tools, ladders, masking, or cleaning chemicals.
Assign responsibility to the event that can cause the problem. A painter who primes over uncured compound may face a failure claim. A tile contractor who splashes thinset on new trim may create a repair claim. A mechanical contractor who starts dusty equipment while finish paint is curing may contaminate the coating. The contract should identify who documents the condition, authorizes the repair, and pays when the damage falls outside the painter's work.

Hold a short coordination meeting before painting starts. Review the shared schedule, add buffer time after drywall and trim, confirm which trades are finished, and name one person who can approve repairs. That process replaces “touch it up later” with a defined decision, an accountable person, and a finish that is less likely to be sacrificed by the next crew.
Performance and Specification Choices That Matter
Color is the visible choice, but performance comes from the entire system. A kitchen, bathroom, hallway, basement, bedroom, and exterior wall don't experience the same moisture, abrasion, cleaning, or movement. Selecting one generic coating for every room may simplify purchasing, but it can create avoidable maintenance and adhesion problems.
Waterborne systems now account for 46.2% of global construction paints and coatings volumes, while acrylic-based coatings represent 42.5% of the resin market and about $28.1 billion in 2025, according to this construction coatings market analysis. The same source describes a concentrated industry in which 15 to 20 major global players control roughly 62% of total market volumes. For a homeowner, the practical lesson is not to chase a market category. It's to specify a coating based on the room, substrate, exposure, and required compliance.
Choosing the system by exposure
Kitchens and bathrooms need a film that tolerates cleaning and periodic humidity. A scrubbable acrylic may suit many interior applications, while a specialty system may be appropriate for an unusually demanding surface. Corridors, stairwells, mudrooms, and children's areas benefit from a coating selected for scuff resistance and maintenance rather than only a pleasing color.
Sheen is part of that decision. Higher sheen can improve cleanability and highlight surface defects. Lower sheen can soften the appearance of uneven walls but may provide a different cleaning experience. The right choice depends on the substrate quality, lighting, room use, and homeowner expectations.
| Room / Zone | Recommended Paint Category | Sheen | Primary Driver |
|---|---|---|---|
| Kitchen walls | Washable interior acrylic system | Selected for cleaning and wall condition | Grease, moisture, and routine wiping |
| Bathroom walls | Moisture-tolerant interior system | Selected for ventilation and surface quality | Humidity and cleanability |
| Hallways and stairs | Scuff-resistant interior system | Durable finish suited to lighting | Traffic and repeated contact |
| Ceilings | Ceiling-specific interior coating | Low-reflectance finish where appropriate | Light control and uniform appearance |
| Trim and doors | Durable trim enamel system | Higher sheen only when the surface supports it | Impact, hand contact, and cleaning |
| Cabinets | Cabinet-grade coating system | Based on application method and use | Adhesion, leveling, and repeated handling |
Primer selection is equally important. Patched drywall, bare wood, galvanized metal, and previously glossy trim each present different bonding and absorption conditions. A generic wall primer may not be suitable for every substrate in the house.
Low-emission and water-based choices can support indoor-air-quality goals, but product selection still needs to account for cure conditions and the occupants' return schedule. In multi-family buildings, the project team may also need to review building requirements, fire-rated assemblies, and approved products before changing a specified system.
Warranty language should identify the required primer, film build, preparation, and application conditions. A manufacturer may reject a claim when the installer substitutes an unspecified primer or coats over an unprepared surface. Cabinet, trim, and door finishes also need to be matched to the construction scope, including options such as painted and stained cabinetry finishes.
A Practical Checklist Before the First Roller Goes On
A homeowner doesn't need to direct every brush stroke, but should ask the general contractor to confirm the conditions that control the result. Use the following checklist at the pre-paint meeting:
- Substrate readiness: Confirm that drywall compound, caulk, repairs, and masonry are fully dry and that the agreed surface-finish standard has been met.
- Primer coverage: Verify where full priming is required and where spot priming is appropriate. Record the primer product and substrate it covers.
- Trade completion: Confirm that electrical, plumbing, HVAC, tile, cabinetry, trim, and other work that could open or damage painted surfaces is complete.
- HVAC protection: Identify which returns are sealed or controlled during sanding and how the system will be restarted without blowing dust onto wet film.
- Floor protection: Decide whether flooring is installed before painting and who supplies, installs, checks, and removes the protective covering.
- Room schedule: Paint after major rough-ins and dust-producing work, but before switch plates, decorative hardware, and final fixtures are installed.
- Caulking responsibility: Put in writing who caulks trim joints, fills nail holes, repairs trade damage, and performs final touch-ups.
- Cure window: Confirm when workers, cleaners, cabinet installers, and occupants can return to each room without marking the coating.
- Color and sheen record: List every room, ceiling, trim area, product line, color, and sheen so future repairs don't rely on memory.
- Access and ventilation: Agree on which windows, exhaust fans, and doors can remain open while the coating cures, especially in an occupied home.

Documentation protects the homeowner after the crew leaves. Photograph labeled paint cans, retain technical data and safety sheets, record the room associated with each color, and keep sealed leftover material in a suitable storage location for future repairs. Don't store products where freezing, overheating, moisture, or children can reach them.
The final walkthrough should separate normal punch-list touch-ups from damage caused by later work. A good project manager marks each item, assigns responsibility, confirms the repair method, and records acceptance after the work is complete. That process protects the finish and makes the relationship between paint and construction clear from the start.
Excellent Home Improvement coordinates full-home remodels, kitchens, bathrooms, basements, drywall, trim, cabinetry, and interior or exterior painting as connected scopes rather than isolated tasks. Visit Excellent Home Improvement to discuss your renovation, surface-preparation needs, dust-control plan, and paint sequencing with a New York remodeling team.


