Bathroom Remodel from Tub to Shower: The Complete NYC Guide
Planning a bathroom remodel from tub to shower? Follow this NYC-focused guide covering costs, permits, waterproofing, and curb vs curbless designs.
By Excellent Home Improvement
A bathroom remodel from tub to shower averages about $3,000, with published estimates ranging from roughly $1,200 to $8,000, and the typical return on investment is about 60% when the home retains another full bathroom. The catch is that about 70% of homeowners report at least one unplanned cost, so the project needs to be priced as a construction job, not a cosmetic fixture swap.
In New York City, the tub is often the easy part. Once the surround comes off, the crew may find damaged subfloor, deteriorated framing, a misaligned drain, or plumbing that can't support the shower layout you selected. Co-op alteration rules, building access restrictions, filing requirements, and inspections can add time before the first tile is installed.
A successful conversion starts with the same discipline used for any wet-area renovation: expose the structure, verify the rough-in, repair what is compromised, build a compliant waterproofing system, and only then install finishes. The shower can look simple when it's complete, but the work behind the tile determines whether it stays dry and serviceable.
Table of Contents
- Why This Conversion Matters Beyond Aesthetics
- Demolition and Structural Assessment
- Choosing Between Curb and Curbless Designs
- Waterproofing to Code and Flood Testing
- Tile Selection and Fixture Installation
- Navigating Permits and Project Costs
Why This Conversion Matters Beyond Aesthetics
The financial case is attractive because a tub-to-shower conversion can deliver a meaningful functional change without the scope of a full bathroom renovation. Industry guidance places the average project at about $3,000, with estimates from roughly $1,200 to $8,000 depending on materials, plumbing changes, and shower style. For a home that still has another full bathroom, the reported average return on investment is about 60%, with a broader range of 45% to 74%, according to industry guidance on tub-to-shower conversion costs and ROI.
That value depends on the existing bathroom and the buyer profile. A primary bathroom with an accessible, modern shower can be more useful than a deep tub that rarely gets used. But removing the only tub in a home changes bathing flexibility, so resale considerations should be part of the decision rather than an afterthought.

The number that changes the estimate
The hidden-condition risk is the reason I don't treat the advertised fixture price as the project budget. A 2026 homeowner survey cited by a remodeling publication found that about 70% of respondents encountered at least one unplanned cost during this type of work. The leading issues included structural repairs at 38%, water damage behind the tub at 32%, and unplanned plumbing work at 29%, as reported in guidance on concealed conditions in curbless shower projects.
Those findings match what demolition reveals on older NYC jobs. A tub can conceal wet framing for years, especially where failed caulk or a leaking valve allowed water behind the surround. The crew should open the area, inspect the substrate, and document the condition before anyone commits to tile quantities or final plumbing selections.
Practical rule: Price the visible renovation, then ask exactly how concealed damage will be handled. A written allowance is more useful than a low number that assumes perfect framing.
The conversion makes sense when the household values easier entry, a larger standing area, simpler daily use, or future mobility planning. It doesn't make sense to remove the only tub solely because a catalog photo looks current. The right question is whether the new shower improves how the bathroom works while preserving enough flexibility for the household and the local resale market.
Demolition and Structural Assessment
Demolition should begin with protection, controlled removal, and a plan for debris movement through the building. In a NYC apartment, that means confirming elevator rules, work hours, hallway protection, and disposal requirements before the crew starts. The team should remove the tub and wall surround without blindly cutting into plumbing or electrical components hidden behind the finish.

Open first, order second
Once the tub is out, demolition should continue down to the subfloor where necessary. The crew needs a clear view of the framing, floor structure, drain location, supply lines, and wall cavities. Ordering a shower base or cutting tile before this inspection creates avoidable risk because the existing drain may not land where the new receptor requires it.
Look for darkened or soft wood, swollen subfloor edges, failed fasteners, mold, and evidence that water has traveled beyond the original wet area. Surface staining isn't automatically a structural failure, but soft material, persistent moisture, or compromised framing requires correction before waterproofing begins.
The correct sequence on site
A reliable sequence is straightforward:
- Protect the building and isolate services. Shut off water as needed and protect finished areas outside the bathroom.
- Remove the tub and surround carefully. Keep the demolition controlled so hidden pipes and electrical runs aren't damaged.
- Inspect concealed conditions. Check rot, mold, framing, subfloor integrity, and drain alignment.
- Repair the structure. Replace weakened material and reinforce framing for valves, grab bars, niches, and glass hardware.
- Confirm the rough-in. Set the drain and supply locations based on the selected shower system.
Framing matters beyond the shower pan. A future grab bar needs solid backing, and a glass enclosure needs accurate, stable walls. If those supports aren't planned before the walls close, the finished bathroom may force expensive rework or leave the homeowner with limited options.
Choosing Between Curb and Curbless Designs
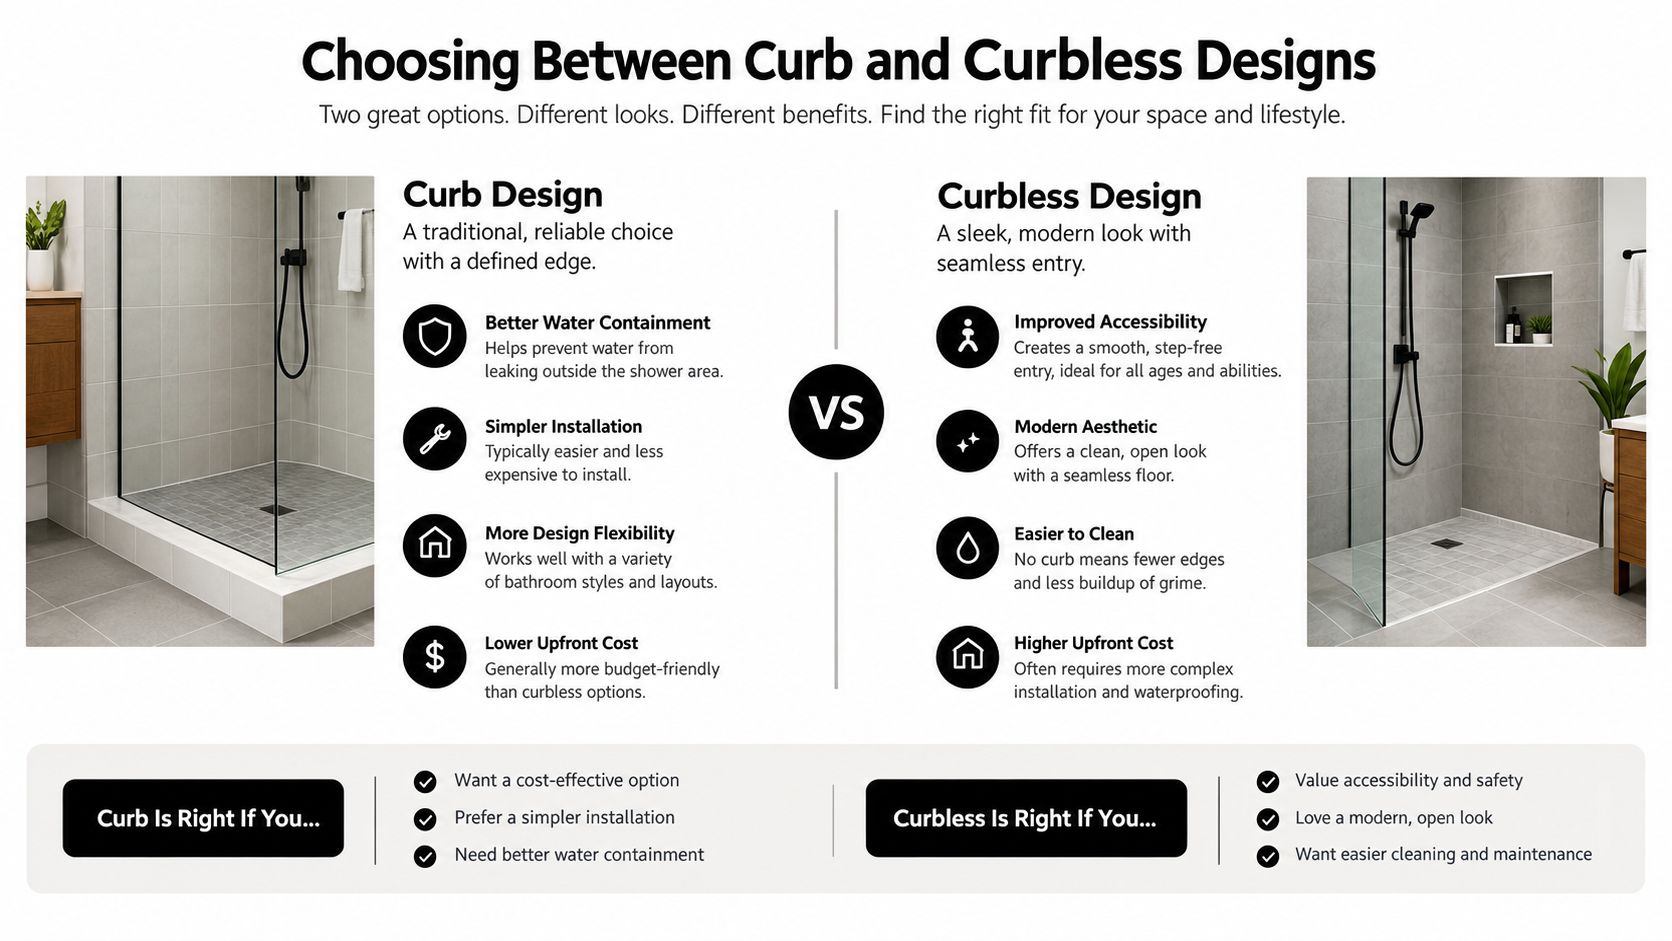
A curb and a curbless entry solve different problems. A traditional curb gives the shower water a physical boundary and is generally more forgiving during construction. A curbless shower creates a smoother entry and can make the room easier to use, but the floor structure, drain placement, splash control, and waterproofing must be coordinated from the start.
Houzz reports that low-curb showers were selected by 52% of homeowners pursuing accessibility features, while curbless showers accounted for 28% of those choices, according to the 2025 U.S. Houzz Bathroom Trends Study. The same study reports that wet rooms reached 16% of renovated bathrooms, with homeowners citing space use, appearance, and accessibility among their reasons.
Where a curb works well
A curb is often the practical choice when the existing floor can't be recessed easily or when the bathroom needs a defined splash zone. It can simplify the transition between the bathroom floor and shower receptor, provide a place for the liner to rise, and reduce the amount of structural alteration.
The trade-off is access. Even a low threshold can be inconvenient for someone using a walker or managing reduced balance. A curb also affects door swing, glass layout, and the visual openness of a compact bathroom.
What curbless construction demands
A curbless shower needs a controlled slope toward the drain without creating a raised transition at the entrance. In an apartment building, the available floor depth may limit how much the floor can be lowered. The contractor may need to coordinate a different drain location, a linear drain, a sloped mortar bed, or a broader wet-room waterproofing area.
The room also needs a realistic splash plan. An open entry can allow water to reach the vanity, baseboard, or bathroom door if the shower head, glass panel, and floor dimensions aren't coordinated. Wet-room construction can look clean, but it increases the importance of ventilation, drainage, maintenance, and continuous waterproofing.
Choose curbless for a clear accessibility or layout reason, not simply because the detail is fashionable. If the structure can't support the required slope, a well-built low-curb shower is safer than a compromised zero-threshold design.
Accessibility planning should include grab-bar blocking, a handheld shower, slip-resistant flooring, and a control location that works from outside the spray path. Those decisions are easier and less expensive when made during framing.
Waterproofing to Code and Flood Testing
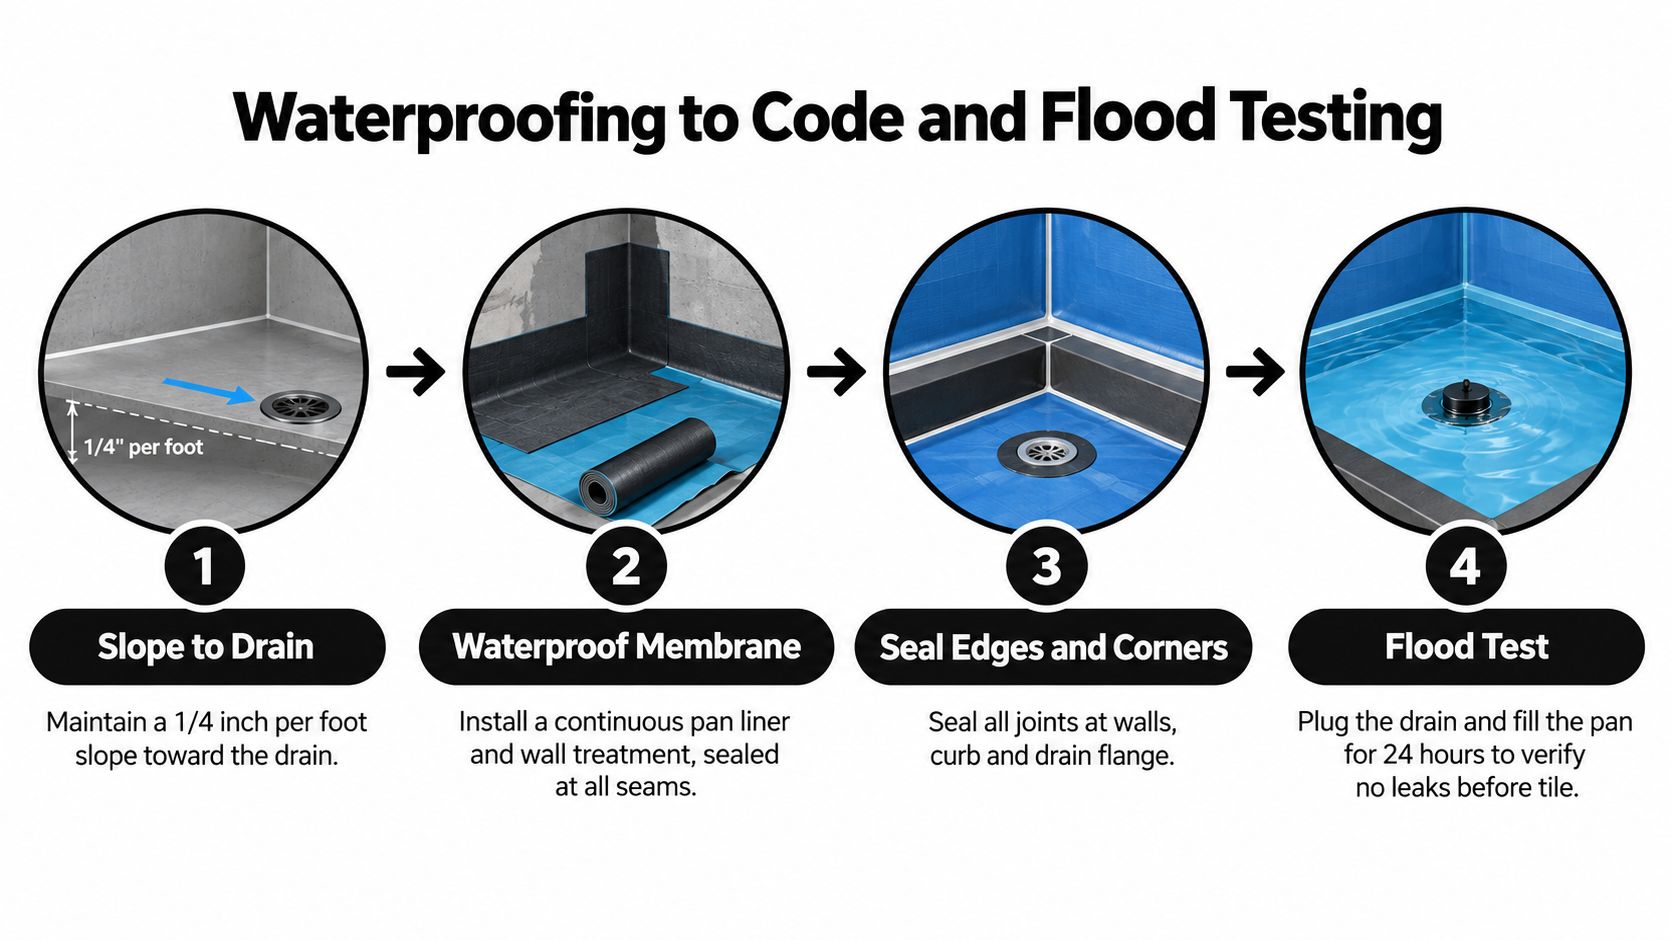
Waterproofing is the part of the conversion that protects the building, not just the tile. The shower receptor needs a continuous slope of at least 1/4 inch per foot toward the drain and no more than 1/2 inch per foot, according to technical guidance on shower pan liner slope and testing. A watertight pan or liner is required, and the liner should rise at least 3 inches above the curb.
The work starts after demolition and structural verification. The installer sets the drain, forms the pre-slope, installs the pan or approved membrane system, treats corners and penetrations, and connects the waterproofing continuously to the walls and drain assembly. A surface may look ready for tile while still containing a flat area, an unsealed fastener, or blocked drain weep holes.
Details that prevent failure
The most common technical mistake is skipping the pre-slope or leaving a flat or reverse-pitched section. Water then remains beneath the finished surface instead of reaching the drain. The installer should also confirm that the drain's weep holes remain open, because a blocked weep path can leave moisture trapped in the pan assembly.
Use a continuous system rather than treating each joint as an isolated patch. Wall corners, curb corners, niches, bench penetrations, the drain flange, and plumbing openings all need compatible seals. Fasteners should be placed according to the selected membrane system, and the waterproofing should extend far enough to protect the actual wet area, especially in an open or curbless layout.
For a practical review of material choices and installation principles, use this bathroom waterproofing guide before approving the wall finish.
The flood test is a stop point
Before tile or wall panels go in, the pan should be plugged and filled for 24 to 48 hours, then checked for measurable loss, as specified in the technical guidance above. The crew should record when the test starts, inspect the surrounding areas, and avoid covering the assembly until the result is acceptable.
A flood test doesn't replace good installation. It gives the project team a chance to find a leaking drain connection, damaged liner, failed corner, or improperly sealed penetration while the assembly is still accessible. Skipping it saves little time and can turn a hidden leak into a finished-wall repair.
Tile Selection and Fixture Installation
The finish phase works only when the materials match the technical shell. Shower-floor tile needs appropriate slip resistance and enough grout coverage to follow the slope without creating awkward lippage. Wall tile should tolerate constant moisture, and the installation pattern should account for niches, valves, benches, glass clips, and outside corners before the first box is opened.
Large-format wall tile can reduce grout maintenance and create a quieter appearance, but it still requires flat walls and careful layout. Smaller floor tile can follow a sloped receptor more easily because the installer has more joints to adjust. Natural stone brings a different maintenance commitment because it generally needs sealing and ongoing care.
Coordinate fixtures before rough plumbing
Choose the valve, trim, handheld shower, fixed head, drain finish, and accessories before the plumber closes the walls. A trim kit must match the rough valve, and the valve depth must account for the waterproofing and finished wall thickness. If those dimensions are guessed, the trim may sit too far inside or outside the wall.
A shower niche also needs early coordination. Its size and position depend on stud locations, waterproofing details, bottle storage, and the tile layout. The same applies to a bench, grab bars, and glass supports. A carpenter can add backing during framing, but adding it after tile installation usually means opening finished work.
Keep the proposal tied to selections
A fixed-price proposal should identify the material tier, tile allowance, fixture scope, glass assumptions, waterproofing system, and demolition exclusions. “New shower fixtures” isn't enough. The contract should make clear whether it includes a standard valve, a handheld, a niche, a shower door, or only a basic trim package.
Review shower systems and fixture configurations while the rough-in is still adjustable. In NYC, sourcing also needs attention because a delayed valve or glass panel can interrupt several trades after the bathroom has already been opened.
For a compact room, a curtain may preserve more clearance than a swinging door. A fixed glass panel can reduce visual bulk but requires careful splash control. Frameless glass demands accurate finished dimensions and solid blocking, so it shouldn't be treated as a final decoration decision.
Navigating Permits and Project Costs
A NYC tub-to-shower conversion becomes a permitting and budgeting issue as soon as the work changes drains, supply lines, walls, electrical circuits, or ventilation. The contractor should identify the required filings, licensed trades, inspections, and building access rules before demolition. In a co-op or condo, the alteration package may also require insurance documents, approved drawings, restricted work hours, and board or management sign-off. Those requirements can delay the start even when the bathroom design is already complete.
Published project ranges provide only a starting point. A basic conversion can fall near $1,200, while a more involved installation can reach $8,000, depending on plumbing, finishes, waterproofing complexity, and design. As noted earlier, published averages place a typical conversion around $3,000, but that figure does not describe a custom curbless bathroom with concealed repairs and premium fixtures.
Build the estimate around risk
Use a line-item proposal instead of one broad allowance. Separate demolition, disposal, structural repair, plumbing, waterproofing, tile, fixtures, glass, permits, protection, and final cleanup. The contract should also explain how concealed damage will be priced when demolition exposes conditions that were not reasonably visible during the walkthrough.
| Cost Factor | Typical Impact | Notes |
|---|---|---|
| Demolition and disposal | Changes with access and existing construction | Apartment protection, elevator rules, and debris handling can affect labor. |
| Plumbing relocation | Can increase scope substantially | Drain alignment and valve placement should be confirmed after opening. |
| Structural repairs | May become an added cost | Rot, mold, and damaged subfloor must be corrected before waterproofing. |
| Waterproofing and receptor | Determines long-term performance | Slope, liner or membrane, drain connection, and testing belong in the written scope. |
| Tile, fixtures, and glass | Follows the selected finish level | Confirm allowances, lead times, trim compatibility, and enclosure assumptions. |
| Permits and approvals | Affect schedule as well as cost | NYC filings, inspections, and co-op requirements should be identified before demolition. |
Plan the NYC schedule before ordering
Co-op approval can control the start date even after materials arrive. Building rules may restrict deliveries, demolition hours, water shutoffs, elevator use, and inspection access. A responsible contractor coordinates those limits with the plumbing and waterproofing sequence instead of promising a fast installation that ignores approvals.
Ask who holds the applicable licenses, who prepares filings, and who communicates schedule changes. This licensed contractor hiring checklist for NYC renovations can help compare proposals by scope, documentation, insurance, and responsibility for corrective work.
A low initial bid is not a controlled budget if it excludes the conditions most likely to appear after demolition.
If you want a contractor who handles filings and concealed-condition allowances from the start, Excellent Home Improvement offers NYC bathroom renovations covering demolition, plumbing coordination, waterproofing, tile, fixtures, ventilation, and project management. Fixed-price proposals are developed from a site walkthrough. Visit Excellent Home Improvement to request an assessment and discuss approvals, hidden-condition risk, and finish scope before work begins.


