Bathroom Renovation Materials: The Complete 2026 Guide
Bathroom Renovation Materials. Explore every bathroom renovation material in 2026, from waterproofing membranes and backer boards
By Excellent Home Improvement

You're choosing tile, a vanity, and a faucet, and the showroom is making every decision feel equally important. It isn't. The finish you can see matters, but the layers behind it determine whether your bathroom stays dry, stable, and easy to maintain after years of steam, splash, cleaning, and movement.
Bathroom renovation materials should be selected as a connected assembly, not as a collection of attractive products. Waterproofing, substrates, tile, grout, ventilation, cabinetry, and fixtures all have to work together. This guide approaches those decisions the way a renovation project manager does, by looking at performance, installation risk, code benchmarks, maintenance, procurement, and the cost of getting an invisible layer wrong.
Table of Contents
- Why Bathroom Renovation Materials Matter More Than Fixtures
- How Bathroom Materials Are Assembled From Substrate to Finish
- Backer Boards for Wet Areas Compared
- Waterproofing Membranes and Code Thresholds
- Tile Flooring and Wall Materials Compared
- Grout and Sealants That Keep Water Out
- Vanities Tubs Toilets and Faucet Materials
- The Real Cost of Spa-Trend Finishes
- Ventilation Fans and Moisture Control Accessories
- Sourcing Lead Times and Waste Planning
- Quick Reference Matrix of Bathroom Materials
- Bathowner Questions on Materials Sourcing and Scheduling
Why Bathroom Renovation Materials Matter More Than Fixtures
A Brooklyn couple once came to us with a renovation budget of $28,000 and a clear priority, a $4,200 freestanding tub. The tub was beautiful, and they had already chosen the filler and finish. Once the existing wall was opened, the core problem appeared: 1920s plaster, failing 4x4 ceramic tile, and no waterproofing membrane behind the shower assembly.
The tub had become the emotional center of the project, but it wasn't the part threatening the room. A freestanding tub filler can be replaced in an afternoon. A failed waterproofing layer behind tile can mean removing the tile, wallboard, and sometimes damaged framing before rebuilding the wet area correctly.
Practical rule: Put the money you can't see in the scope before you spend on the fixtures you can photograph.
That distinction matters because a bathroom is an aggressive environment for building materials. Steam enters air, water reaches corners and penetrations, substrates move, and cleaning products attack finishes. The tile may look perfect while moisture is already traveling behind it if the assembly was never designed to control water.
The visible finish is only the last decision
The 2025 U.S. Houzz Bathroom Trends Study reported a national median renovation spend of $13,000 in 2024, down from $15,000 in 2023, showing how material and finish choices influence a project budget in a shifting market according to the study. The same report found that wet rooms represented 16% of renovated bathrooms, up 3 percentage points year over year, which raises the performance requirements for floors, walls, drains, membranes, and ventilation.
The right question isn't “Which fixture is most luxurious?” It's “What material system can support this fixture and survive the room's wettest conditions?” A heavy tub needs a properly supported floor. A wall-mounted faucet needs planned framing and plumbing. A large-format stone wall needs a flat substrate and an installation method that can carry its weight.
Build the budget from the inside out
Start with demolition, framing, substrate repair, waterproofing, slope, and ventilation. Then price tile, grout, cabinetry, countertops, and fixtures. If the budget tightens, simplify a decorative finish before cutting the membrane, drainage work, or substrate preparation.
That approach protects the expensive items, too. A premium faucet installed over a poorly prepared wall doesn't create a premium bathroom. It creates a fixture sitting on top of deferred risk.
How Bathroom Materials Are Assembled From Substrate to Finish
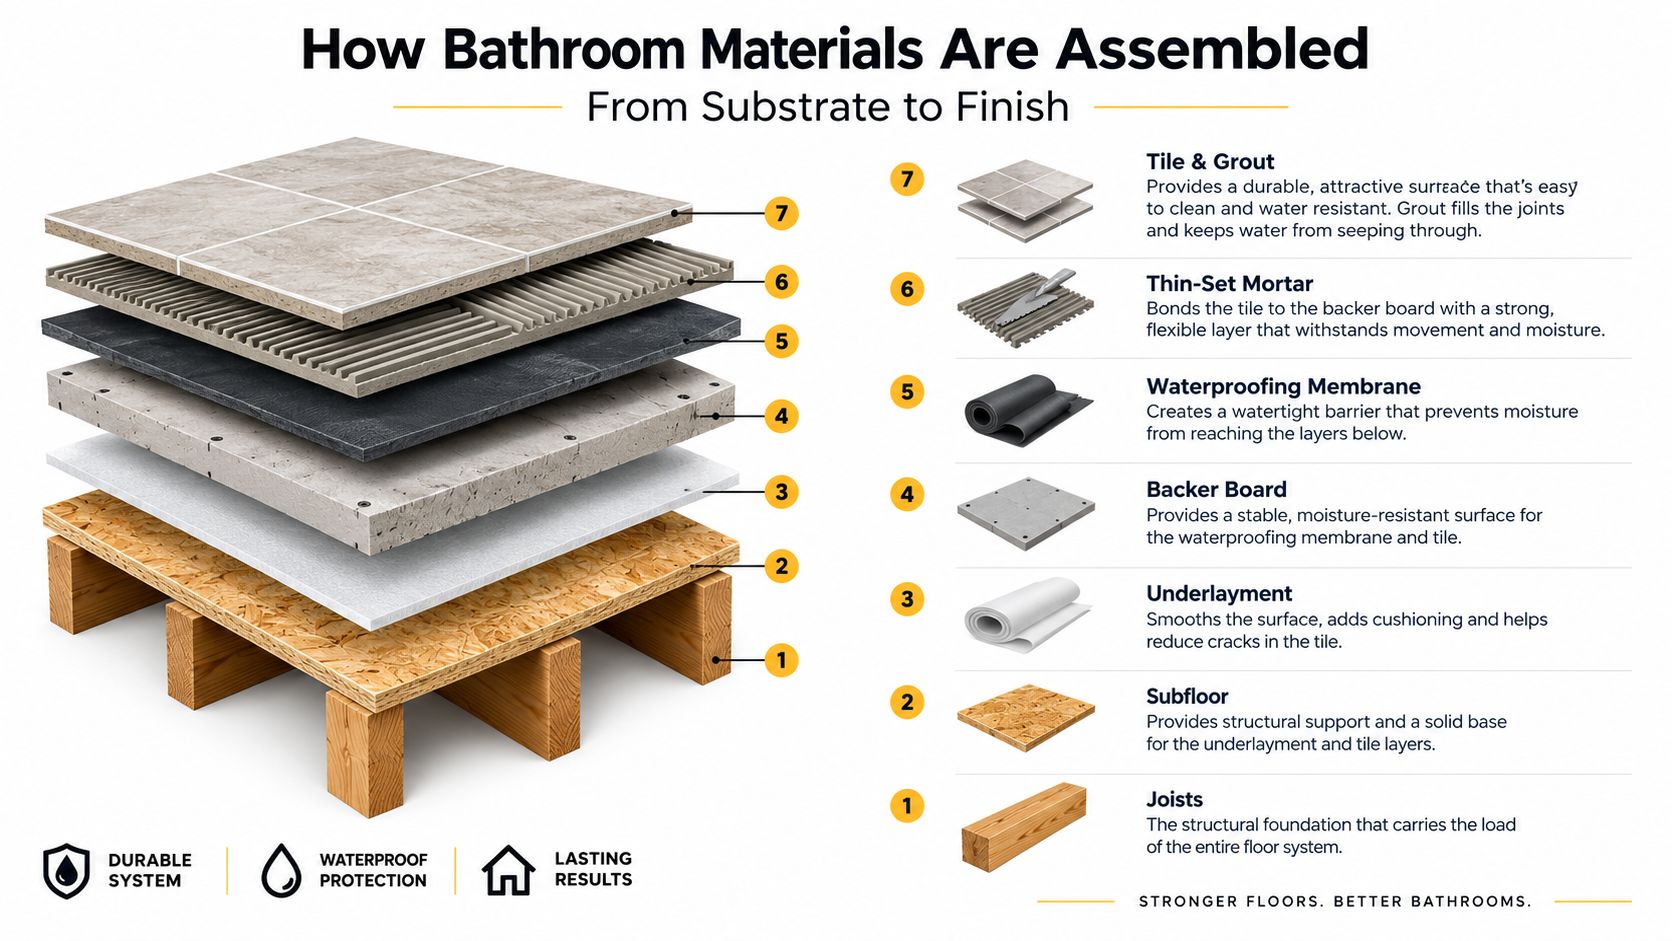
A bathroom floor succeeds or fails as a connected assembly. Joists carry the load, the subfloor ties the framing together, and every layer above must suit the movement, moisture, and finish requirements of the room.
The typical sequence runs from joists to subfloor, then an approved underlayment or uncoupling layer, backer board where specified, waterproofing, thin-set mortar, tile, grout, and flexible sealant at movement joints. Each material has a defined job. Skipping or substituting one layer can transfer stress or moisture into the next.
Wall assemblies need the same discipline
A wet wall generally progresses from studs and services to the specified vapor-control layer, backer board, waterproofing, thin-set, tile, grout, and flexible caulk at changes of plane. Shower receptors, tub edges, curbs, niches, benches, valve penetrations, and pipe openings interrupt the continuous surface, so each requires compatible detailing.
Tile and grout are finish materials, not a waterproofing system. DIN 18534, issued by the German Institute for Standardization, addresses interior waterproofing and bonded waterproofing in areas exposed to splash and service water. The exact assembly still depends on the selected products, substrate, exposure level, and local code requirements.
Dry rooms and wet rooms aren't interchangeable
A powder room without a shower has a different moisture load from a walk-in shower. Standard gypsum board may suit a protected dry area when the finish and local requirements permit it. A shower over an absorbent substrate needs a designed waterproofing assembly, including treated seams and penetrations, rather than tile adhesive and grout alone.
Material choices also affect installation and maintenance. Large-format stone demands flatter substrates, stronger handling plans, and careful support. Natural-look surfaces can show staining, mineral deposits, or uneven wear if grout joints and sealants are neglected. Confirm the membrane, mortar, primer, fasteners, and board are compatible before delivery. That check prevents a hallway full of unusable tile.
Backer Boards for Wet Areas Compared
Backer board is the working surface between framing and finish. The three broad categories used in residential work are cement board, foam-core board, and glass-mat gypsum. They can all be useful, but they don't behave the same way when cut, fastened, loaded, or exposed to water.
Cement board is dense, stable, and familiar to tile installers. It doesn't provide waterproofing on its own, so the assembly still needs a compatible sheet or liquid membrane in a shower. Foam-core board is lighter and easier to cut, and many systems integrate a waterproof skin, reducing the number of separate layers. Glass-mat gypsum is efficient in appropriate applications, but it shouldn't be treated as a universal substitute for a wet-area system.
Comparison of backer boards
| Property | Cement Board | Foam Board | Glass-Mat Gypsum |
|---|---|---|---|
| Moisture behavior | Water-resistant, not waterproof without a membrane | Waterproof-faced system when seams and penetrations are treated correctly | Moisture-resistant surface, application-dependent |
| Compressive strength | High and dense | Varies by system and thickness | Lower than cement board |
| Fastener holding | Strong with correct fasteners and framing | Requires approved washers or fasteners | Suitable for approved assemblies |
| Handling | Heavy, dusty, harder to cut | Light and easy to shape | Lighter than cement board |
| Tile loading | Broadly suitable when framing and method support the finish | Must follow system limits | Must follow tested assembly limits |
| Standards and methods | Commonly evaluated under ANSI A118.9 and TCNA methods | Use the manufacturer's tested system and tile method | Use the manufacturer's tested system and tile method |
| Separate membrane | Usually required in wet zones | Often integrated into the board system | Usually required where waterproofing is needed |
Choose for the whole assembly
The installer needs to know more than the board brand. Ask which membrane, thin-set, fasteners, seam treatment, corner pieces, and tile weight the system allows. A board that performs well in one assembly may fail when paired with an incompatible coating or untreated penetration.
Cutting also affects labor. Foam board usually cuts quickly with hand tools. Cement board creates more dust and takes more effort around plumbing and electrical openings. Glass-mat gypsum can be efficient, but damaged edges and poorly treated joints can compromise the intended performance.
Cost per square foot installed varies by region, access, board thickness, labor rates, and the amount of detailing. Price the complete assembly, including handling, fasteners, seam treatment, membrane, and inspection time, rather than comparing board prices alone.
Waterproofing Membranes and Code Thresholds
A shower can look finished while water is already reaching the framing. Waterproofing therefore has to be specified as a complete assembly, including the membrane, substrate, seams, corners, curbs, valves, niches, drains, and fastener penetrations. Sheet membranes, liquid-applied elastomers, and factory-membrane shower bases can all work, provided the components are compatible and installed to the tested method.
For tiled wet areas, select a bonded waterproof membrane meeting ANSI A118.10. The standard covers load-bearing, bonded membranes intended to protect the tile assembly during service. Steam rooms require a separate vapor review. Manufacturer documentation commonly identifies 0.5 perms or less for steam-room applications, so a shower membrane should not be approved for steam exposure without checking its vapor rating.
Three membrane families
- Sheet membranes: Their factory-controlled thickness makes coverage easier to inspect. Seams and corners still need full bonding, with no gaps, fish mouths, dust, or other contamination.
- Liquid membranes: They conform well around irregular framing and penetrations. The installer must achieve the specified wet and dry thickness throughout. A visually complete coat can still be too thin to perform as intended.
- Factory-membrane bases: These simplify shower-floor geometry and slope control. The drain connection, wall transition, curb, and compatibility with the wall system remain inspection points.
Coverage depends on exposure and substrate. Under E3/AS1, BRANZ states that membranes are required behind tiles in shower enclosures over absorbent substrates. It recommends membranes in bathrooms, kitchens, and laundries over absorbent floor substrates, and extends protection in open showers to walls within 1500 mm. Enclosed showers receive waterproofing across all floor and wall tiles BRANZ wet-area guidance.
What belongs in the submittal
Before tile installation, collect:
- The product data sheet and current installation instructions.
- Substrate, primer, and curing requirements.
- Seam, corner, drain, curb, and penetration details.
- Warranty terms and exclusions.
- Installer training or certification records where required.
- The flood-test record when the assembly or local authority requires testing.
Perform the flood test after the membrane cures and before finishes conceal the work. A commonly specified procedure is a 24-hour plug test, while ASTM D5957 serves as a reference for certain liquid-applied waterproofing evaluations. Confirm local inspection requirements rather than treating one duration as universal.
For a plain-language sequence, use this bathroom waterproofing guide. The membrane must remain continuous, compatible, fully cured, and available for inspection before tile covers it.
Tile Flooring and Wall Materials Compared
Tile selection starts with exposure, not color. Porcelain, ceramic, natural stone, and glass each offer a different balance of absorption, strength, texture, cutting behavior, and maintenance.
Porcelain is often the practical default for floors because it combines low absorption with broad format and finish options. The 2025 Houzz study recorded porcelain as the most popular bathroom flooring material at 39%, followed by ceramic at 26%, so those two categories represented 65% combined among the reported choices the Houzz bathroom trends study documents the flooring preferences. A separate Houzz report also found paint outside the shower used by 72% of homeowners, reinforcing the distinction between protected wall areas and direct wet zones the 2024 Houzz bathroom trends report.
Compare the material before you compare the color
| Tile Material | Water Absorption | Slip Rating Wet | Maintenance Cycle | Installed Cost Per Sq Ft |
|---|---|---|---|---|
| Porcelain | Low when classified as porcelain | Specify a tested wet-floor rating, with DCOF ≥0.42 where applicable | Routine cleaning, grout care | Project-specific |
| Ceramic | Varies by body and product | Confirm the tested rating for the intended location | Routine cleaning, grout care | Project-specific |
| Natural stone | Varies widely by stone and finish | Honed or textured surfaces generally suit wet zones better than polished surfaces | Sealing and stone-safe cleaning | Project-specific |
| Glass | Product-dependent | Small formats and textured surfaces can improve footing | Frequent cleaning to control spotting | Project-specific |
The ANSI A137.1 DCOF benchmark of 0.42 or greater is used for certain wet interior floors. Don't substitute an older SCOF label for a current DCOF result, and don't select a polished surface for a shower floor just because the showroom lighting makes it look elegant.
Natural stone needs a maintenance conversation. Marble can etch from acidic products. Limestone and travertine need compatible cleaners and sealing. Slate texture can improve grip but may hold residue. Large-format tile demands a flat substrate, commonly checked against a 1/4-inch variation over 10 feet in tile installation guidance, because unsupported corners and lippage can lead to cracking.
Specify body type, finish, size, edge, trim profile, grout joint, and slip rating on the selection sheet. For porcelain options, review the porcelain tile collection with those criteria, not just a photograph.
Grout and Sealants That Keep Water Out
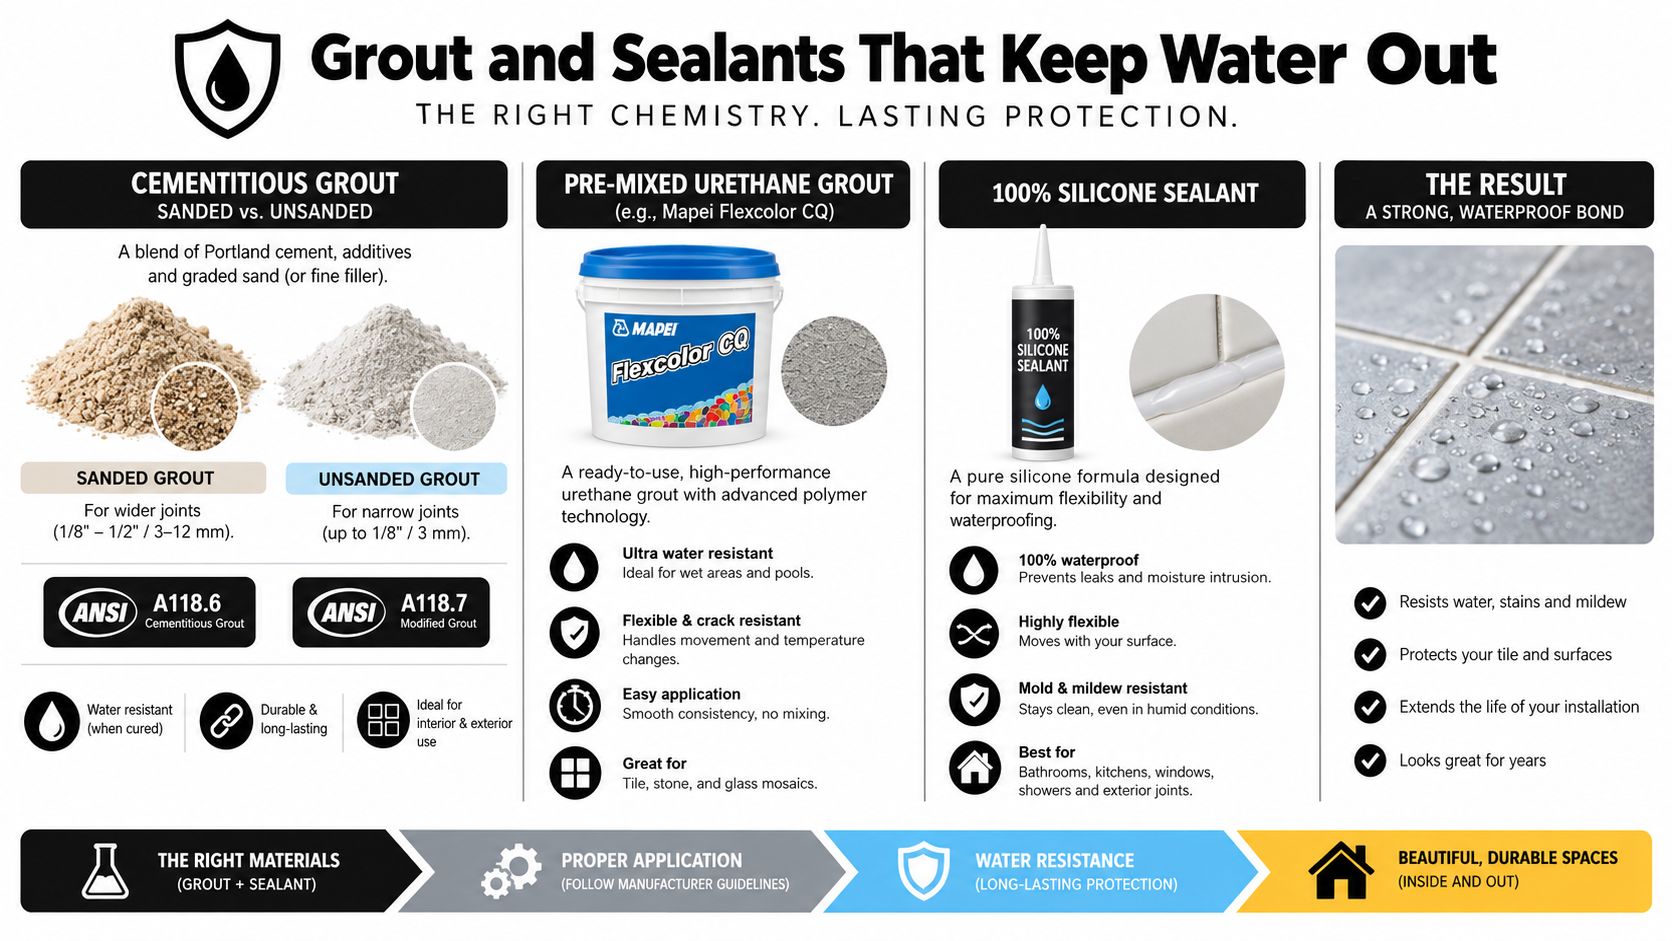
Grout fills joints, but it isn't the waterproofing layer. Cementitious grout is porous even when sealed, and water can travel through it into the assembly if the membrane behind the tile is missing or discontinuous.
The main choices are cementitious grout, premixed urethane grout, and 100% solids epoxy grout. Cement grout remains practical and repairable, with sanded and unsanded formulations selected according to joint width, tile surface, and the applicable ANSI A118.6 or A118.7 classification. Urethane grout resists staining without a separate sealer in many applications. Epoxy grout, evaluated under ANSI A118.3, offers strong chemical and stain resistance but demands disciplined mixing, placement, and cleanup.
Movement needs a flexible joint
Changes of plane are movement zones. Wall-to-wall corners, wall-to-floor transitions, tub edges, and material changes should receive a flexible sealant rather than grout. Tile industry guidance in TCNA EJ-171 also calls for movement joints in field areas at appropriate intervals, commonly 8 to 12 feet, depending on the assembly and conditions.
Use a 100% silicone or an ASTM C920 sealant suited to the exposure. Inside shower corners need a mold-resistant formulation, correct joint depth, and clean bonding surfaces. If a joint is deep, backer rod controls sealant geometry and prevents three-sided adhesion. Skipping it can produce splitting, premature separation, or a joint that never cures correctly.
Seal only what needs sealing
Penetrating sealers enter porous stone or grout without creating a heavy surface film. Topical sealers sit on the surface and can change appearance or wear unevenly. Many porcelain and glazed ceramic products don't need sealing, while natural stone usually needs a product-specific maintenance plan.
Ask for a sample-board test before installation. The test should include the tile, chosen grout, cleaner, and sealant, because color, absorption, and cleanup behavior can change across the complete assembly.
Vanities Tubs Toilets and Faucet Materials
Fixtures still deserve careful specification, but their material choice has to match location, load, water exposure, and future service access. A vanity near a shower needs a different carcass strategy from a cabinet in a dry powder room.
For wet locations, solid-surface panels, quartz composite, and marine-grade plywood are sensible options for vanity construction and tops. Avoid MDF cores close to splash zones unless the product is specifically engineered and protected for that exposure. The sink cutout, backsplash joint, plumbing access, and countertop edge often fail before the cabinet box does, so inspect those details during installation.
Match the fixture to the building
Cast iron tubs feel solid and hold heat, but their weight can create a structural question on an upper floor. A filled cast iron tub may impose a substantial load on joists, while lighter composite or solid-surface options can simplify placement where the structure has limited capacity. Don't guess. Have the framing and load path reviewed before ordering.
For toilets, verify the rough-in, outlet position, seat height, supply location, and service clearance before selecting the bowl. A gravity-fed or pressure-assisted model with a strong independently tested flush result is generally more useful than a decorative shape that leaves poor access around the tank or valve.
Faucets need a body that tolerates repeated wetting, a ceramic cartridge or valve, accessible shutoffs, and a finish appropriate to the room's cleaning conditions. A wall-mounted faucet also requires blocking and plumbing depth before the wall closes. Deck-mounted faucets offer easier replacement later, but the deck hole pattern must match the basin.
| Fixture Category | Material Options | Wet-Zone Suitability | Expected Lifespan | Spec Note |
|---|---|---|---|---|
| Vanity | Solid surface, quartz composite, marine-grade plywood | Strong when edges and plumbing openings are sealed | Long with dry cabinet interiors | Avoid vulnerable cores near direct splash |
| Tub | Cast iron, composite, solid surface | Excellent with supported installation | Long with serviceable drain and overflow | Review floor structure before heavy units |
| Toilet | Vitreous china with gravity or pressure-assisted mechanism | Designed for bathroom exposure | Long when parts remain serviceable | Confirm rough-in and access |
| Faucet | Brass or compatible durable body with ceramic valve | Strong when finish and seals suit exposure | Long with replaceable cartridges | Coordinate trim depth and shutoffs |
Browse sinks and tubs for bathroom renovation only after the framing, drain, supply, and clearance requirements are documented. The product has to fit the room you can build.
The Real Cost of Spa-Trend Finishes
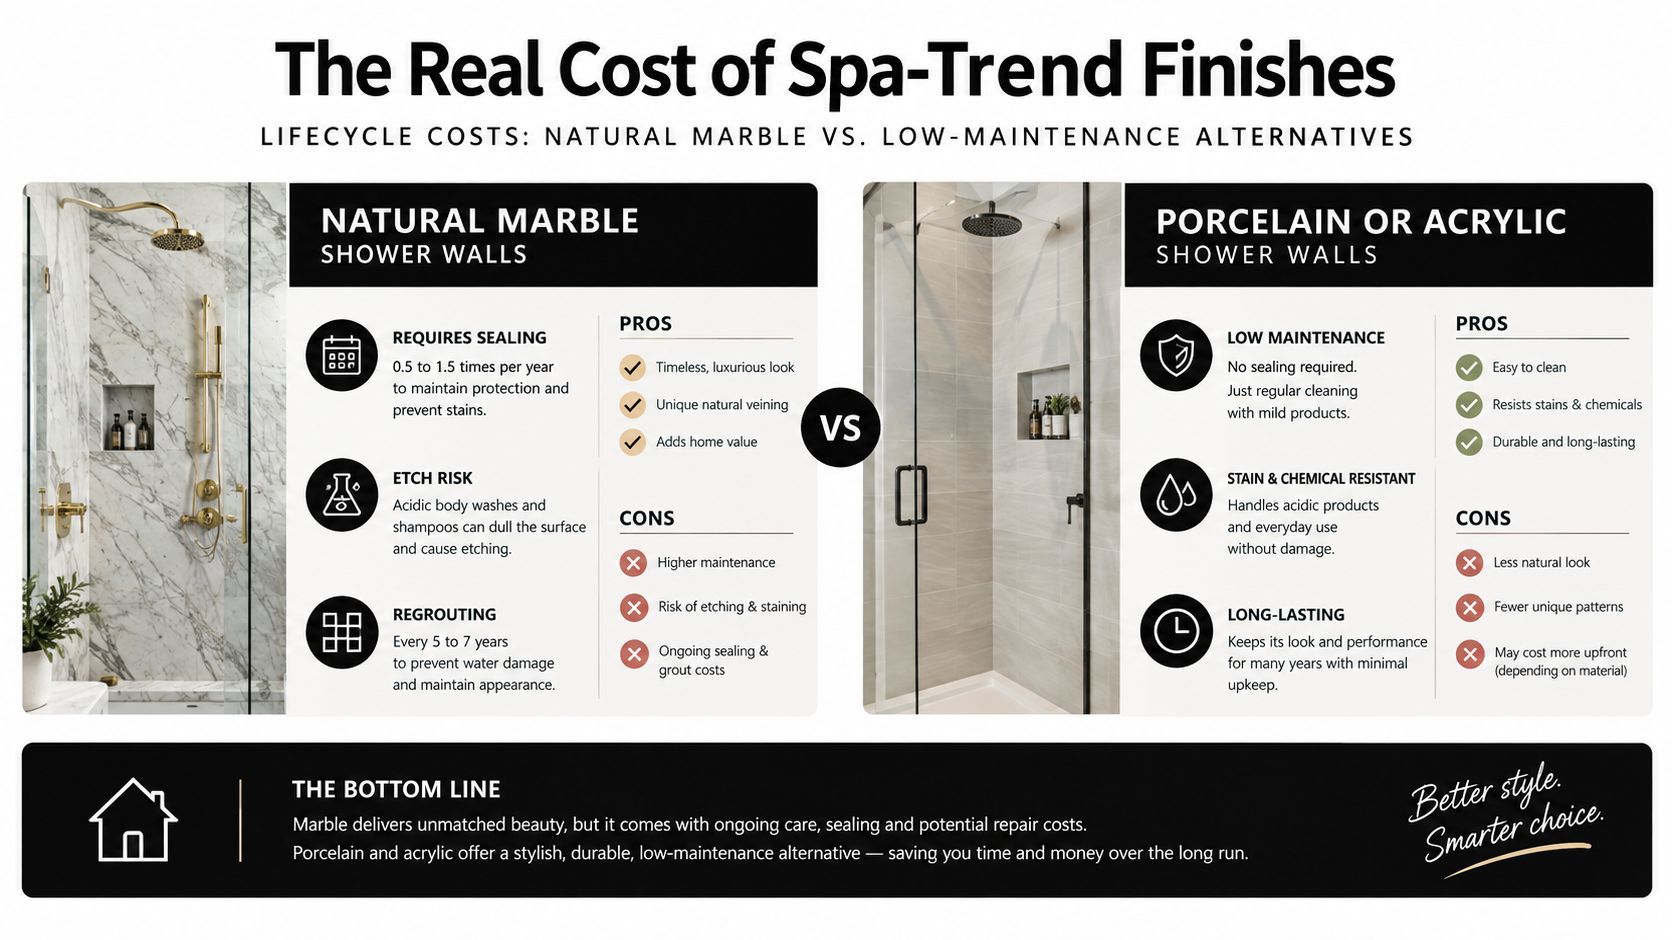
Natural-looking finishes sell a mood, not a maintenance schedule. Current design coverage favors warmer, softer, and more organic surfaces such as limestone, travertine, wood tones, terrazzo-like textures, and microcement, but inspiration images rarely show the cleaning, sealing, repair, or replacement work behind that look recent trend coverage illustrates the direction.
Natural marble is the clearest example. It can be exceptional in a bathroom, but acidic body washes and cleaners can etch the surface. Sealing may be needed 0.5 to 1.5 times per year, and regrouting may be needed every 5 to 7 years, depending on exposure and care. Those figures come from the supplied project guidance, and they should be treated as planning assumptions to verify with the stone supplier and installer, not as a warranty.
Decorative coatings need specialist labor
Microcement and tadelakt create smooth, plaster-like surfaces, but pinholes, impact damage, color variation, and poor detailing at corners can make repairs visible. The supplied planning brief places microcement installation around $40 to $80 per square foot installed, followed by annual waxing, but local labor and system requirements should be confirmed before approval.
Fluted and ribbed ceramic tile adds shadow and texture, yet every reveal collects grout haze and makes lippage easier to see. Rectified edges and a controlled joint help, but they don't replace a flat substrate or a careful setting crew.
A finish that looks expensive in the showroom can be expensive because it requires more maintenance, not because it performs better.
Metal finishes have their own caveats. Brushed brass with a durable deposited coating may resist wear, but warranty exclusions can apply in coastal humidity or when abrasive cleaners are used. Put the care instructions and warranty exclusions in the homeowner handover package.
Ventilation Fans and Moisture Control Accessories
A bathroom fan isn't a cure for a weak moisture-control system. The fan, duct, damper, exterior termination, control, make-up air path, wall finishes, and drying habits all affect whether moisture leaves the room.
Specify an appropriately sized, independently tested fan and verify the installed duct path. Smooth metal ducting creates less resistance than a long run of crushed flexible duct. The duct should terminate outdoors, include a backdraft damper, and remain accessible enough for inspection. Moist air should never be discharged into attic insulation or a concealed cavity.
Size the system, then control it
Room area is only the starting point. Static pressure from elbows, grilles, long duct runs, and exterior caps can reduce actual airflow. A quiet fan that can't overcome the duct resistance isn't performing its job.
Controls should match how people use the room:
- Humidity sensing: Starts the fan when moisture rises and continues operation after the shower.
- Timer control: Keeps the fan running after occupants leave instead of relying on a short manual switch cycle.
- Low-noise operation: Helps residents use the fan consistently, especially when bedrooms share a wall.
- Make-up air: A door undercut or transfer path lets replacement air enter so the fan can exhaust rather than stall.
Australian and NCC guidance requires wet-area waterproofing membranes to comply with AS/NZS 4858 and be installed according to the manufacturer's instructions. It also places a practical benchmark on shower-area wall lining protection, with waterproofing extending to at least 1800 mm above finished floor level or 50 mm above the shower rose, whichever is higher the referenced technical guidance outlines the system approach.
Paint with mildew resistance, properly treated cement-board corners, compatible sealants, and a vapor-permeable wall system can support drying. None replaces exterior exhaust.
Sourcing Lead Times and Waste Planning
Material selection changes the schedule before demolition begins. A custom surface, unusual tile, or imported fixture may look like a finish decision, but it can become a critical-path item if no acceptable alternate exists.
Ask the general contractor to identify long-lead items, approved alternates, storage requirements, and inspection points before ordering. Highly customized surfaces, mosaics, natural stone, and microcement can create more coordination work than a standard tile field. One materials guide notes that specialty tile layouts and mosaics can add up to 20% more material waste and cutting complexity the procurement guidance explains why layout changes real material use.
Decide who should buy what
Homeowners can sometimes purchase decorative accessories or a clearly documented in-stock finish. Contractors should usually procure materials where compatibility, warranty, quantity, lot control, and delivery inspection matter, especially membranes, setting materials, valves, drains, and specialty tile.
A useful handoff sequence is:
- Substrates and framing materials.
- Waterproofing products and accessories.
- Tile, trims, and grout.
- Cabinetry and countertops.
- Plumbing trim, mirrors, glass, and accessories.
Don't order tile by the visual area alone. Confirm pattern, direction, cuts, niches, transitions, attic stock, and the manufacturer's recommended allowance with the installer. Waste is influenced by room geometry and layout, not only by the material's unit price.
Keep porcelain and backer-board debris separated from waterproofing pails, adhesives, and spray containers. Disposal requirements vary, so the project plan should identify clean-fill and regulated waste routes before the work starts.
Quick Reference Matrix of Bathroom Materials
A comparison matrix is useful during a pre-construction meeting because it forces the team to discuss performance and failure points before finish selections become emotional. It also exposes where a product needs a supporting layer, such as a membrane behind tile or a sealed edge around a vanity top.
The table below uses qualitative cost descriptions rather than invented market pricing. Actual pricing depends on location, access, labor, substrate condition, product availability, and the amount of detailing.
| Material | Typical Size or Thickness | Code or Performance Benchmark | Common Failure Mode | 2026 Cost Range |
|---|---|---|---|---|
| Waterproofing membrane | Product-specific sheet or liquid layer | ANSI A118.10, AS/NZS 4858, or applicable local method | Untreated seam, corner, curb, or penetration | Project-specific |
| Cement board | Product-specific board thickness | ANSI A118.9 and tested tile methods | Board treated as waterproof without a membrane | Project-specific |
| Foam backer | Product-specific panel thickness | Manufacturer-tested waterproof tile assembly | Damaged skin or poorly sealed fastener | Project-specific |
| Porcelain tile | Product-specific format and thickness | Water absorption, DCOF, PEI where applicable | Cracking from movement or inadequate coverage | Project-specific |
| Ceramic tile | Product-specific format and thickness | Product classification and wet-use suitability | Absorption or edge damage in an unsuitable location | Project-specific |
| Natural stone | Slab or tile, product-specific | Stone-specific absorption and finish requirements | Etching, staining, or neglected sealing | Project-specific |
| Epoxy grout | Product-specific joint application | ANSI A118.3 | Poor cleanup or incorrect mixing | Project-specific |
| Vanity substrate | Cabinet and top dimensions | Moisture exposure and edge protection | Swollen core at plumbing or splash edges | Project-specific |
| Tub material | Product-specific shell and support | Structural support and drain compatibility | Deflection, cracking, or unsupported load | Project-specific |
| Toilet material | Product-specific bowl and tank | Rough-in, flush performance, local plumbing code | Poor access, wrong rough-in, or failed seal | Project-specific |
| Faucet body | Product-specific casting and cartridge | Applicable plumbing and flow requirements | Cartridge wear, leaking connections, finish damage | Project-specific |
| Exhaust fan | Product-specific airflow rating | HVI or local mechanical requirements | Duct resistance, attic discharge, or weak control | Project-specific |
Use the matrix in the showroom, but confirm every row against the product data sheet and local authority requirements. A benchmark is useful only when the delivered material and installed assembly match it.
Bathowner Questions on Materials Sourcing and Scheduling
Homeowners usually ask the same questions once the material list becomes real. Should tile be ordered before demolition? Who checks the lot? What happens if the custom vanity arrives damaged? Who pays when a rough-in valve is back-ordered?
The answer starts with responsibility in writing. The contract or procurement schedule should identify who selects, orders, receives, inspects, stores, and warranties each material. If the homeowner buys a finish directly, the project should still document the approved product, quantity, delivery date, and responsibility for concealed defects.
Should tile arrive before demolition?
Not necessarily, but the project shouldn't reach tile installation without the tile physically inspected and counted. Ordering before demolition can protect the schedule when the existing dimensions are understood, but opened walls and floors may reveal changes that affect quantity, layout, or substrate requirements.
Before acceptance, photograph:
- Product labels: Keep the manufacturer, color, size, and lot information.
- Delivered condition: Record cracked boxes, chipped edges, and visible shade variation.
- Quantity: Compare the delivery against the approved takeoff and attic-stock plan.
- Storage: Keep tile dry, supported, and protected from traffic or freezing conditions where applicable.
Who handles a damaged vanity?
The person receiving the vanity should inspect it before installation. A damaged cabinet discovered after plumbing and countertop work may create a dispute over whether the damage occurred during delivery, storage, or installation. Record the condition immediately, notify the seller and contractor, and don't modify the item until the replacement or repair path is approved.
Custom cabinetry also needs field verification. Walls may not be square, plumbing may shift, and finished dimensions may differ from early drawings. The cabinet order should follow a verified site measurement, not a showroom assumption.
What happens when a valve is back-ordered?
The project manager should identify whether the missing valve affects rough-in, wall closure, or only trim-out. If the valve body is needed before waterproofing and tile, an approved alternate must be selected before the wall closes. If only decorative trim is delayed, the contractor may be able to complete other work, but the final installation still needs a documented compatibility check.
Stage deliveries so substrates arrive first, waterproofing second, finish tile third, and trim and accessories last. Confirm lead times with the general contractor in writing every two weeks, photograph lot numbers for warranty records, and preserve a schedule buffer for curing, punch-list corrections, and sealant touch-ups. Excellent Home Improvement coordinates bathroom waterproofing, tile, fixtures, vanities, ventilation, sourcing, and project management for renovations across New York City and Westchester. Visit Excellent Home Improvement to discuss your material selections, site conditions, and construction sequence before ordering.