Bathroom Renovation Steps That Actually Work
Learn the bathroom renovation steps NYC contractors follow, from planning and permits to waterproofing, tile, fixtures, and final inspection
By Excellent Home Improvement & Remodeling

You've signed the contract, chosen the tile, and cleared the bathroom. Then the first morning arrives and you realize nobody has explained what happens between demolition and the final shower. In a New York City apartment, the answer matters because an overlooked approval, an opened wall, or a failed waterproofing inspection can stop the job when every finish has already been ordered.
The reliable bathroom renovation steps follow a controlled sequence. Planning comes before demolition, rough plumbing and electrical work happen before walls close, waterproofing is inspected before tile hides it, and ventilation is commissioned rather than judged by how quiet the fan sounds. The messy middle is where good project management earns its keep.
Table of Contents
- What a Real Bathroom Renovation Looks Like End to End
- Planning, Permits, and Pre-Demo Preparation
- Selective Demolition and Framing Repairs
- Rough Plumbing, Electrical, and Mechanical
- The Waterproofing System and Why It Decides Everything
- Tile, Fixtures, Trim, and Final Inspection
- How to Verify Your Bathroom Exhaust Fan Actually Works
What a Real Bathroom Renovation Looks Like End to End
You've just signed for a bathroom renovation in a Bronx co-op. The contractor measures the room, photographs the existing conditions, confirms the building's rules, and reviews every fixture before anyone removes a tile. That early discipline may feel slow, but it prevents a plumber from discovering that the selected vanity conflicts with the drain location or that the board requires paperwork nobody filed.
A properly managed job moves through recognizable stages:
- Planning and approvals: The layout, fixtures, materials, permits, building requirements, and site protections are confirmed.
- Selective demolition: Crews remove only what the scope requires, control dust, and record concealed conditions.
- Framing and rough-ins: Carpenters correct substrates, while plumbers, electricians, and mechanical trades install the systems that will disappear behind the walls.
- Waterproofing: The shower membrane, drain connection, corners, penetrations, and slope are treated as one wet-area system.
- Tile and trim: Tile, grout, vanity, lighting, plumbing fixtures, accessories, and paint are installed in the correct order.
- Commissioning and closeout: The exhaust system is tested, inspections are completed, defects are corrected, and the punch list is signed.
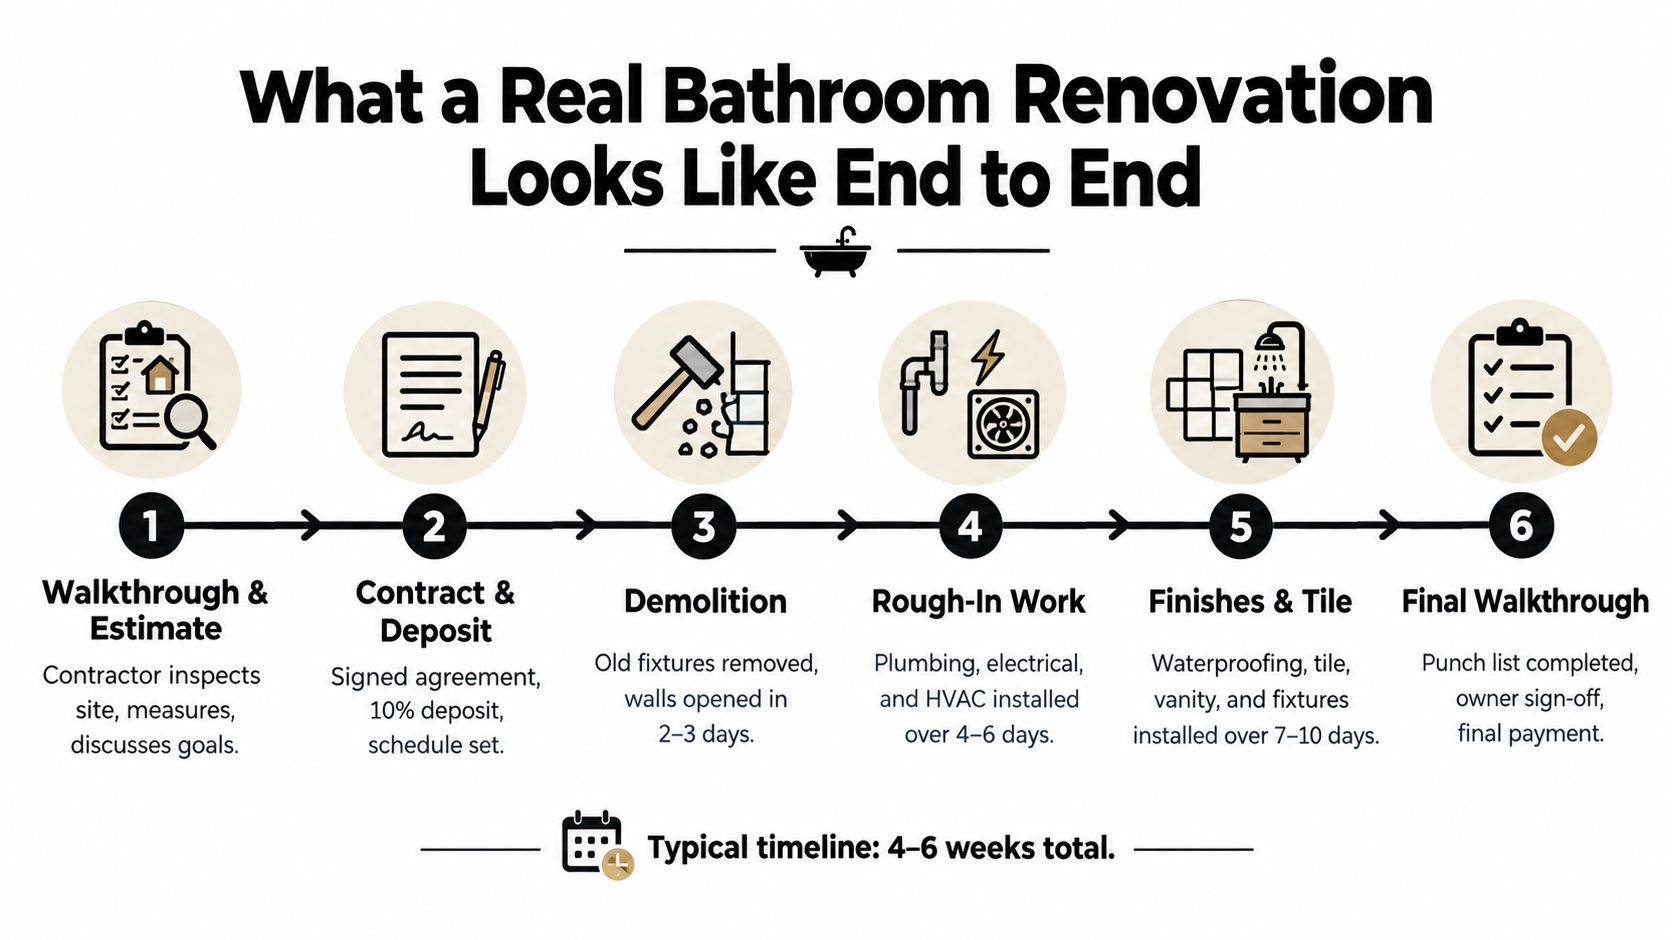
The duration depends on access, approvals, concealed damage, material availability, and whether the building allows work on the planned days. A clean schedule can unravel when the scope wasn't documented or when a selection arrives after the installer is ready. An industry remodeling source reports that incomplete scope definition can produce change orders totaling 10–30% of the original contract, while fully specified designs may limit changes to about 5% or less, mainly for concealed conditions. The change-order guidance supports a simple rule: decide visible items early and reserve allowances for conditions nobody could see.
For a visual example of how a finished project can be organized, review this Morris Park teal bathroom renovation. The point isn't the color palette. It's the coordination behind the finished room.
Project rule: A bathroom isn't a collection of independent trades. Each trade creates conditions the next trade must inherit.
Planning, Permits, and Pre-Demo Preparation
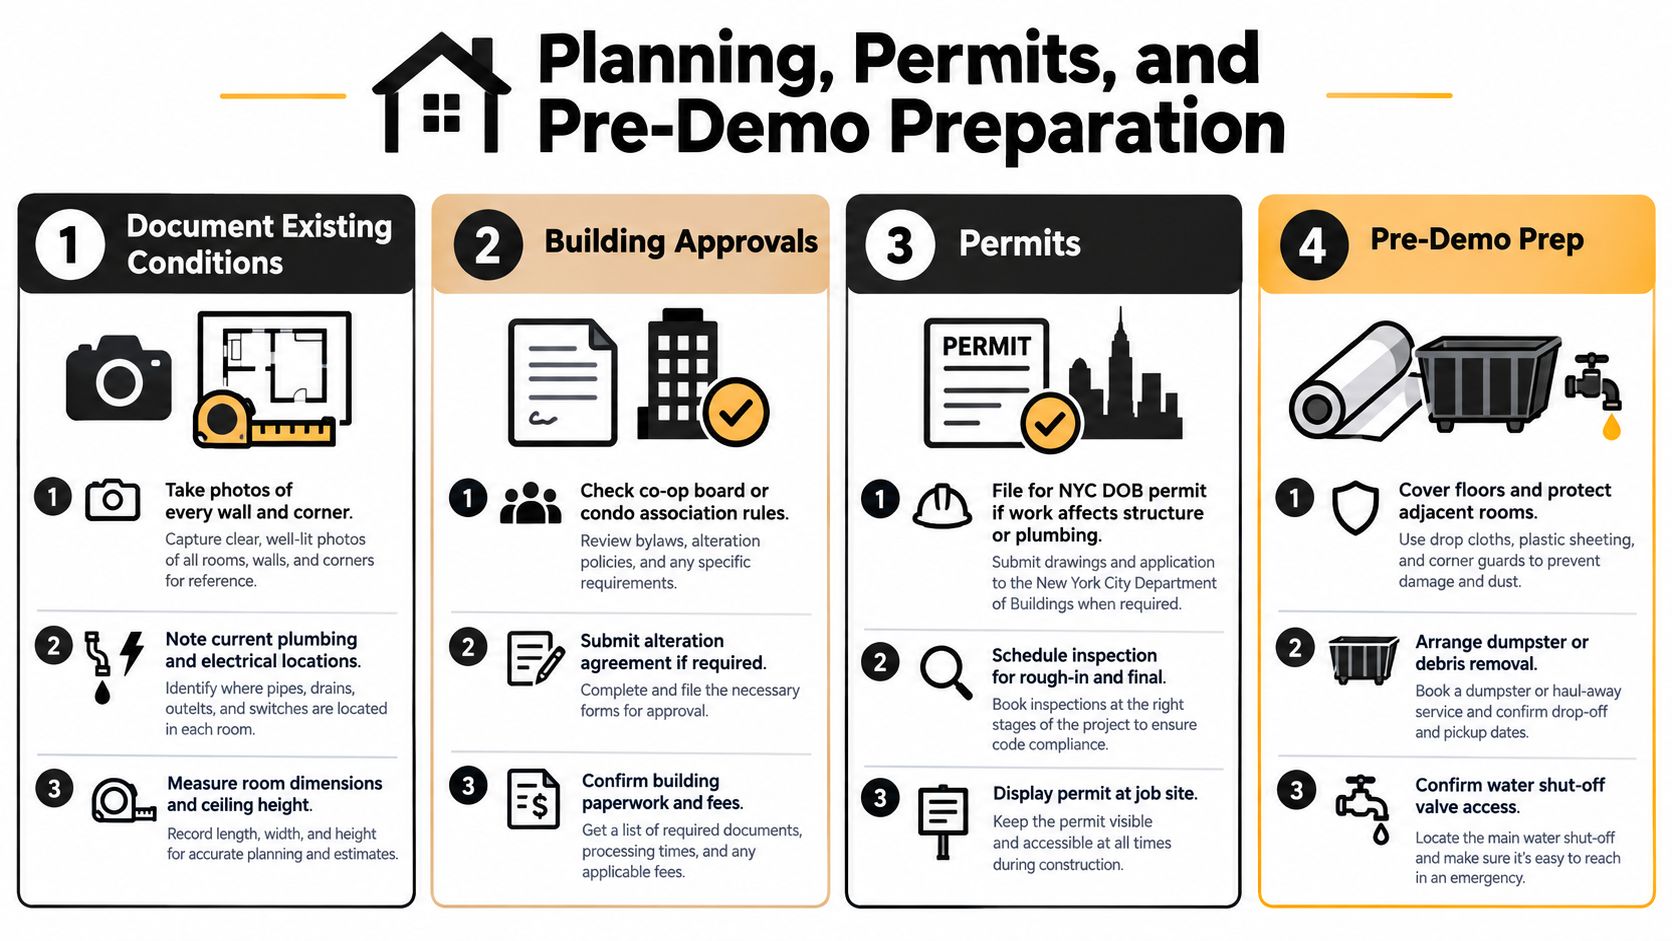
The most expensive bathroom mistakes often happen before the first hammer blow. Start by documenting what exists, not what you assume exists. Photograph every wall, ceiling, corner, fixture connection, shut-off valve, electrical device, and area where the new layout will differ from the old one. Record room dimensions, ceiling height, door swing, window location, plumbing routes, and any visible staining.
In a co-op or condominium, ask the managing agent or board for the alteration requirements before setting a start date. The building may require an alteration agreement, insurance certificates, licensed trade information, work-hour restrictions, elevator reservations, or a review of plumbing and electrical drawings. A single-family home still requires a local permit review when the work affects regulated systems, structure, plumbing, electrical work, or mechanical ventilation. Confirm who is filing, who schedules inspections, and where the permit documentation will be kept.
Check the building's age before disturbing paint
The federal government banned residential lead-based paint in the United States in 1978. In older apartments, brownstones, and multifamily buildings, painted walls, trim, doors, and previously painted surfaces may therefore require lead-safe planning. For paid renovation work in pre-1978 homes, the EPA's Renovation, Repair and Painting Rule generally requires the contractor and firm to be lead-safe certified when painted surfaces are disturbed. The EPA's lead-safe renovation guidance also explains the pre-renovation education requirement.
For interior work, the threshold is more than 6 square feet of disturbed painted surface in a room. For exterior work, it is more than 20 square feet. The rule can apply to demolition, plumbing, electrical work, carpentry, and painting preparation, not just to a dramatic wall removal. Affected surfaces must be tested or presumed to contain lead-based paint, with containment, controlled practices, and thorough cleaning before reoccupancy.
Freeze the scope before the walls open
Your pre-demolition checklist should include:
- Layout: Confirm the location and dimensions of the toilet, vanity, tub or shower, niches, doors, and accessories.
- Fixtures: Approve the exact valve, drain, toilet, sink, vanity, lighting, fan controls, and mirror.
- Materials: Confirm tile, grout, trim, waterproofing components, backer board, sealants, and paint.
- Approvals: Verify permits, board paperwork, insurance documents, work hours, elevator access, and inspection requirements.
- Protection: Isolate water and electrical services, protect floors and adjacent rooms, establish dust containment, and plan debris removal.
Don't let demolition begin while critical selections remain undecided. A missing valve or incompatible drain can force the crew to pause, and a pause in a co-op often affects several trades rather than just one.
Selective Demolition and Framing Repairs
Good demolition is controlled exposure. Crews protect corridors, floors, doors, and neighboring finishes before removing tile, plaster, cabinets, or fixtures. They isolate water and electrical services, contain dust, remove debris through the approved building route, and photograph the exposed structure before covering anything again.
Aggressive demolition creates avoidable damage. A worker who tears through a wall without checking for concealed pipes or wiring can turn a bathroom scope into a larger repair. Careful removal reveals the conditions that control the next decision, including a soft subfloor, damaged joists, corroded supply lines, an out-of-plumb wall, or an old resilient floor that needs separate hazardous-material evaluation.

Repair the structure before installing systems
Framing repairs should solve the reason the old bathroom failed, not merely provide something for new tile to cover. A carpenter may sister joists to support a new tub, reinforce a wall for a wall-hung vanity, add backing for grab bars and accessories, or build a curb-free shower transition. The team should also correct bowed studs and uneven planes before installing the substrate.
A project manager's daily log should record:
- Exposed damage: Note rot, staining, movement, corrosion, and any unexpected material.
- Structural response: Photograph repairs and identify which framing members received reinforcement.
- Backing locations: Mark support for vanities, mirrors, grab bars, shelves, and accessories.
- Substrate readiness: Confirm that walls and floors are sound, flat, dry, and suitable for the selected waterproofing method.
The cheapest time to change the drain location is while the floor is open. The most expensive time is after tile, trim, and a finished ceiling have concealed the route. Don't accept a vague promise that an uneven wall will be “made up” with adhesive. The substrate should be corrected first, because tile setting can't compensate reliably for movement or significant irregularity.
Rough Plumbing, Electrical, and Mechanical
With framing corrected, the trades install the systems that will eventually disappear. Plumbing establishes supply, waste, venting, valve height, drain position, and fixture connections. Electrical work places circuits, switches, lighting, receptacles, GFCI protection, heated-floor wiring, and mirror connections. Mechanical work routes the exhaust duct before the ceiling or wall closes.
The sequence needs active coordination. The plumber can't place a valve based on an unconfirmed finished-wall thickness, and the electrician shouldn't leave a vanity box where the mirror or medicine cabinet will land. The contractor should also protect penetrations and install nail plates where required so later fastening doesn't damage concealed services.
Treat inspections as hold points
Rough inspections happen before drywall, cement board, or other finishes conceal the work. Inspectors and project managers may check plumbing connections and tests, electrical protection and box placement, framing, fire blocking, and the condition of the work area. The exact requirements depend on the jurisdiction and permit scope, so the contractor should confirm them before scheduling.
Don't close the cavity because the next trade is available. Before walls close, verify:
- Plumbing: Supply and drain routes are secure, accessible connections are correct, and pressure-test documentation is available.
- Electrical: GFCI protection, boxes, grounding, cable protection, and backing match the approved plan.
- Mechanical: The fan duct reaches the exterior termination, has an appropriate route, and won't be crushed by the ceiling assembly.
- Documentation: Rough inspections are complete or formally released, and photographs record concealed work.
The wet area remains the main quality-control gate. Waterproofing isn't an afterthought applied by the tile setter. The membrane, drain, corners, penetrations, and substrate must be coordinated before the room becomes visually finished.
The Waterproofing System and Why It Decides Everything
Tile looks solid, but tile and grout aren't waterproof. Water can move through joints, corners, cracks, and small gaps, so the shower relies on a continuous membrane beneath the finish. That membrane must connect the shower floor, walls, corners, niches, penetrations, and drain assembly without an unprotected break.
A liquid-applied membrane can work when the installer achieves the specified coverage and curing conditions. A sheet membrane can provide a consistent layer when seams, corners, and penetrations receive the system's compatible accessories. Hybrid assemblies can also work, but only when the components are approved for use together. Mixing products because they happen to be available on site is a common way to create an untested assembly.
Inspect the wet area before tile
A competent installer prepares the substrate, forms the shower slope, integrates the drain, reinforces changes of plane, seals penetrations, and allows the membrane to cure according to the system requirements. Where the manufacturer and local code require it, the contractor performs a water or flood test before tile installation. The test belongs before the finish, when a defect can still be repaired without destroying a completed shower.
Look for unnecessary fasteners through the membrane. A later trade should not drill into the wet-area system casually to mount a shelf, door track, or accessory. Install backing in advance and use the approved attachment method.
| Failure Mode | Visible Symptom | Verification Step |
|---|---|---|
| Incompatible components | Different membranes, sealants, or drains appear combined without a documented system | Confirm every component belongs to the approved assembly and inspect the manufacturer's installation requirements |
| Missing corner reinforcement | Thin or unreinforced transitions at wall corners, niches, or changes of plane | Check reinforcement and sealing at every change of plane before the substrate is covered |
| Unnecessary membrane penetration | Fasteners or later trade penetrations appear in the shower area | Compare penetrations with the approved detail and confirm backing and sealant methods |
| Walls closed before testing | Tile or backer board hides the wet area before inspection or testing | Require documentation of membrane coverage, drain integration, curing, and any required water test |
Your acceptance record should document membrane coverage, drain integration, slope toward the drain, substrate flatness, plumbing pressure tests, and the status of rough inspections. The bathroom waterproofing guide is useful background, but the installed system must still follow the selected manufacturer's details and local requirements.
Wet-area rule: If you can't inspect the membrane and confirm the drain connection before tile goes up, you're being asked to trust the part most likely to determine the shower's service life.
Tile, Fixtures, Trim, and Final Inspection
Once the wet area passes its quality checks, the visible work can proceed. Tile layout should be resolved before setting begins, especially on focal walls. A good layout protects the sightline, balances cuts, aligns grout joints with fixtures, and avoids leaving a narrow sliver at a prominent corner.
Substrate preparation still controls the result. Large-format tile and natural stone need suitable setting materials, correct coverage, and a flat base. Wet and dry zones may call for different grout decisions, while changes of plane should receive a flexible sealant rather than a rigid grout joint. That detail matters at wall corners, floor-to-wall transitions, and around the tub or shower perimeter.
Check the trim before calling it complete
Final fixture installation should look deliberate, not merely functional. Inspect the following:
- Plumbing trim: Valve escutcheons sit against the finished wall, handles operate smoothly, and every connection is dry.
- Electrical finish: Vanity lighting, receptacles, switches, mirror wiring, and GFCI protection are complete and safely landed.
- Accessories: Shelves, bars, mirrors, and cabinets attach to planned backing rather than relying on tile alone.
- Sealant: Changes of plane and fixture transitions receive appropriate caulking, with clean, continuous joints.
- Ventilation: The fan, grille, control, duct, and exterior termination are installed and ready for commissioning.
The final inspection isn't the same as a visual walkthrough. Required plumbing, electrical, mechanical, and building sign-offs must be completed according to the permit scope. After that, the homeowner and contractor should walk the room together, operate every fixture, inspect grout and sealant, check doors and drawers, test lights and controls, and record each correction on a written punch list.
Don't release final payment because the room photographs well. Release it when the documented work is complete, required sign-offs are addressed, leaks are absent, the fan performs, and every punch-list item has an owner and completion date.
How to Verify Your Bathroom Exhaust Fan Actually Works
A quiet exhaust fan isn't automatically a good exhaust system. The U.S. Environmental Protection Agency says the fan should discharge directly outdoors, not into an attic, wall cavity, soffit, or another interior space. It also warns that hearing the motor doesn't prove that the system is delivering adequate airflow. EPA remodeling and indoor-air guidance provides the right starting point for commissioning.
For a standard bathroom, a common benchmark is about 50 CFM for intermittent operation. A larger primary bathroom may require about 80 CFM, while continuous operation uses a lower target of 25 CFM under the EPA guidance. ASHRAE residential ventilation guidance also addresses local mechanical exhaust and system design, including the relationship between room volume and airflow.
| Scenario | Target Airflow | Verification Method |
|---|---|---|
| Standard bathroom, intermittent operation | About 50 CFM | Test airflow at the grille or confirm tested fan performance at the installed duct resistance |
| Larger primary bathroom | About 80 CFM | Have the installer verify delivered airflow after the duct is connected |
| Continuous local exhaust | 25 CFM | Confirm the control mode and measure or document delivered continuous airflow |
Commission the whole route, not just the motor
Ask where the duct runs, how many bends it contains, whether the duct is smooth and appropriately sized, and where it terminates. Restrictive flex duct, a crushed run, a missing backdraft damper, an unsealed exterior cap, or a dirty grille can reduce delivered airflow even when the fan rating looks adequate.
A basic homeowner check can confirm that air is moving, but it can't establish precise performance. Hold a tissue near the grille, check for outside air entering when the fan is off, inspect the exterior termination for discharge, and listen for rattling or backdrafting. For a formal assessment, use an airflow test at the grille after installation, with the door in its normal position and a reasonable path for replacement air.
Make controls part of the design
The fan should operate during bathing and continue afterward. DOE guidance identifies delay-off controls of at least 10 minutes as useful for moisture control. A timer or humidity control is more reliable than asking every occupant to remember the switch, especially in a household where the bathroom is used at different times.
Older apartments and tightly sealed homes deserve closer attention. If the duct route can't deliver the intended airflow, continuous ventilation or an energy-recovery ventilator may deserve evaluation. A 2025 study of homes occupied by adults with asthma reported greater asthma-control improvement with energy-recovery ventilation than with exhaust-only systems, 8.4% versus 3.8%, although the study wasn't bathroom-specific. That result doesn't turn an ERV into a universal bathroom requirement, but it does challenge the assumption that every exhaust arrangement performs equally.
Review the available ventilation options, then require the contractor to document the installed route, exterior discharge, controls, and commissioning result. Excellent Home Improvement offers bathroom renovation work that can coordinate demolition, rough-ins, waterproofing, tile, fixtures, ventilation, permits, and final cleaning through one project-management process. That integrated sequence is useful when the homeowner wants one party responsible for the transitions between trades, not just the appearance of the finished room.
The practical closeout checklist is short:
- Paperwork: Permits, inspection records, product information, and warranty documents are collected.
- Wet area: Membrane, drain, slope, sealants, grout, and fixture connections have been checked.
- Systems: Plumbing, GFCI protection, lighting, fan controls, and delivered ventilation are tested.
- Finish quality: Tile alignment, grout, caulk, paint, doors, drawers, and accessories are reviewed.
- Site condition: Dust, debris, protective coverings, and construction residue are removed.
- Punch list: Every remaining item has a responsible party and a completion confirmation.
For a bathroom renovation in the Bronx, Westchester, or across New York City, Excellent Home Improvement can coordinate design, material selection, permitted construction, waterproofing, ventilation, and final closeout. Contact the team with your existing layout, building requirements, and renovation goals so the bathroom renovation steps are documented before demolition begins.