Finishing Basement Floor Concrete: A Complete Guide
Learn the proven steps for finishing basement floor concrete, from moisture testing and radon checks to coatings and radiant heat. Practical guide
By Excellent Home Improvement
Finishing a basement floor is safe only after testing proves the slab is dry enough for the selected assembly and radon levels are acceptable. EPA estimates that high radon occurs in approximately 6 million U.S. homes, and the average indoor concentration is about 1.3 pCi/L, so a clean-looking slab isn't automatically ready to cover.
You may be standing in that basement now, looking at a gray floor that seems perfectly serviceable. The plan is simple: clean it, roll on a coating, or lay vinyl and turn the space into a family room, office, gym, or rental area. In older homes from the Bronx up through the Westchester line, that approach can fail because the slab is part of the building enclosure, not just a flat surface.
A basement floor can pass moisture vapor, admit radon through cracks and joints, and collect condensation when the slab stays cool and indoor air is humid. The correct order is diagnosis, water control, surface preparation, testing, and only then flooring selection.
Table of Contents
- The Hidden Risks of Basement Slabs
- Moisture Dynamics and Vapor Transmission
- Diagnosis Before Decoration
- Preparing the Concrete Surface
- Selecting Moisture-Tolerant Finishes
- Building for Flood Resilience
- Common Mistakes to Avoid
The Hidden Risks of Basement Slabs
A homeowner often discovers the problem after the finish is down. The vinyl edges lift, adhesive softens, a musty odor develops under padding, or a coating blisters in a neat pattern above a crack. Covering the symptom hasn't changed the slab's relationship with the soil beneath it.
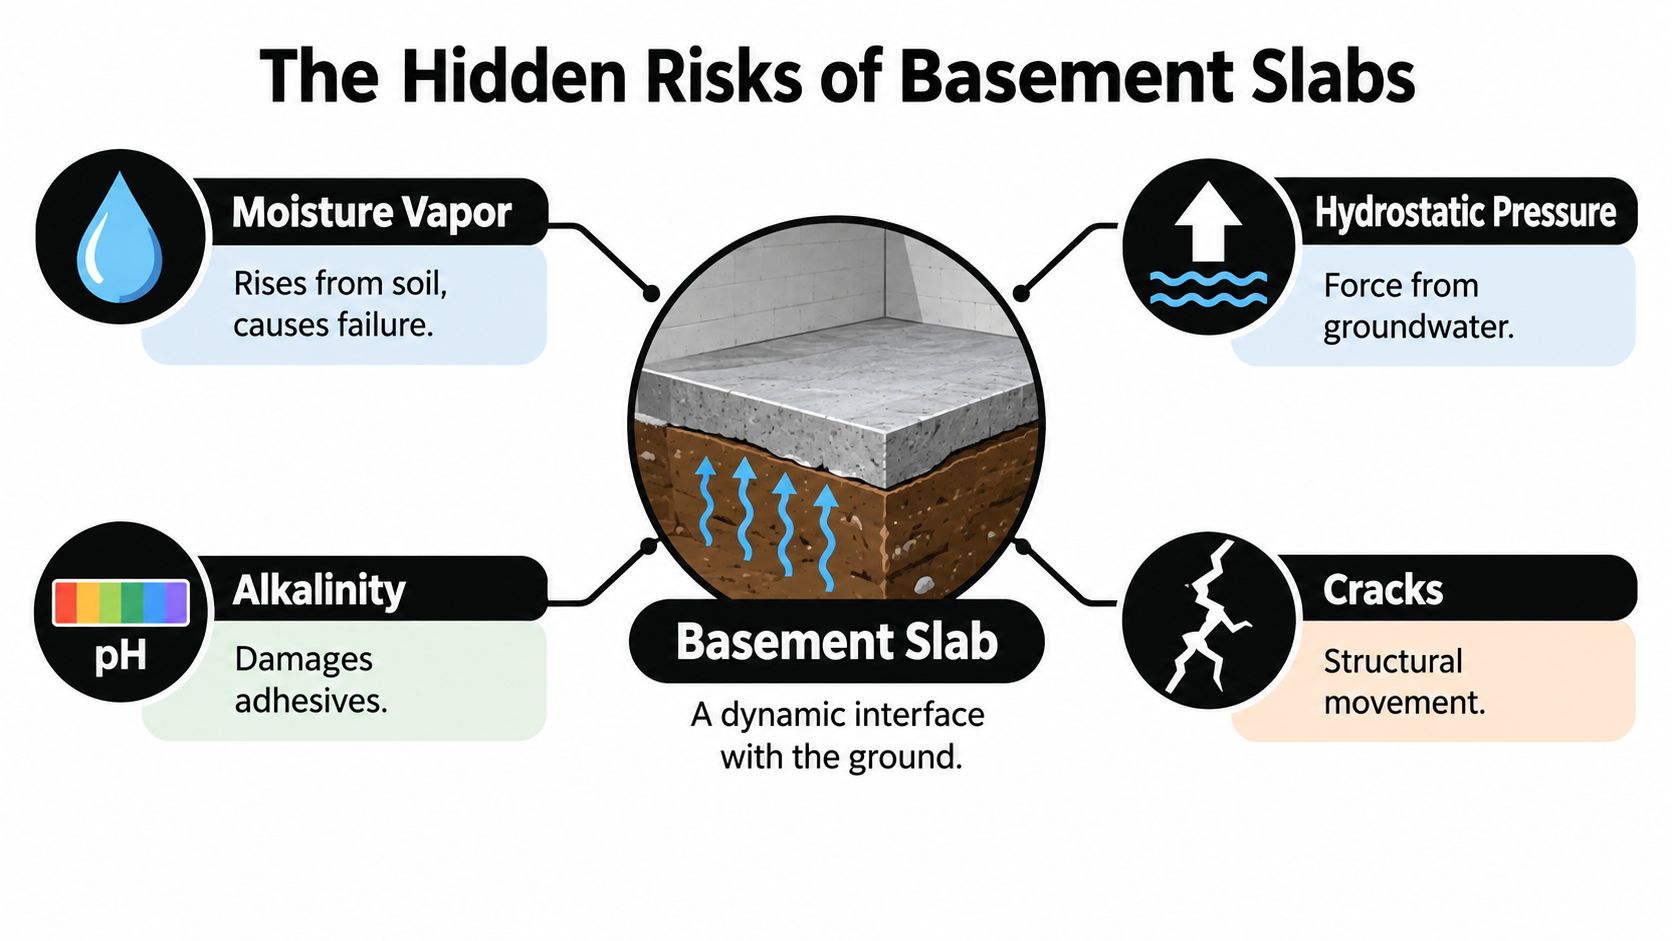
A finished basement slab is both a structural surface and a potential pathway for soil moisture and radon. EPA identifies basements and ground-floor rooms in direct contact with soil as locations generally more likely to have higher radon, which can enter through concrete-floor cracks, construction joints, drains, sump openings, and masonry pores.
Start with the slab, not the product
Look for visible clues, but treat them as prompts for testing rather than proof of a dry floor:
- Efflorescence: White, powdery deposits suggest water has moved through the concrete and carried dissolved minerals to the surface.
- Perimeter seepage: Darkened edges, damp corners, or staining near foundation walls point toward drainage or hydrostatic pressure concerns.
- Cracks and joints: A crack can transmit vapor or radon even when it isn't actively leaking.
- Condensation: A cool slab can collect moisture from humid basement air without any groundwater entering from below.
- Openings: Floor drains, sump pits, pipe penetrations, and utility gaps deserve inspection and appropriate sealing or mitigation.
EPA states that residential radon exposure is associated with an estimated 14,000 annual U.S. lung-cancer deaths, with an uncertainty range of 7,000 to 30,000. Those figures explain why radon belongs in the finishing decision, not as an afterthought once walls and flooring have enclosed the room. The same EPA guidance notes that the EPA and U.S. Surgeon General recommend radon testing in homes below the third floor, which includes basement spaces.
Practical rule: A slab that looks dry has passed a visual inspection. It hasn't passed a moisture or radon assessment.
Don't frame walls over slab edges, install impermeable flooring, or enclose mechanical areas until you know whether the floor is transmitting moisture or soil gas. If liquid water is present, correct the source first. A coating may hide a stain, but it won't repair failed exterior drainage or eliminate pressure beneath the slab.
Moisture Dynamics and Vapor Transmission
Basement moisture doesn't behave like a single leak that you can always see and mop up. Water can move as liquid through a crack, as vapor through the concrete pores, or as condensation from the room air onto a cool surface. These paths require different remedies.
EPA field research in three Pennsylvania houses found that moisture content at slab-floor locations was generally higher than at wall locations. In one basement, perimeter slab readings averaged approximately 4.61% at baseline, with individual perimeter measurements ranging from 4.41% to 4.88%, as reported in the EPA basement moisture study.
The source isn't always groundwater. The same study found that outdoor air moisture explained approximately 70%, 73%, and 74% of the variation in basement air moisture across the three houses. That means seasonal weather, ventilation, heating, and cooling can change the room conditions even when the slab itself hasn't changed visibly.
Why a dry day can mislead you
A slab may test more favorably during a dry period and perform differently during wetter weather or after a change in indoor humidity. When warm, damp air reaches a cold concrete surface, condensation can form. Carpet and padding then hold that moisture against the floor, creating a concealed environment where odor and biological growth can develop.
Radon-control equipment can also affect basement moisture conditions without solving every moisture problem. The EPA research reported non-summer basement-moisture reductions of about 3% to 20% with active soil-depressurization systems. That result supports coordination between radon work and moisture planning, but it doesn't make a radon system a substitute for drainage, waterproofing, or a compatible floor assembly.
What moisture pressure does to finishes
Low-permeability finishes create the greatest risk when vapor continues moving upward. Adhesives can lose bond, coatings can blister or peel, and resilient flooring can buckle or peak. A finish that performs well in a dry room may fail over the same slab when vapor pressure, humidity, and temperature change.
For tile assemblies, waterproofing and drainage details must be designed as part of the complete floor system. Review the available basement waterproofing systems only after identifying whether the actual issue is seepage, vapor, condensation, or a combination of these conditions.
Diagnosis Before Decoration
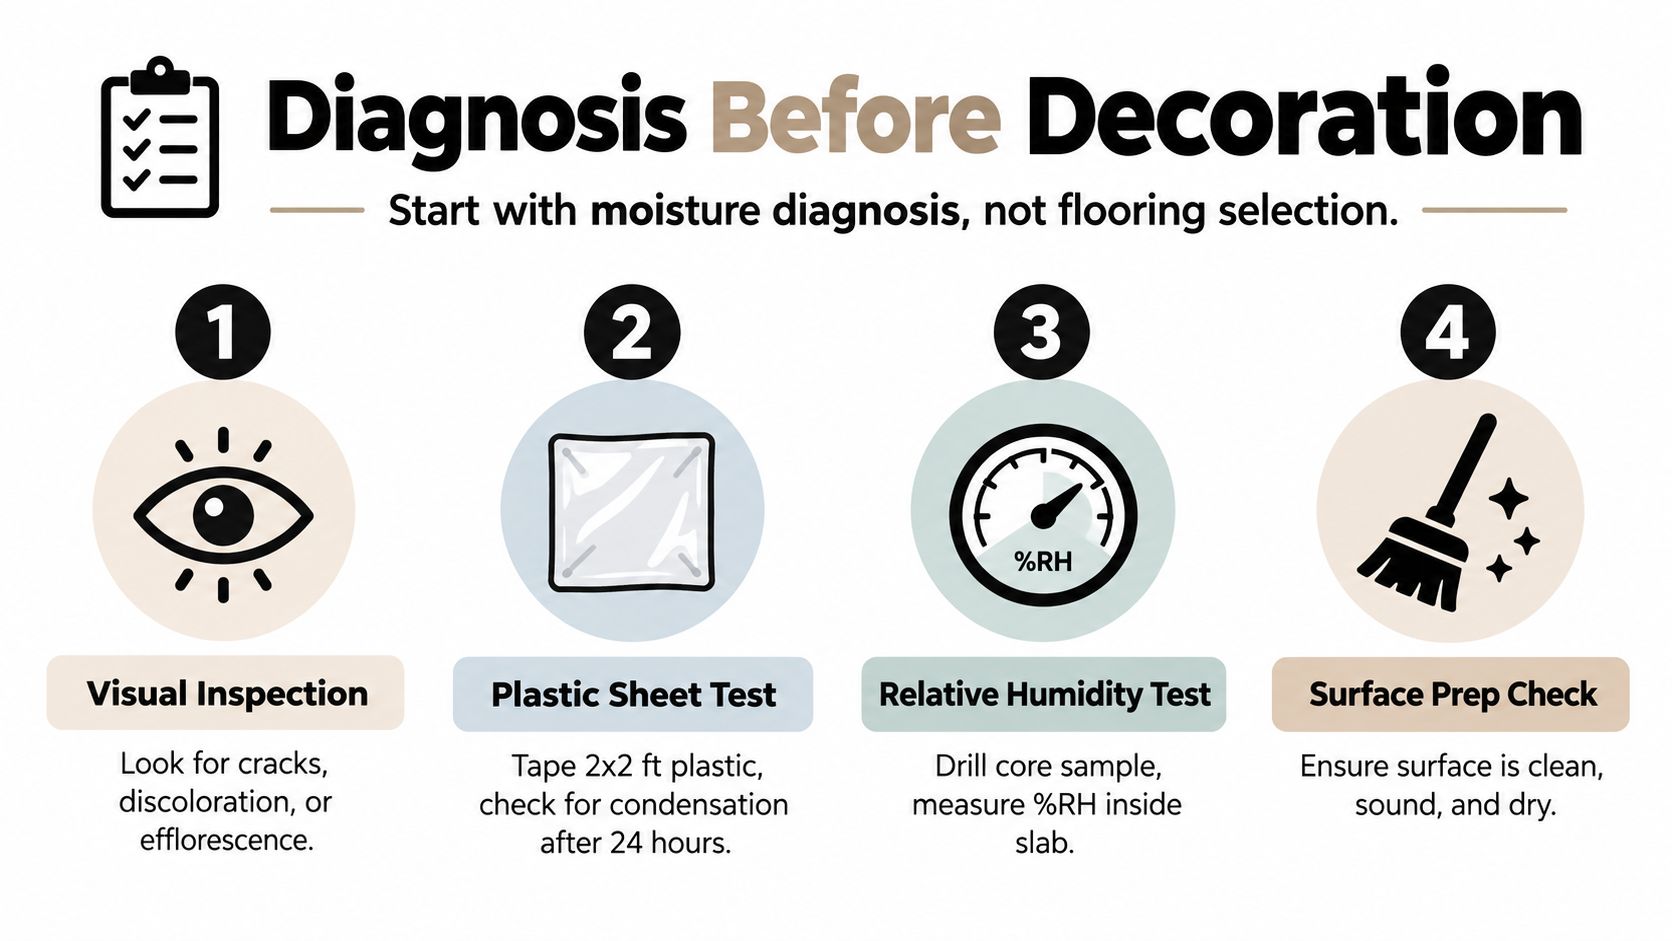
The reliable sequence starts with moisture diagnosis, not with a flooring sample. A contractor should first inspect for liquid intrusion, plumbing leaks, perimeter seepage, efflorescence, condensation, and openings around drains or sumps. Any active water problem needs correction before the slab is covered.
Build a representative testing plan
Don't test only the darkest spot. Map representative zones that include perimeter areas, cracks, low sections, utility openings, and areas that appear dry. Record the location, date, temperature, relative humidity, slab age when known, and the acceptance limit published for the intended flooring system.
A non-destructive moisture meter can help screen the slab, but it isn't the final decision for resilient flooring. ASTM F2659 evaluates comparative moisture conditions in the upper 1 inch, or 25.4 mm, and directs users toward quantitative testing when a more definitive assessment is needed. Read the ASTM F2659 scope and guidance before treating a meter reading as an installation approval.
Quantitative methods answer different questions:
| Test approach | What it measures | How to use the result |
|---|---|---|
| ASTM F1869 | Vapor emission in pounds of moisture per 1,000 square feet per 24 hours | Compare the result with the flooring adhesive or manufacturer's published limit |
| ASTM F2170 | In-situ relative humidity inside the concrete | Use the system's required internal RH limit, not a generic contractor rule |
| Screening meter | Comparative surface or near-surface conditions | Use it to identify areas requiring quantitative testing, not as a final warranty decision |
Choose mitigation from the result
If the slab has liquid intrusion, repair drainage or waterproofing defects before considering a coating. If the issue is vapor transmission, a compatible vapor-control system, approved primer, or floating assembly may be appropriate. If the room is humid and the slab is cool, stabilize the environment and address condensation before testing again.
A contractor preparing a broader basement renovation should coordinate slab testing with framing, insulation, mechanical equipment, and finish-floor tolerances. Testing represents only the locations and conditions observed at that time. Incomplete sampling creates false confidence, particularly when a dry-season result is treated as a permanent guarantee.
Preparing the Concrete Surface
Once water conditions are understood and the selected system accepts the measured moisture level, physical preparation begins. The goal isn't merely to make the floor look clean. The goal is to expose sound concrete with enough profile and uniformity for the primer, adhesive, coating, tile assembly, or floating system to perform as designed.
Remove what won't bond
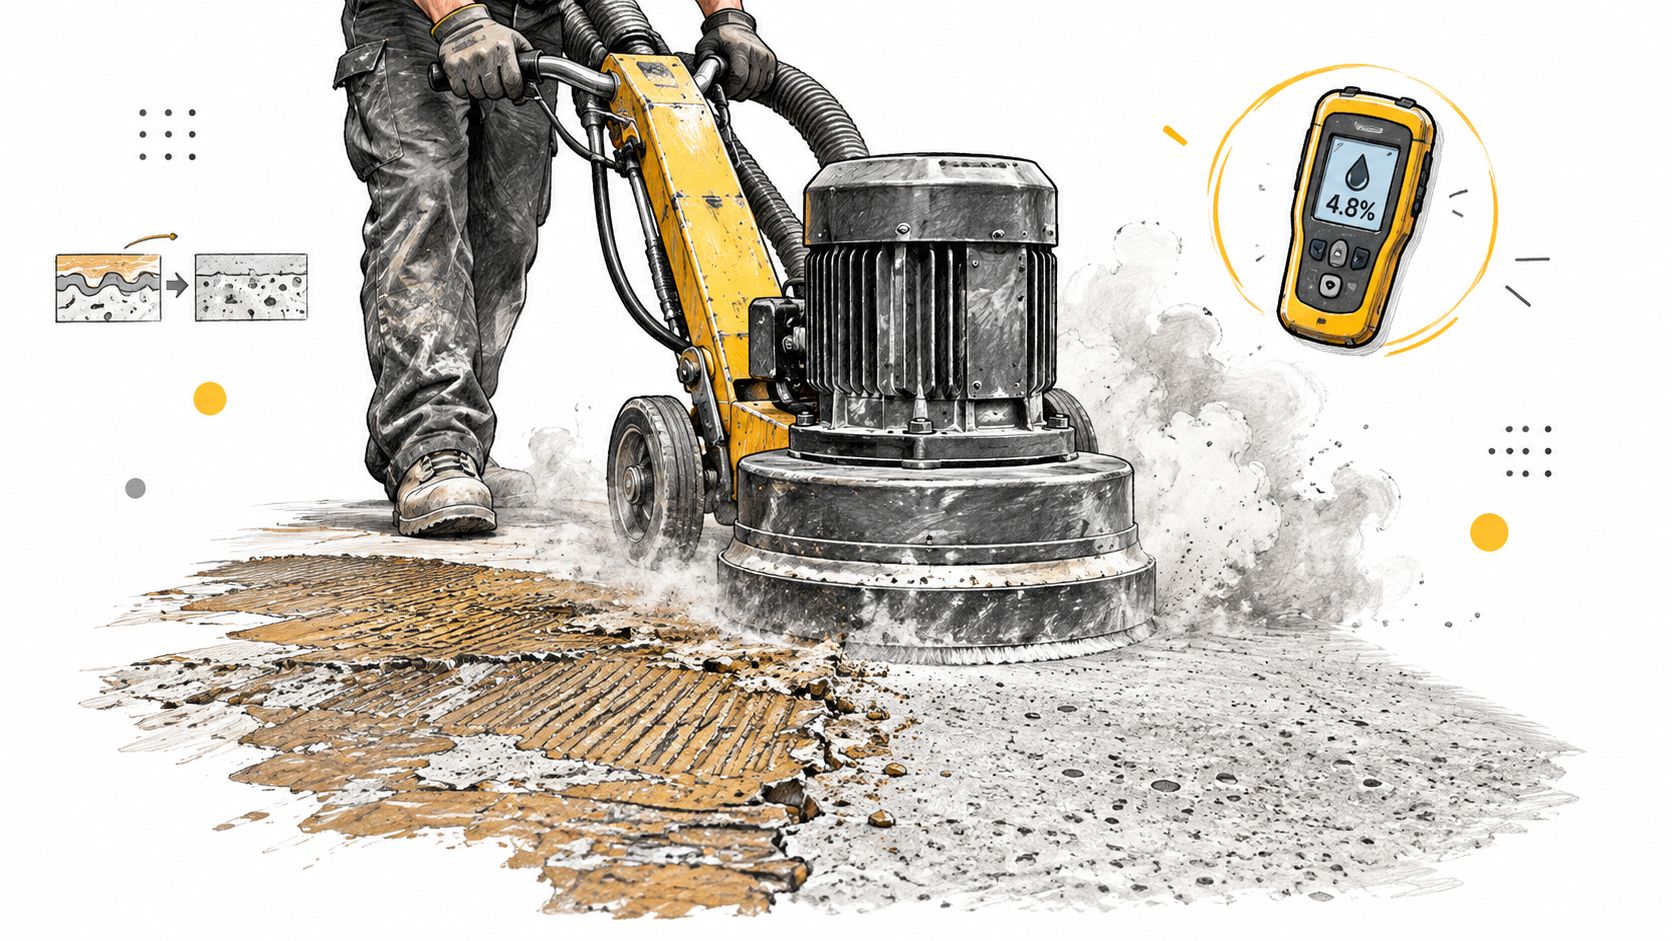
Mechanically remove laitance, old adhesive, paint, oil, weak concrete, and other contaminants. Depending on the slab and finish, that may involve grinding or shot blasting, followed by thorough vacuuming. Wet-cleaning can add moisture to a below-grade assembly and leave contaminants redistributed across the surface, so vacuuming is generally the safer preparation step after mechanical removal.
Check the floor with a straightedge and identify high spots, ridges, and depressions. A coating can follow minor texture, but it won't make an uneven slab flat. Floating planks, tile, and resilient flooring each have their own flatness requirements, so compare the substrate with the selected product's installation instructions rather than relying on sight.
Repair movement and surface damage
Open cracks, spalls, and weak edges need compatible repair materials. A rigid patch over a moving crack may fail again, while an incompatible repair compound can interfere with adhesive or coating adhesion. Determine whether a crack is dormant, moving, wet, or connected to a joint before choosing the repair method.
After repairs cure, grind or feather raised edges and vacuum again. Don't apply primer, a vapor-control coating, adhesive, or underlayment until the product documentation confirms compatibility with the measured moisture condition and the prepared substrate.
Surface preparation is part of the floor system. It isn't a cosmetic step that can compensate for unresolved water entry.
Finally, confirm the room's temperature and humidity are within the installation requirements. Protect the prepared slab from new contamination, and keep the perimeter and expansion joints identifiable so the finish doesn't bridge movement points without an approved detail.
Selecting Moisture-Tolerant Finishes
A basement floor earns its finish after the slab passes the moisture and gas checks. Product samples come later. The right choice depends on how the slab behaves, how the room will be used, and how much access you may need after installation.
Coatings versus assemblies
Epoxy and polyurethane can give you a hard, cleanable surface, but they are unforgiving. If moisture is still driving up through the slab, the bond can fail as blistering, peeling, or delamination. I have seen good-looking coatings let go because the floor was treated like a decorating decision instead of a slab condition decision.
A stained or sealed concrete floor keeps the slab visible and can work well in a utility area or finished living space if the concrete is sound and the sealer matches the actual moisture condition. It still needs testing. A finish that looks breathable can still fail when liquid water, salts, contamination, or vapor pressure have not been addressed.
Floating vinyl can avoid direct adhesive contact if the full assembly is approved, including underlayment and perimeter detailing. That does not make it a waterproof basement strategy. It still needs a flat slab, the right perimeter treatment, and moisture results that fit the manufacturer's limits. Tile and other hard-surface finishes often make more sense where cleanup, durability, and recovery after a water event matter more than softness underfoot.
Treat carpet as a conditional choice
Carpet over a basement slab is a judgment call, not a default upgrade. In a persistently damp area, carpet and organic pad hold moisture, hide changes in slab condition, and make drying after a leak slower and more expensive. A removable rug over a cleanable hard floor usually gives you more control.
If you want a warmer floor, solve the moisture problem first, then choose an assembly the manufacturer permits for that slab condition. Avoid wood sleepers or interior insulation laid directly over a moisture-prone slab just to raise the floor. DOE basement insulation guidance warns that some basement assemblies can lose drying potential when moisture intrusion is part of the picture.
Coordinate radiant heat and finish selection
Radiant heat raises the stakes. The heating layout, topping or repair material, moisture-control layer, finish, and movement detailing all have to work together. Heat does not fix a wet slab. It can make a bad decision more expensive.
For paint and decorative work elsewhere in the remodel, coordinate substrate prep with interior painting services, but keep the floor decision separate from color and styling choices. A finish can look right in a sample board and still be wrong for the slab underneath.
Some federal project specifications have used example thresholds such as less than 85% internal RH and less than 3 pounds per 1,000 square feet per day of vapor emission for certain floor installations, as shown in the Unified Facilities Guide Specifications for resilient flooring preparation. Treat those as examples, not universal pass numbers. The selected finish system, adhesive, and manufacturer requirements control whether the slab is acceptable.
Building for Flood Resilience
A basement that has taken on water once should be finished like it may take on water again. I have seen plenty of lower levels look fine for years, then lose a floor in one storm because the design focused on comfort first and recovery last. That is the wrong sequence. In a basement, flood resilience starts with access, drainage, and cleanable materials, then the finish.
FEMA guidance on flood-damage-resistant materials treats concrete and tile as materials that can perform better in wet conditions because they can be cleaned and disinfected after flooding. That does not make them perfect. It makes them easier to recover than carpet, pad, and other absorbent layers that trap contamination and usually end up in bags at the curb.
Design around access and recovery
Keep the sump pump, cleanouts, floor drains, shutoffs, and inspection points accessible. A finished basement fails the minute a plumber or waterproofing crew has to cut through a built-in platform or permanent floor just to reach a service point.
FEMA's home floodproofing guidance also warns that dry floodproofing is generally not recommended for homes with basements, because saturated soil can overload basement walls. A coating on the interior face of the slab or wall is not a flood strategy by itself. If flood exposure is part of the property history, the right path is a professional review of structure, drainage, groundwater behavior, and site conditions before you pick the finish.
| Basement condition | More resilient direction | Common weak choice |
|---|---|---|
| Known flood exposure | Concrete, tile, or another cleanable hard surface | Thick carpet with absorbent pad |
| Sump or drain access required | Removable or carefully detailed finish sections | Permanent finish over service points |
| Intermittent dampness | Moisture-compatible assembly after diagnosis | Organic layers over an unverified slab |
| Potential below-slab water | Drainage review and professional design | Relying on surface sealant alone |
Plan the recovery, not just the installation
Where flood risk is real, I like details that buy time and improve recovery. That can include under-slab drainage in the right assembly, and a sump setup that still works when power does not. The exact design depends on the house, but the principle stays the same. The floor should let you inspect, clean, dry, and repair after a water event without tearing out half the basement.
There are trade-offs. Tile feels harder and colder than carpet. Sealed concrete shows patching, cracks, and old slab character. In a basement with water history, those are usually acceptable compromises. Saturated padding, damaged adhesive, and hidden organic material are worse.
Common Mistakes to Avoid
The most expensive basement floors usually fail because the installation sequence was wrong, not because the owner chose an unattractive color. Someone saw a dry surface, taped down plastic, got no obvious condensation, and approved a finish without quantitative testing or a review of the manufacturer's limits. The floor looked finished until moisture found the weakest layer.
The shortcuts that cause trouble
- Relying only on a plastic sheet: A plastic observation can reveal a problem, but it doesn't characterize vapor conditions throughout the slab or replace quantitative testing.
- Testing one convenient location: A dry center area doesn't represent a perimeter crack, low spot, sump edge, or damp wall junction.
- Sealing active leaks: Surface coatings don't correct failed drainage, groundwater pressure, plumbing leaks, or seepage through a joint.
- Ignoring room conditions: Seasonal humidity and cool concrete can create condensation even when groundwater isn't entering.
- Skipping the product limit: A generic moisture rule doesn't override the adhesive, coating, tile system, or flooring manufacturer's published requirements.
- Covering service points: A finished floor that blocks the sump, drain, or cleanout creates a maintenance problem before it creates a design benefit.
- Installing organic layers in damp areas: Carpet and padding can conceal moisture and complicate cleanup after flooding.
Use a decision record
Keep the slab map, test locations, readings, photographs, repair products, cure times, and finish requirements with the project documents. If a contractor proposes a coating, ask what moisture condition it accepts, how the surface will be profiled, how cracks will be treated, and what happens if the result falls outside the published limit.
The durable basement floor is the one that matches the building's water behavior, not the one that hides it fastest.
For a Bronx or Westchester renovation, that means treating finishing basement floor concrete as a building-envelope task. Diagnose the slab, control water and radon pathways, prepare the surface mechanically, choose a repairable finish, and preserve access to the systems that keep the basement dry. Doing those steps in order gives you a floor that can be maintained instead of one that just looks complete on installation day.
Excellent Home Improvement coordinates basement finishing with moisture control, slab preparation, framing, insulation, and code-related renovation work across New York City and Westchester. Visit Excellent Home Improvement to arrange a site evaluation and discuss a floor assembly based on your basement's actual moisture, radon, access, and flood conditions.