Basement Bedroom Remodel: A Practical Planning Guide
Plan a basement bedroom remodel with confidence. Covers egress, insulation, moisture control, HVAC, electrical, and code compliance for a safe, livable space.
By Excellent Home Improvement
You're probably looking at a basement and seeing extra square footage that could finally solve a real problem. A teenager wants privacy. Guests need a place to sleep. You need one more usable room, but the main floors of the house are already spoken for.
That's where a basement bedroom remodel gets tricky. Downstairs space can become excellent living space, but only if you treat it as a code and building-performance project first. Homeowners often start with paint colors, flooring, and recessed lights. On actual jobs, the first questions are less glamorous. Can the room legally function as a bedroom? Can it stay dry through wet weather? Will it get enough conditioned air to feel stable in August and January?
A finished basement remodel also has real resale implications. A finished basement commonly recoups about 71% of its cost at resale in the U.S., though local recovery can vary widely by market, according to the 2025 Cost vs. Value discussion cited here. That upside gets weaker fast if the room feels damp, fails inspection, or has to be reopened after the finishes are in.
Table of Contents
- Planning a Basement Bedroom Remodel the Right Way
- Egress Windows and Life-Safety Code Requirements
- Moisture Control Before Any Finishes Go In
- Choosing the Right Insulation for Foundation Walls
- HVAC, Electrical, and Indoor Air Quality
- Common Mistakes and a Final Pre-Build Checklist
Planning a Basement Bedroom Remodel the Right Way
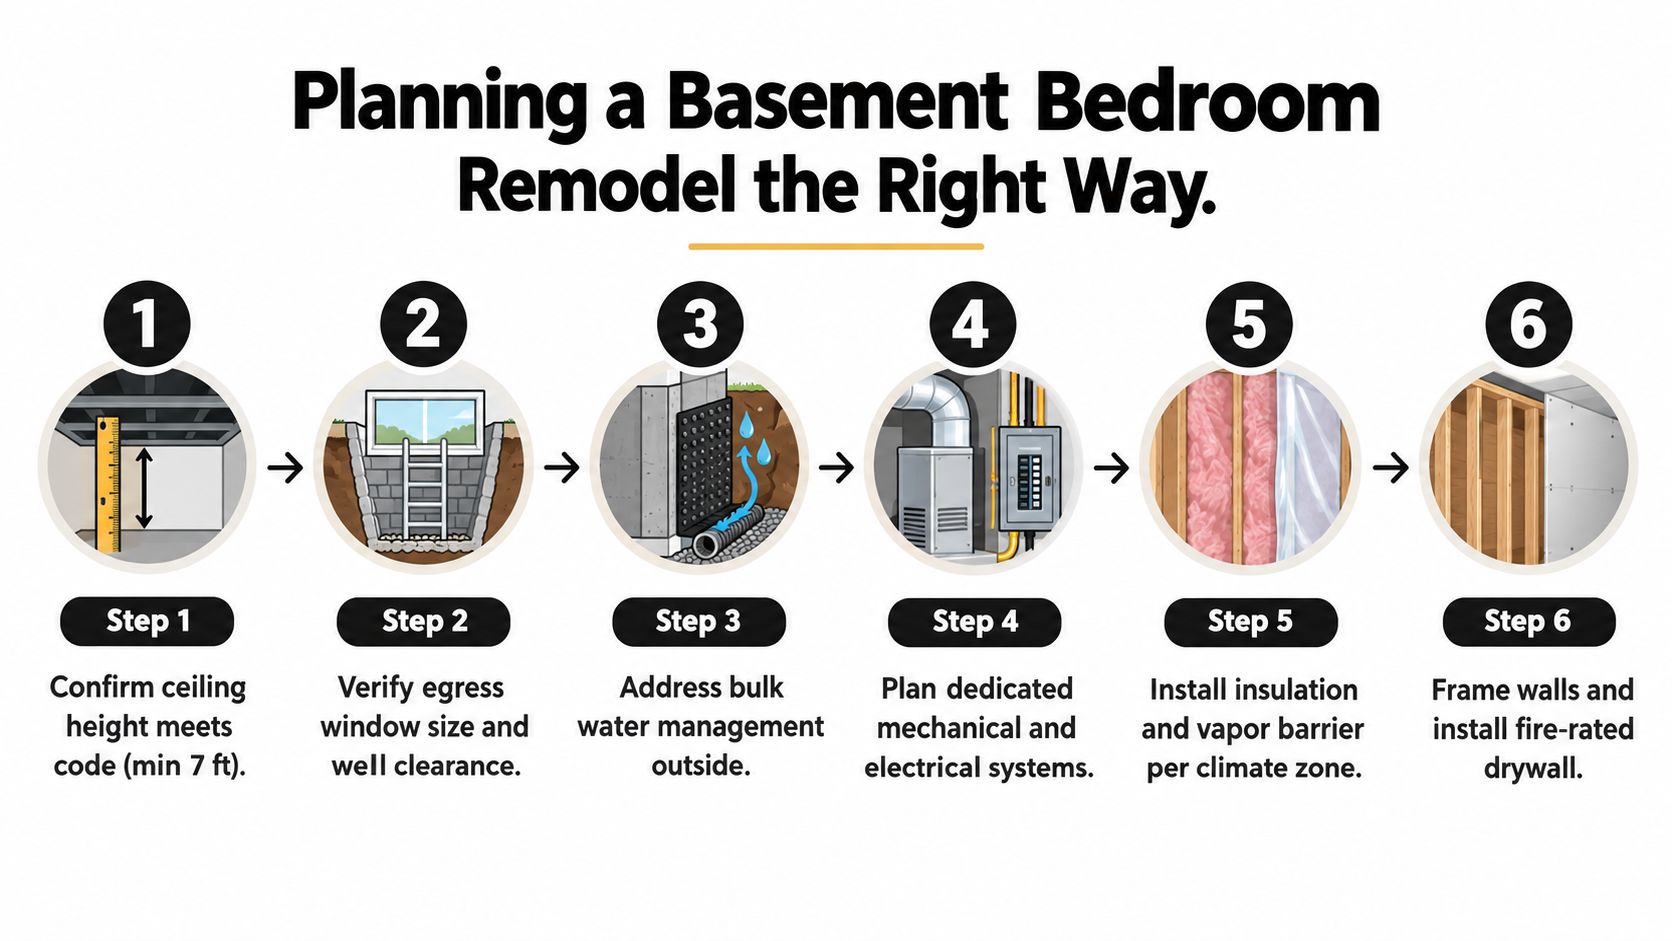
A basement bedroom remodel should start with feasibility, not finishes. Before anyone talks about trim profiles or wall colors, confirm that the space can handle sleeping-room code, moisture control, and mechanical needs without forcing bad compromises.
The usual order that works on real projects looks like this: check ceiling height, verify egress options, diagnose water and humidity issues, map HVAC and electrical, then frame. Drywall comes much later. If you reverse that order, you risk paying twice.
What to verify before design starts
Bring three things into the first contractor meeting:
- Existing drawings if you have them: Old plans help identify structural walls, slab conditions, and utility routes.
- Mechanical layout: Furnace, boiler, piping, duct trunks, cleanouts, and panel location all affect where a bedroom can go.
- Local rules and site limits: Zoning, permit requirements, and property conditions shape what can be built and how it gets approved.
If you want to understand how a professional renovation team typically sequences this kind of work, review a structured remodel planning and construction process before pricing the job.
The jobsite logic that protects your investment
The biggest mistake is treating the basement like a spare room that happens to be below grade. It isn't. The room sits against concrete, close to earth moisture, often under ductwork and plumbing, and sometimes next to equipment that was never planned around sleeping use.
Practical rule: If the basement is going to contain a sleeping room, tell every trade that at the start. Framing, HVAC, electrical, insulation, and permit plans all change once the space becomes a bedroom.
A permitted room and a comfortable room aren't always the same thing. A basement can pass inspection and still feel cold at the perimeter, stuffy at night, or sticky in humid weather. That gap usually comes from poor sequencing, not bad decorating.
Start with these decisions in order:
- Confirm the room can physically work. Ceiling constraints, utility crossings, and foundation conditions often limit layout more than homeowners expect.
- Flag the sleeping use early. Egress, smoke and CO devices, ventilation, and rough-ins all need to reflect that use.
- Solve building issues before finish selections. Water entry, damp walls, and air movement problems should be addressed before insulation or framing.
- Rough in systems before enclosure. Once walls close, changes get expensive and messy.
That's the difference between a basement bedroom remodel that still performs well a few seasons later and one that starts shedding trim, smelling musty, or overheating at night.
Egress Windows and Life-Safety Code Requirements
The bedroom can't be treated as a legal sleeping room until the egress question is solved. This isn't just a best practice. It sits at the center of life safety, and modern code has treated it that way for a long time. The International Residential Code required emergency escape and rescue openings for sleeping rooms and basements by 2000, and the 2021 IRC made 5.7 square feet the universal minimum clear opening for these openings, as summarized in this IRC egress code history review.
The dimensions that drive the layout
A basement bedroom should be built around an IRC-compliant emergency escape and rescue opening with these minimums, based on this basement bedroom egress guide:
| Requirement | Minimum Code Value |
|---|---|
| Net clear opening | 5.7 square feet |
| Clear height | 24 inches |
| Clear width | 20 inches |
| Sill height above finished floor | 44 inches maximum |
Those numbers don't live on paper only. They determine where the bed can go, where the framed wall lands, how the header is handled, and whether a window well can work outside. On many basement jobs, the egress opening sets the room before the room sets anything else.
Don't frame first and “fit the window later.” That's how projects end up with a legal drawing and an illegal installed opening.
What the field conditions decide
Below-grade openings are rarely plug-and-play. You need enough exterior depth for a compliant well, enough structural room to cut the foundation properly, and enough coordination so the new opening doesn't create the very leak the remodel was supposed to eliminate.
Things to check on site:
- Foundation depth and outside grade: The well has to fit the opening and still work with existing soil conditions.
- Water management at the cut: Flashing, drainage, and grading around the well matter as much as the window unit itself.
- Interior sill height after finishes: A rough opening that looks fine before flooring and framing can miss the limit once the room is finished.
- Operability from inside: The opening typically needs to work from the interior without tools or special knowledge.
Why egress gets expensive when it's late
Late egress changes often trigger a chain reaction. Move the opening and you may need to revise framing, relocate wiring, change insulation layout, rebuild a well, or alter the room furniture plan because the path to the window can't be blocked.
That's why the layout should be locked before framing begins. In real basements, egress isn't a checkbox. It's the wall that every other decision has to respect.
Moisture Control Before Any Finishes Go In
Most basement bedroom failures don't start with paint or flooring. They start with moisture that was ignored because the room looked dry during a single walkthrough.
Moisture is the dominant technical risk in this kind of remodel. Independent building guidance notes that roughly 20% of a dwelling's heat loss can occur through uninsulated basement walls, which leaves those surfaces colder and more prone to condensation. The same guidance recommends keeping finished-basement relative humidity below 60%, ideally around 30% to 50%, to reduce mold risk and musty odors, as outlined in this basement finish moisture guideline.
Start outside, not at the drywall
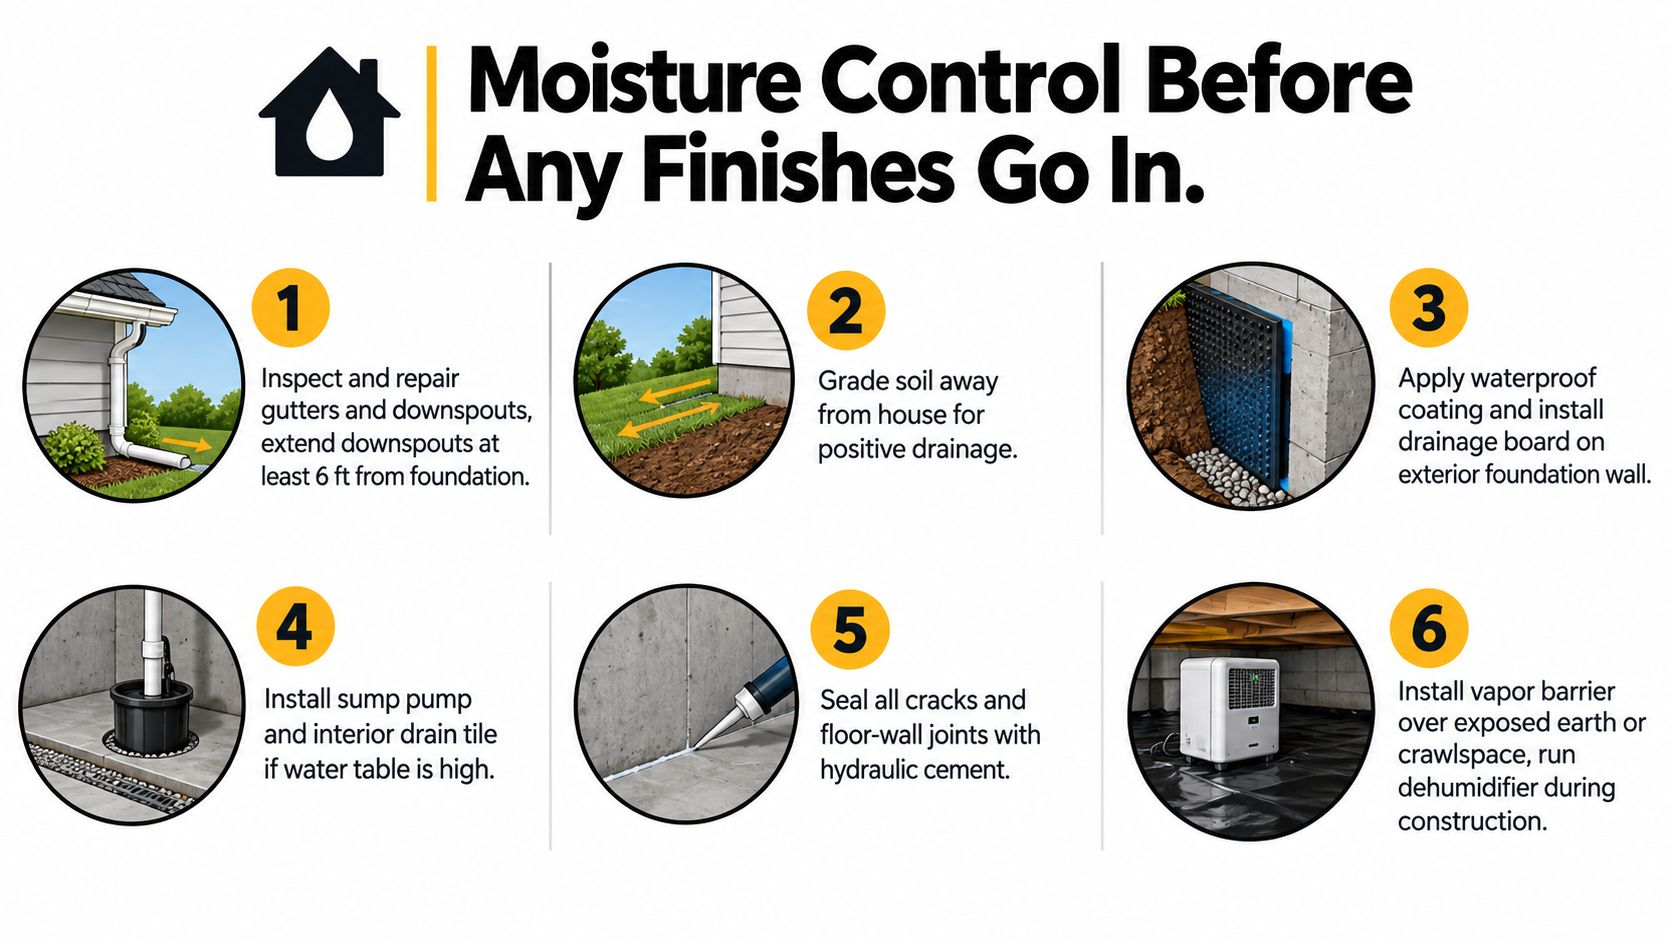
When a basement takes on water, the fix usually begins beyond the foundation wall.
Check these first:
- Roof drainage: Gutters and leaders need to move water away from the house, not dump it at the footing line.
- Surface grading: Soil should pitch away so runoff doesn't sit against the wall.
- Exterior foundation condition: Cracks, failed coating, and blocked drainage paths need attention before interior finish work makes them harder to track.
If you're reviewing ways to protect below-grade assemblies, it helps to look at practical waterproofing system options for renovation work.
Then figure out what kind of moisture you have
Not every damp basement has the same problem. Bulk water entry, vapor drive, condensation, plumbing leakage, and seasonal humidity all behave differently. If you lump them together, you'll apply the wrong fix.
A simple field check many contractors use is taping plastic to suspect concrete and watching what develops over time. If moisture shows up consistently, the wall or slab needs more investigation before any finishes go in. Dehumidifiers can help stabilize conditions, but they don't replace drainage, air sealing, or proper insulation.
Field note: A dehumidifier is a backup tool. It shouldn't be the first defense against a wet basement.
Wait for proof, not hope
One of the hardest conversations on a basement bedroom remodel is telling a homeowner to delay finishes until the space has stayed dry through wet weather. That delay is cheaper than rebuilding the room.
Hidden condensation can destroy a basement bedroom even when the room looks complete. Stud cavities stay dark. Trim hides swelling. Flooring conceals slab moisture until the smell shows up. If the basement hasn't demonstrated stable conditions, framing and drywall are premature.
The room has to earn the finish package. In below-grade work, that's just reality.
Choosing the Right Insulation for Foundation Walls
Insulating a basement bedroom wall isn't about stuffing the cavity with whatever fits. The right assembly has to manage cold concrete, inward moisture, and interior comfort at the same time. That means the moisture behavior of the wall matters at least as much as the insulation value.
Some assemblies work well because they separate the finished room from the concrete with a moisture-tolerant layer. Others look fine on install day and create condensation risks later, especially if a vapor-open material sits where the wall surface stays cold.
What each assembly does well
| Assembly | Typical R-Value | Vapor Control | Best Use Case |
|---|---|---|---|
| Closed-cell spray foam against foundation wall | Varies by installed thickness | Built-in vapor retarder | Tight basements where headroom matters and the wall needs strong air sealing |
| Rigid foam board against foundation with framed wall inside | Varies by board type and thickness | Continuous control layer when seams are handled well | Basements where you want a defined plane for studs and a cleaner path for utility planning |
| Stud wall with cavity insulation such as mineral wool or fiberglass | Varies by stud depth and product | Requires a separate moisture strategy | Only when paired with a deliberate assembly that keeps interior air from reaching cold concrete |
Because this section has no verified numerical insulation dataset to cite, the better way to compare these is by behavior.
The trade-offs that matter in the field
Closed-cell foam helps when the wall is uneven and the room can't spare much depth. It also simplifies air sealing. The trade-off is cost and less flexibility if you expect a lot of future changes inside the wall.
Rigid foam with a framed wall gives a cleaner build sequence on many remodels. Electricians and finish carpenters usually have a more familiar surface to work with, and the thermal break can be continuous if the details are handled carefully. The weak point is sloppy seam treatment or poor transitions at the rim joist.
Cavity insulation alone is where I see the most avoidable mistakes. If the assembly lets warm interior air reach cold concrete, the wall can collect condensation where no one sees it.
The rim joist is not a throwaway detail. If that area leaks air, the bedroom will feel it no matter how nice the wall finish looks.
Pick the assembly to match the basement, not a generic detail
A low-ceiling basement may push you toward thinner high-performing insulation. A basement with multiple future wiring needs may favor a framed service cavity. A basement with a history of dampness needs the most moisture-aware wall you can reasonably build.
The best insulation choice is the one that matches the room's moisture profile, preserves as much usable space as possible, and gives the mechanical and electrical trades a realistic path to finish the work cleanly.
HVAC, Electrical, and Indoor Air Quality
A sleeping room below grade needs its own mechanical plan. Borrowing a little air from the first floor and hoping the door undercut handles the rest usually produces a room that feels stale, uneven, or both.
Many basement bedroom remodels underperform. The finishes are new, the room is legal, but the bedroom never really feels right because the air movement was treated as an afterthought.
Condition the room like a room someone will actually sleep in
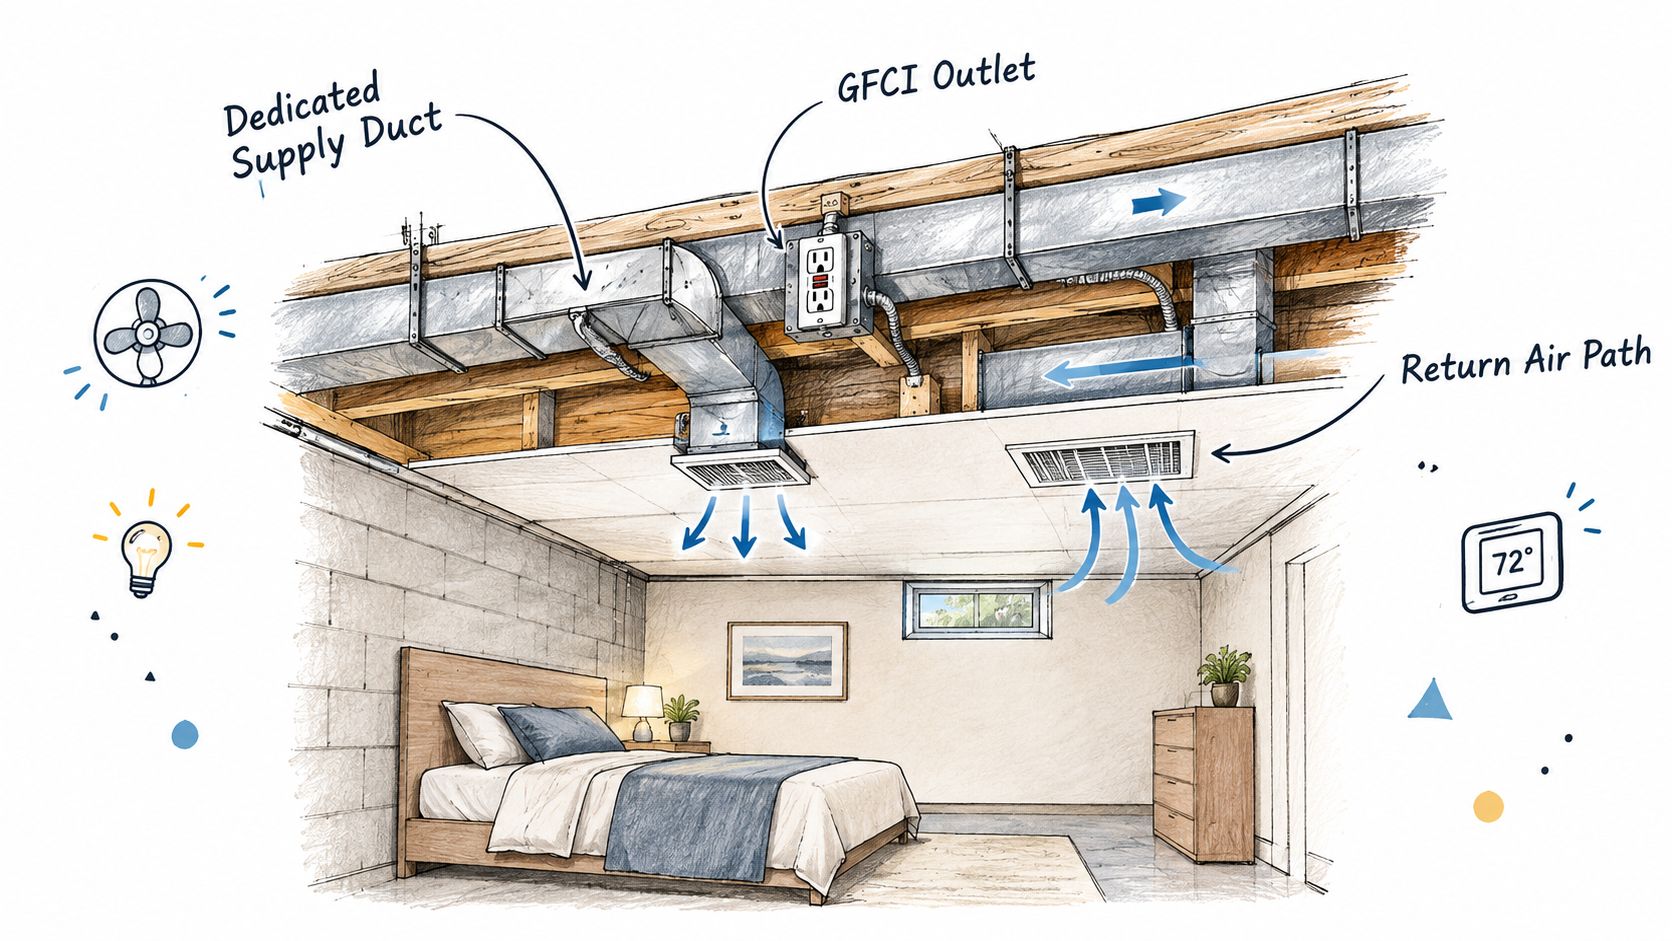
A basement bedroom needs a supply path and a return path that make sense for the house. Without both, air can get trapped, temperatures drift, and the room may feel stuffy overnight even when the rest of the house is comfortable.
On planning drawings, I want to see:
- A dedicated supply strategy: Not just a branch added wherever it was easiest to tap the trunk.
- A clear return-air path: Either a dedicated return or a code-appropriate path that prevents the room from becoming a dead pocket.
- Equipment review: Added runs affect system performance, so the existing air handler or furnace setup has to be checked before changes are built in.
Ventilation deserves separate attention. A tighter remodeled basement can hold moisture and stale air if the room lacks a real exchange strategy. In some homes that means tying into a broader ventilation approach. In others, it means targeted exhaust planning.
If you're sorting through ventilation options for a lower-level living space, review practical home ventilation solutions for remodeled interiors.
Air quality starts before the finishes
The undercovered issue in basement bedrooms is that indoor air quality can be a long-term health problem, not just a comfort complaint. Guidance on basement bedroom planning often mentions radon testing but doesn't give it enough weight. Public guidance frequently uses 4 picocuries per liter as the threshold associated with radon mitigation planning, and below-grade bedrooms are especially exposed to ground-contact air leakage, as discussed in this basement remodeling and radon planning overview.
Test before the room is finished. If mitigation is needed, it's far easier to plan for access before the slab edge, utility routes, and wall cavities disappear behind finish materials.
A basement bedroom that looks polished can still be a poor sleeping environment if radon, stale air, and humidity were never addressed together.
Electrical work needs to reflect bedroom use
Electrical planning changes when the space becomes a bedroom. The loads need review. Circuit capacity matters. Device placement matters more than people think once furniture and egress are fixed.
A clean basement bedroom electrical scope usually includes:
- Load calculation and panel review: Don't assume the nearest general circuit has room.
- Protection devices as required by code: Bedroom use often changes the protection requirements.
- Lighting layout that works with ceiling constraints: Recessed fixtures, switches, and bedside power all need to fit around ducts and joists.
- Life-safety devices: Smoke and carbon monoxide alarm locations should be coordinated early.
- Exterior or well-related lighting if needed: Egress areas should be usable in real conditions, not just on the permit drawing.
This is also where one factual mention fits. Excellent Home Improvement handles permitted basement finishing work that includes framing, insulation, moisture control, egress, and electrical to NYC code, which is the kind of integrated scope a basement bedroom remodel usually requires when several trades affect the same room.
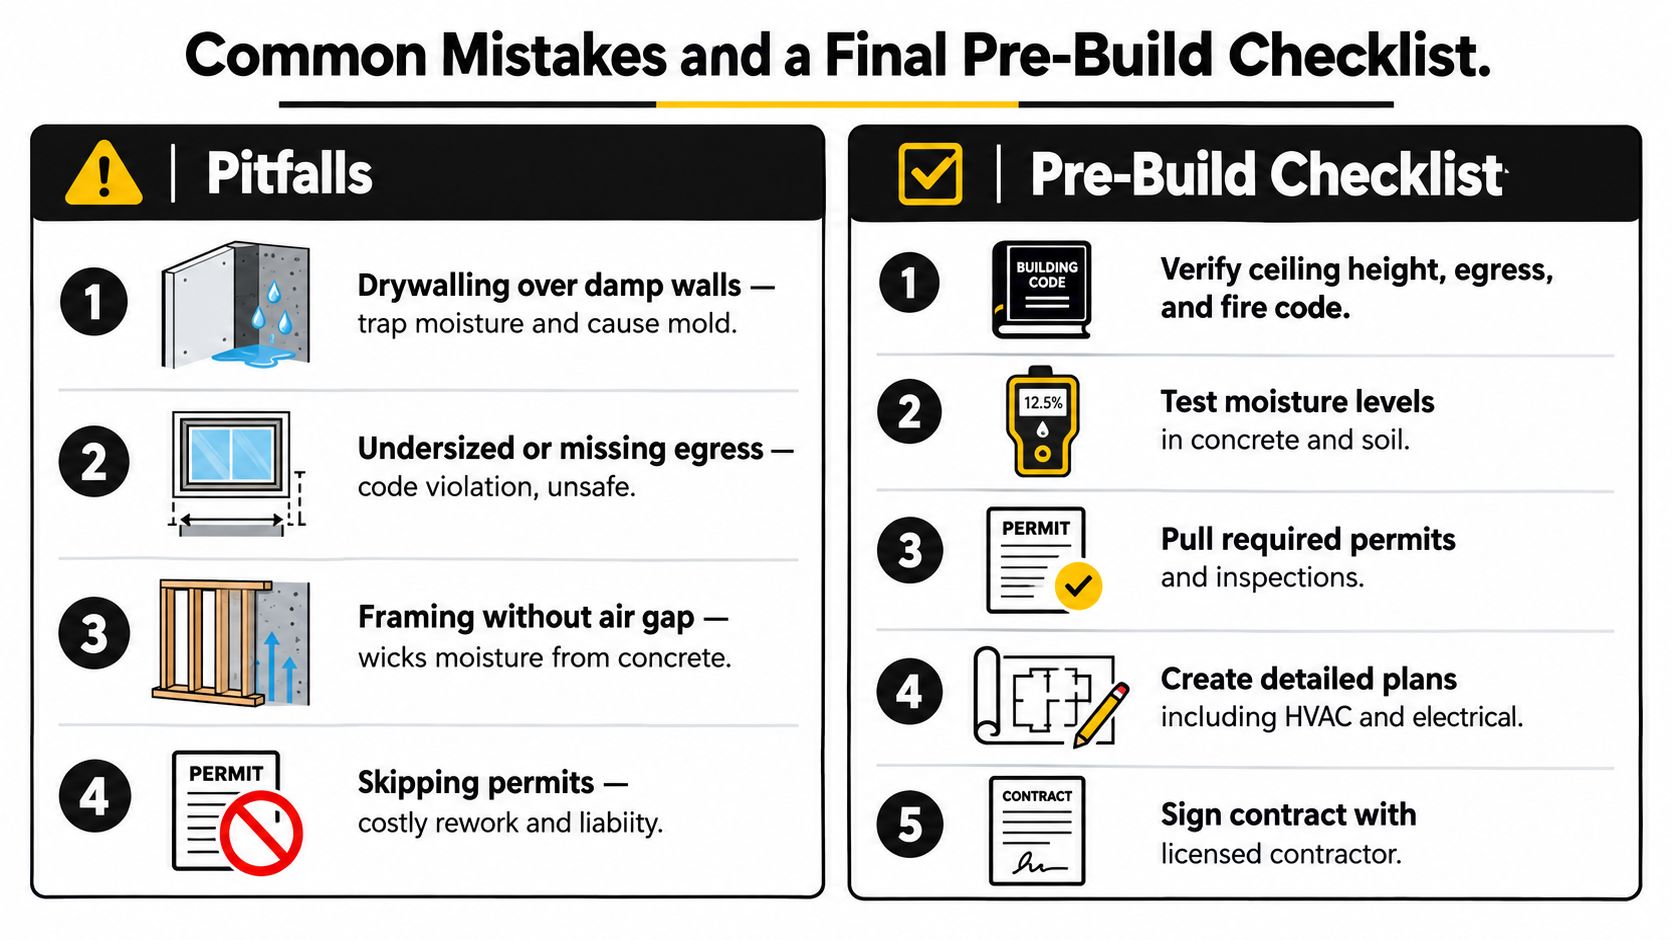
Common Mistakes and a Final Pre-Build Checklist
The failures that show up again and again are usually boring. That's why they're expensive. Nobody gets into trouble because they picked the wrong paint color. They get into trouble because they enclosed unresolved conditions.
The most common bad outcomes come from rushing the enclosure stage. Wet wall gets drywall. Egress gets sketched but not field-verified. Rim joist gets insulated without proper air sealing. A new bedroom circuit gets added to a panel that should have been reviewed first.
Mistakes that trigger rework
- Finishing over damp surfaces: This traps moisture where it can feed odor, staining, and hidden damage.
- Treating egress as a late item: By the time framing is done, the legal opening may no longer fit the intended room.
- Ignoring air pathways: A bedroom with supply but no usable return path rarely feels balanced.
- Skipping permit coordination: Basement bedrooms involve life-safety, and inspection is part of the job, not optional paperwork.
- Designing around furniture before infrastructure: The room should be laid out around egress, moisture-safe walls, and utility paths first.
Bring this checklist to bid day
Walk into contractor meetings with these answers ready:
- Ceiling feasibility: Is the proposed room shape realistic once framing, lighting, and mechanicals are accounted for?
- Egress plan: Has the opening location been field-measured and coordinated with exterior conditions?
- Moisture status: What evidence shows the basement stays dry enough for enclosure?
- Wall assembly: Which insulation and vapor-control approach fits this foundation?
- HVAC approach: How will supply, return, and ventilation be handled for sleeping use?
- Radon status: Has the basement been tested, and if needed, how would mitigation be integrated?
- Electrical capacity: Can the panel and branch circuits support the new room cleanly?
- Permit path: Who is pulling permits, preparing drawings if needed, and coordinating inspections?
Final check: If any answer above is “we'll figure that out after framing,” the project isn't ready to build.
A good basement bedroom remodel feels straightforward only after the hard planning work is done. That's the part worth being stubborn about.
If you're planning a basement bedroom and want it built as durable living space instead of a dressed-up storage room, Excellent Home Improvement offers permitted basement renovation work with the framing, insulation, moisture control, egress, and multi-trade coordination this kind of project demands. You can review their renovation approach and request next-step guidance through Excellent Home Improvement .